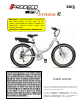
2013 IMPORTANT: ALUMINUM FRAME. NOT INTENDED FOR HARD RIDING. DO NOT JUMP OR HIT CURBS, AVOID IMPACTS. INSPECT FRAME FOR FRACTURES. SERIOUS BODILY HARM CAN OCCUR IF MISUSED. SEE MANUAL FOR ADDITIONAL INFORMATION. USER GUIDE Some of the content of this manual may differ from your bicycle depending on the options of the bicycle and what your dealer provided. © 2013 PRODECO TECHNOLOGIES. All rights reserved. PRODECO TECHNOLOGIES and the PRODECO TECHNOLOGIES logo are trademarks of PRODECO TECHNOLOGIES.
Table of Contents 1) Chapter 1: Introduction ……………………………………………………………………………………………….. 4 a. About this manual ………………………………………………………………………………………………….. 4 b. Important notices …………………………………………………………………………………………………… 4 c. General warning ……………………………………………………………………………………………………. 4 d. A special note to parents ………………………………………………………………………………………….. 5 2) Chapter 2: Getting Started …………………………………………………………………………………………… 5 a. Unpacking your box ……………………………………………………………………………………………….. 5 b.
8) Chapter 8: Battery Management …………………………………………………………………………………….. 23 a. About your battery ………………………………………..………………………..………………………………. 23 b. Removing the battery …………………..………………..………………………..………………………………. 23 c. Installing and locking the battery …………….………..………………………..………………………..………. 24 d. Charging the battery ………………………..……………………………………..………………………………. 25 e. Storing the battery ………………………………………..………………………..………………………………. 25 f. Battery power indicator ………………………..………………………..…………………………………………. 25 g.
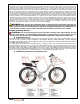
OPERATIONAL INSTRUCTIONS Chapter 1: Introduction Prodeco Technologies thanks you for your purchase of your new Stride R. Your bicycle is a high quality and environmentally friendly light electric vehicle. This manual will serve to provide you with the information needed to operate, maintain and enjoy it safely. Your electric bicycle should provide you with years of healthy enjoyment provided you follow these steps. For technical questions or customer service, please contact PRODECO TECHNOLOGIES at 800.943.
d) A special note to parents The Prodeco Technologies Stride R is intended for use by adult riders only. Many state laws require electric bicycle riders to be a minimum age of 16 with some states having minimum ages set as low as 10 years old and other states up to 18 years old (at the time of the writing of this manual).
c) Contents of the box Check the contents of your box.
CAUTION: The seat tube quick release clamp must be checked for tightness to ensure the saddle will not accidentally slide into the seat tube when riding. This can cause a rider to lose balance and may result in a fall. To tilt the nose of your saddle upwards or downwards, you will need to use the 5mm hex key included with your multiuse tool kit that came with your bicycle. The saddle mounting clamp attaches the saddle to the seat post via a front and rear barrel nut and bolt.
and not half way open to allow the adjusting of the rise and proper rotation of the handlebar. The further you rise and adjust the stem, you should rotate the handlebar forward. The same in reverse, when lowering the stem, you should rotate the handlebar backwards, allowing for an adjustment of the controls in a favorable position. Once the adjustment is complete, push the lever down firmly until the tab locks the stem in place. Check the lever is locked by pulling up on the lever.
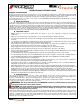
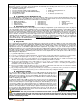
Framework for Considering Motorized Use on Non-motorized Trails and Pedestrian Walkways under 23 U.S.C. § 217 The purpose of this document is to provide guidance to Federal Highway Administration (FHWA) division offices and a consistent framework for determining when to permit an exception for motorized use on non-motorized trails and pedestrian walkways under 23 U.S.C. § 217(h)(5). The relevant legislation reads as follows: (following page) 23 U.S.C. § 217.
Quick Releases: Make sure seat post, rear axle & frame quick release levers are properly adjusted and all are in the locked position. Handlebar and saddle alignment: Make sure the saddle and handlebar stem are parallel to the bike‘s center line, clamped and bolts tightened enough so that you can‘t twist them out of alignment. If not, align and tighten them. Handlebar ends: Make sure the left handlebar grip and right throttle grip are secure and in good condition. If not, replace them.
k) Using your brakes Your Stride R is equipped with a high performance ―Tool Free‖ adjusting Avid BB5 Disc Brake system. The BB5 front and rear disc brakes allow your new Stride R to stop quickly and accurately. Oversized Avid HS ―Heat Shedding‖ stainless steel disc rotors are utilized for the axles for increased heat dissipation. When properly adjusted, the Stride R high performance disc brake system offers tremendous stopping power.
There is also a battery indicator for checking a full charge. Press the indicator button to display the battery‘s energy storage. The indicator is located under the battery handlebar. Once the battery is charged, you should discontinue charging and remove the charger. Unplug the charger‘s power cord from the wall and remove the charging plug from the battery. You are ready to install the battery pack back onto your bicycle.
Check for Traffic: Always Be Aware of the Traffic Around You - Over 70 percent of car-bicycle crashes occur at driveways or other intersections. Before you enter any street or intersection, check for traffic. Always look left-right-left, and walk your bicycle into the street to begin your ride. If you are already in the street, always look behind you for a break-in traffic, then signal before going left or right. Watch for left or right turning traffic.
b) Frame size The typical measurement number used today in deciding if a frame size is the correct size for a rider is the seat tube length. This number usually begins around 17‖ for MTB style bicycles and can go as high as 25‖ for Road style bicycles. The seat tube length is measured from the centerline of the crank (bottom bracket) to the top of the seat tube (seat tube clamp).
f) Suspension fork adjustment The Stride R uses a dual pre-load adjustable suspension fork. The fork‘s dual adjustment offers either a softer of firmer ride for smoothing out the bumps in your path. The pre-load can be adjusted according to your weight and liking. You can easily adjust the suspension performance by rotating the knobs at the top of each leg at the crown. Chapter 6: Tire, Tube, Wheel and Axle Repair The Stride R was designed for ease of servicing.
c) Removing and installing the front wheel The front wheel on the Stride R can be removed or installed without tools. A quick release skewer through a hollow axle is utilized for easy and quick wheel removal. A quick release skewer is a rod that has a threaded acorn nut on one end and a cam lever assembly on the other end. The cam lever applies pressure and locks the axle in place. The majority of higher quality bicycles produced in the last decade incorporates this design.
Tire pressure is given either as maximum pressure or as a pressure range. How a tire performs under different terrain or weather conditions depends largely on tire pressure. Inflating the tire to near its maximum recommended pressure gives the lowest rolling resistance; but also produces the harshest ride. High pressures work best on smooth, dry pavement.
Chapter 7: Maintenance and Replacement Your new Stride R was designed for ease of use and owner servicing. There are no tasks which require advanced skills. Most maintenance and replacing of parts were designed to be accomplished by the typical bicycle rider. Please read this section to learn how to keep your Stride R performing like new. a) Keeping your bike clean Your new Stride R is an outdoor friendly electric bicycle but should be kept clean and free from dirt.
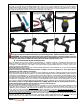
FINE TUNING Before each ride Check cables for signs of wear or fraying. Squeeze the brake lever firmly and check for proper brake function. Adjust for pad wear if necessary. Check pads for wear and replace if necessary. Ensure rotors are free of foreign substances and oils. Cable Slack Adjustment Use the barrel adjuster on the brake lever to remove any cable slack from the system. Turn the adjuster out until there is no free play in the lever but not so far that the torque arm on the caliper is advanced.
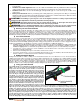
e) Derailleur adjustment (SRAM X5) If the chain of your bicycle falls off at the largest COG/sprocket or the chain is having problems remaining on the correct gear, you may need to adjust your derailleur. There are a multiple ways to adjust your derailleur but for a simple adjustment on the changing of gears, follow these instructions. Located at the shifter, the adjusting knob where the cable enters the shifter will adjust gear shifting. This knob allows the loosening or tightening of the cable.
SHIFTING ADJUSTMENT Check that the chain and the rear derailleur are in the smallest cog position. While pedaling, twist the shifter up one detent. If the chain hesitates or does not shift to the second cog, increase the cable tension by turning the shifting adjustment knob counter clockwise. If the chain shifts beyond the second cog, decrease the cable tension by turning the shifting adjustment knob clockwise. Repeat the two former steps until shifting and cable tension is accurate.
Lubricating is always at the point where 2 surfaces touch together and friction is created. Your local neighborhood bicycle shop or most mass merchants who sell bicycles will offer various types of lubes for your bicycle. Below are the areas you should lubricate according to your maintenance schedule at the end of this chapter. Chain: The chain should be lubricated at each of the links. You can turn the crank counter clockwise while lubricating each area of pivot.
l) Torque specifications for common parts: Nuts and bolts for your bicycle are set to a standard torque setting at the factory. Over time of use and shipping, nuts and bolts could become loose. Below is a chart on the torque settings in Lb per Inch for the common parts of the Stride R. They have also been converted to Lb per Foot and NM.
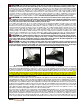
c) Installing and locking the battery As shown in the photos above, the battery has 2 thin ―slotted rails‖ (1 on each side of the battery towards the front) and a ―raised slot‖ (towards the rear and near the handle) at the underside of the battery. These rails and slots hold the battery in place when riding. The battery mount attached to the bicycle has one large metal tab at the rear and 2 small metal tabs at each side.
To remove the battery, follow these instructions: Locate the key ignition on the battery base and turn the key in a counter clockwise rotation to the ―UNLOCK‖ position. You must push the key in to turn from the ―OFF‖ position to the ―UNLOCK‖ position. Grab the handle at the back of battery and pull towards the back of the bicycle to slide it off. The battery is now transportable and can be charged away from the bicycle. d) Charging the battery The battery can be charged on or off the bicycle.
Chapter 9: Electrical Components The Stride R electric components were developed to be maintenance free with no serviceable parts. There are 5 components used to power your bicycle. Each component can easily be replaced by the average person with minimal mechanical skills. The design has been simplified so your local bicycle shop can service it without issue and minimal time.
Chapter 10: Warranty Service and Repair Prodeco Technologies has taken great measures in designing and producing your new bicycle to be issue free while offering years of performance. The bicycle however is a mechanical item and an issue can arise. Your bike components are covered for a 2 year period from the date of purchase or within 30 months of the production date, whichever is sooner. The production date is part of your master serial number.
b) Registering your bike It is very important you register your new bicycle when purchasing. This is the only way your warranty will take effect. It is required you register your bicycle within 2 weeks from the date of purchase. You must save your receipt of purchase. To register your bicycle, you can fill out the form on the Prodeco Technologies website at www.prodecotech.com or you can fill out the registration card in the next section below and theither scan it to service@prodecotech.com, fax it to 954.
e) Part replacement procedure In the occurrence of a component becoming defective, Prodeco Technologies tries to make part replacement as painless as possible. Simply contact Prodeco Technologies service department and explain the problem. A representative will assist you with getting the part at issue replaced quickly. You can also bring your bicycle to a local authorized dealer and they can assist you with any problem. Parts are always in stock and can be ship immediately.
Chapter 12: Parts # 1 2 3 4 5 6 7 8 9 10 11 12 13 14 15 16 17 18 19 20 21 22 23 24 25 26 27 28 29 30 31 32 33 34 35 36 37 38 39 40 41 42 43 44 45 46 47 48 49 50 51 52 53 54 55 56 57 58 59 60 Part Description ACCESSORY - BELL - Aluminum - v31 - Thumb Lever - 40mm Diameter - Silver Shell ACCESSORY - TOOL - Multi Use Tool - HB034 - Black & Nickel BATTERY - Prodeco Technologies - LiFEPO4 - 38.4V - -- 9Ah -- - v1.3a BATTERY CHARGER - 43.