© proDAD GmbH proDAD Mercalli © proDAD GmbH – www.prodad.
© proDAD GmbH Content Welcome General information Copyright / legal Information What is Mercalli? Why the name Mercalli? What is new in Version 2? How does Mercalli V2 work? Version overview Installation and registration Help function Mercalli overview (stand-alone version) Mercalli overview (plug-in version) Choosing the right Stabi-Cam Perfect stabilization - tips & tricks What does Avoid Border mean? Unwanted rolling shutter effects Further tips and recommendations Advice on filming for even better resu
© proDAD GmbH Decrease Horizontal Tilt Decrease Vertical Tilt Extras Border Handling Best Stabilization Best Border Fix Border Auto-fill colors Avoiding a border with Zoom Keep Camera Dynamic Exporting a file (stand-alone mode) Further use of the saved video Windows® NLEs - plug-in support Adobe Premiere Adobe After Effects Adobe Premiere Elements Canopus Edius Sony Vegas Pro Pinnacle Studio Avid Studio MAGIX Corel Video Studio Mercalli plug-in - general functions Compare View (video display in preview) Vir
© proDAD GmbH Welcome to proDAD Mercalli ! Mercalli lets you remove the effects of camera shake, jolts and trembling from recorded video sequences, to enhance the quality of important footage. Mercalli also improves your material by smoothing irregular pan or zoom shots. This makes Mercalli a highly valuable tool that'll rescue and optimize crucial video clips.
© proDAD GmbH liability whatsoever for the consequences of any incorrect statements or information which the documentation or translation may contain. Subject to technical and optical modifications. Information regarding any inaccuracies is always welcome. Copyright The software and the individual components of this product are the property of proDAD GmbH. By installing this product, the licensee agrees to refrain from unauthorized use and duplication.
© proDAD GmbH What is new in Version 2? Highlights of Version 2 include the completely new stabilization technology based on all 3 camera axes (known as 3D stabilization), resulting in a far higher success rate in the detection of unwanted movements and giving you far better results in the steadied clips. In addition, a new "smart border" technology reduces the required zoom-in factor to preserve as much image information as possible from the original footage in the stabilized clip.
© proDAD GmbH Version overview Mercalli SAL • Setup for stand-alone Windows 32/64 SAL version Mercalli Pro • Setup for Windows 32/64 video editing programs and SAL version • Setup for Apple OS video editing programs • Alongside the stand-alone version, this package also features plug-ins for programs including the following: Adobe Premiere CS5 (Windows and Apple OS), Adobe Premiere Elements, Magix VideoDeluxe, Grass Valley Edius / Neo, Sony Vegas 32/64.
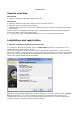
© proDAD GmbH You can now start Mercalli from a shortcut on your desktop or by clicking Start/All Programs/proDAD/Mercalli 2.0 Start. 2. Mercalli, installation of the plug-in version Just as in Version 1, Mercalli can also be used as a plug-in. To start the installation, double-click the setup file. By installing the program, you agree to the terms and conditions in the legal notice section and to the license terms.
© proDAD GmbH Please refer to the section Windows® NLEs - plug-in support for information on use as a plug-in. 3. Registering Mercalli Please register your proDAD Mercalli at http://www.prodad.de/register.html. Help function Pressing the F1 key opens the Help function. The user guide is also available in PDF format directly from the Programs menu. Go to Windows Start menu Programs proDAD Manual-Mercalli You can also use the Search function to quickly find specific terms or topics in the user guide.
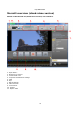
© proDAD GmbH Mercalli overview (stand-alone version) Details of the Mercalli V2 (stand-alone version) user interface. 1. Open Video... 2. Playback via Control 3. Virtual Stabi-Cam 4. Important stabilization settings 5. View 6. Tips 7. Detail settings 8. Video Preview 9. Instruments 10. Graphs 11.
© proDAD GmbH Mercalli overview (plug-in version) Details of the Mercalli V2 (plug-in version) user interface. 1. 2. 3. 4. 5. 6. 7. 8.
© proDAD GmbH Choosing the right Stabi-Cam The Stabi-Cam is the tool that analyzes and corrects video data. The right choice of Stabi-Cam depends on how the original video was shot and the type of final result you wish to achieve. Although the Universal profile will improve your footage in all cases, in certain situations it makes sense to try out a different Stabi-Cam in order to produce the perfect result. Example: tracking of a moving vehicle filmed from the side.
© proDAD GmbH Perfect stabilization - tips & tricks After running the video analysis and the first playback of the stabilized footage, you may well be satisfied with the result – but perhaps it is possible to do even better. Check the following points and you may be able to further improve the stabilization of your video.
© proDAD GmbH What does Avoid Border mean? Switching on the Avoid Border mode first of all hides the empty (black) areas of the image that result from shifting the image to stabilize it. This is done by zooming the video. As a result, the greater the degree of shake in the video, the greater the zoom factor in the stabilized footage. But Mercalli V2 also features a new Smart Border Technology.
© proDAD GmbH If your footage suffers from rolling shutter effect (distortions or image wobble) after stabilization, this is a problem inherent in your camcorder's CMOS sensor. Mercalli exposes this weakness. You can now eliminate this effect by enabling the Rolling-Shutter Compensation option in the Virtual Stabi-Cam area.
© proDAD GmbH Example videos: 1. Minicam-wobble.wmv 2. FlipCam-RS-skew.wmv Please note: To play the videos, your PC must be connected to the Internet.
© proDAD GmbH Further tips and recommendations Advice on filming for even better results You can already do a lot when filming to help achieve steady footage. Bear the following points in mind: • To help rolling shutter compensation when shooting from a vehicle or with a moving camera, do not start filming when already moving (but have the camera stationary at the start and end of the shot if possible).
© proDAD GmbH If this step does not solve the problem, you can remove the above packages using their uninstall functions. Similar packages are available free on the Internet, e.g. at http://www.freecodecs.com/. * Freeware from http://ffdshow-tryout.sourceforge.net and http://haali.su/mkv/ Please note that these are not proDAD products and proDAD grants no warranty of any kind for these products and accepts no responsibility for any malfunction.
© proDAD GmbH 19
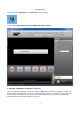
© proDAD GmbH Open Video... Once you have started Mercalli, you can then choose one of three ways to import a video. 1. Via the option Open Video ... 2. Drop Video here (import directly into the Mercalli Preview) The Open Video dialogue opens. Now browse to the folder that contains your video. Select the video file and click Open.
© proDAD GmbH The video then appears in the Mercalli Preview.
© proDAD GmbH 3. You can also load a video from the Windows Explorer by dragging and dropping it into the Mercalli Preview area. Please note: Please refer to the appropriate section for information on possible import problems. Playing back the original video via Control When the video has been imported (and analyzed), it can be played back in the Mercalli Preview (via Control = playback controls, such as Play/Pause).
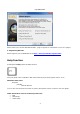
© proDAD GmbH Virtual Stabi-Cam Various Stabi-Cams are available to analyze and correct your shaky video footage. Select a suitable Stabi-Cam from the Virtual Stabi-Cam area (the default selection is Universal Camera). Click the menu to show other Stabi-Cams. 1. Advice on using the virtual Stabi-Cam Because every video has different characteristics, we recommend starting an initial video analysis with the Universal Camera Stabi-Cam.
© proDAD GmbH The rolling shutter effect is an unwanted effect inherent in components known as CMOS sensors, which are commonly used in digital single-lens reflex cameras (DSLRs), pocket cams, mobile telephones and video cameras. Rolling shutter effect tends to be undetectable or hardly noticeable in footage before stabilization. But after a video is successfully stabilized in post-production, the rolling shutter effect remains and may slightly or severely impair the quality of the footage.
© proDAD GmbH Starting analysis To start video analysis, click on or above the Preview on Analysis of the video will start. The user interface switches to the analysis view. Clicking the switch at the top left cancels the analysis (1). On the right are various instruments (2) with stabilization readings and information about the video. Below the Mercalli Preview, real-time graphs (3) on the analysis of the video are shown, such as: 1.
© proDAD GmbH 26
© proDAD GmbH Playing back the stabilized video When the video has been analyzed, it can be played back in the Mercalli Preview (via Control = playback controls, such as Play/Pause). The Control panel (which contains time information on video playback (shown here: 19 seconds / 00 frames/second) is located above the Mercalli Preview.
© proDAD GmbH Graphs The graphs show you the correction carried out on the stabilized video clip. They consist of a zero line (1) and the positive (2) and negative (3) reading areas. Pan Shot Compensation The Pan Shot Compensation graph shows movement in the video due to shifting along the Xaxis and Y-axis (horizontal/vertical). Use the Pan Shot Smoothing slider to adjust the overall smoothing of movements in the video.
© proDAD GmbH Roll-Compensation (with On/Off) The Roll-Compensation graph shows movement in the video due to rotation about the Z-axis. Moving the mouse over the graph displays the instantaneous values. You can also deactivate the Roll-Compensation graph (immediately to the right of the graph). Doing so disables correction and display of stabilization about the Z-axis. The crosshatched bands at the top and bottom of the graph indicate the limit of the maximum rotation movements in the video.
© proDAD GmbH Zoom Compensation (with On/Off) The Zoom Compensation graph shows movement in the video due to zooming. The correction and the reading on the graph depend on the position of the Smooth out Zoom slider on the Adjustments tab. Moving the Smooth out Zoom slider to the right spreads the zoom over a number of frames, creating a harmonious zooming movement. You can also deactivate the Zoom Compensation graph (immediately to the right of the graph). Doing so disables zoom correction and display.
© proDAD GmbH Adjustments tab will then be disabled. Tilt-Compensation (with On/Off) The Tilt-Compensation graph shows movement in the video due to tilt about the X-axis and Yaxis. Moving the mouse over the graph displays the instantaneous values. The correction and the reading on the graph depend on the position of the Decrease Horizontal Tilt and Decrease Vertical Tilt sliders on the Adjustments tab.
© proDAD GmbH You can also deactivate the Tilt-Compensation graph (immediately to the right of the graph). Doing so disables correction and display of stabilization about the X-axis and Y-axis. The sliders Decrease Horizontal Tilt and Decrease Vertical Tilt will then be disabled on the Adjustments tab.
© proDAD GmbH Roll / Pan Shot / G-Force / CMOS-Sensor / CamLimiter / History Below the Preview in Mercalli, various graphical instruments are displayed, which show the different characteristics of the stabilized video during playback. 1. Roll The Roll-Instrument shows the necessary roll movement correction of the video. 2. Pan Shot The Pan-Instrument shows the necessary Pan movement correction of the video. 3. G-Force The G-Force-Instrument shows the acceleration of the needed Pan correction. 4.
© proDAD GmbH Adjustments The Pan Shot Smoothing and Avoid Border sliders are located above the Mercalli Preview. These sliders give you a large degree of control over the correction of the video. Please note: Because of the huge range of different possible types of video footage, there is no general rule for the use of the sliders Pan Shot Smoothing and Avoid Border. Their ideal positions will vary from video to video. But thanks to its interactive handling, Mercalli makes it very easy to experiment.
© proDAD GmbH The Pan Shot Smoothing slider has the greatest visual effect on the video (smoothing of movement in the footage). Changes are also visible in the correction curve on the Pan Shot Compensation graph. Avoid Border The use of the Avoid Border slider is also dependent on the type of shake affecting the video and, of course, differs from video to video. In general, Mercalli proceeds according to certain automatic routines.
© proDAD GmbH You can also disable the Avoid Border slider (the setting in Extras/Border Handling switches from Best Border to Best Stabilization and a thin border becomes visible), the Cam-Limiter indicator (below the Preview) is then switched off.
© proDAD GmbH View (Split screen vertical/horizontal and Show Original) and Customization The stabilized video can be played back in the Mercalli Preview. Various options are available in the View area. 1. Split screen vertical 2. Split screen horizontal 3.
© proDAD GmbH 1. First click on Play in the Control panel to start playback of the stabilized video. When the Split screen vertical option is selected, the video playback is split into two adjacent sections. Clicking the Split screen vertical option again switches back to the unsplit Preview. 2. When the other option Split screen horizontal is selected, the video playback is also split into two sections, but this time one above the other.
© proDAD GmbH Clicking the Split screen horizontal option again switches back to the unsplit Preview. 3. Use the Show Original option if neither the horizontal nor the vertical split screen is suitable for an assessment of the quality achieved, or if the original video has a more dynamic feel. In the latter case, fine tuning may be necessary. Press and hold the Show Original option (with the left mouse button) to display the unstabilized original video in the Preview.
© proDAD GmbH Settings The Settings area contains 3 tabs: Format The Format tab displays information on the current video and allows adjustment of the FieldOrder setting. Video information (Pixel, Duration, Rate, Bits and Limits) This area displays information on the current clip, such as 1. 2. 3. 4. Pixel – video format and aspect ratio, example here: 1440x1080/1.333 Duration – clip length in seconds Rate - e.g. 25.00 frames/second Bits - e.g.
© proDAD GmbH Field-Order settings Mercalli offers the following Field-Order settings: Auto / Progressive / Lower Field First / Upper Field First. The default setting is Auto (automatic detection of the video). 1. Auto (default): Auto means that the information contained in the video is automatically read. Warning: Some codecs store incorrect information or none at all, and automatic detection may fail as a result. This may lead to incorrect stabilization.
© proDAD GmbH IMPORTANT: For Rolling-Shutter Compensation to work correctly, the correct field order for the video must be used, otherwise the rolling shutter correction will have no effect, or may even produce errors.
© proDAD GmbH Adjustments The Adjustments tab contains other sliders for detailed optimization of video stabilization. Pan Shot Smoothing The Pan Shot Smoothing slider is located above the Preview in Mercalli and also on the Adjustments tab. Use the Pan Shot Smoothing slider to adjust the overall smoothing of movements in the video. Moving the slider further to the right increases the degree of stabilization, making the video steadier.
© proDAD GmbH Smooth out Zoom The Smooth out Zoom slider controls the smoothing of zooming movements in the video. Moving the slider to the right increases the smoothing of changes in zoom. This has the effect of steadying shaky zoom. Changes are visible in the zoom correction curve on the Zoom Compensation graph.
© proDAD GmbH You can also disable the Smooth out Zoom slider. Just click the appropriate checkbox on the Adjustments tab. Doing so disables zoom correction.
© proDAD GmbH Rolling Motion Compensation The Rolling Motion Compensation slider controls correction of movement in the video due to rotation about the Z-axis. Changes are visible in the correction curve on the Roll-Compensation graph. You can also disable the Rolling Motion Compensation slider, provided the Smooth out Zoom slider has already been disabled. Just click the appropriate checkbox on the Adjustments tab. Doing so disables correction of roll (Z-axis).
© proDAD GmbH Decrease Horizontal Tilt The Decrease Horizontal Tilt slider controls correction of movement in the video due to rotation about the X-axis (tilting of the camera about the horizontal axis). This is indicated by the cyan curve in the Tilt-Compensation graph (below the Preview). Moving the slider Decrease Horizontal Tilt alters the degree of correction for rotation about the X-axis. The alteration is visible in the form of a cyan curve on the graph.
© proDAD GmbH You can also disable the Decrease Horizontal Tilt slider. Just click the appropriate checkbox on the Adjustments tab. Doing so disables correction of movement about the X-axis.
© proDAD GmbH Decrease Vertical Tilt The Decrease Vertical Tilt slider controls correction of movement in the video due to rotation about the Y-axis (tilting of the camera about the vertical axis). This is indicated by the magenta curve in the Tilt-Compensation graph (below the Preview). Moving the slider Decrease Vertical Tilt alters the degree of correction for rotation about the Yaxis. The alteration is visible in the form of a magenta curve on the graph.
© proDAD GmbH You can also disable the Decrease Vertical Tilt slider. Just click the appropriate checkbox on the Adjustments tab. Doing so disables correction of movement about the Y-axis.
© proDAD GmbH Extras The Extras tab allows you to configure Border Handling. Border Handling The Border Handling menu provides various border options. The compensation of movements in footage results in borders. For instance, when a frame is repositioned 10 pixels to the left to compensate for camera shake to the right, a border, or rather a gap in the image data, will appear on the right of the frame. This will generally be shown as no content, or a black image area.
© proDAD GmbH Best Stabilization When the Best Stabilization option is selected, a black border appears around the stabilized video. It may vary from frame to frame depending on the degree of shake in a specific situation. This border can be filled with video using the Auto-fill colors option, but the added video content will be blurred. You can zoom the video using the Zoom slider to further reduce the border.
© proDAD GmbH Excessive zoom-in may result in blur or graininess in the video. Best Border When the Best Border option is selected, no border appears in the stabilized video. The border is eliminated by zooming in on the video. The zoom factor depends on the degree of shake and the desired degree of correction as determined by the position of the Zoom slider. Further advice on Border Handling can be found in the FAQs in the Support section at www.prodad.com.
© proDAD GmbH Fix Border When the Fix Border option is selected, a static black border appears in the stabilized video. Its thickness depends on the maximum degree of shake contained in the video. This border can be filled with video using the Auto-fill colors option. But the added video content will be blurred. The border thickness can be altered manually using the Zoom slider. The resulting zoom-in may lead to blur or graininess in the video.
© proDAD GmbH Finally, bear in mind that this is the preferred option if you later intend to use the stabilized video to create a picture-in-picture effect with your video editing software, since you would then crop the video anyway. You can also use editing software to zoom the video. Auto-fill colors The Auto-fill colors option fills a black border with video content, i.e. the border is filled with video, but it may appear blurred.
© proDAD GmbH Avoiding a border with Zoom You can use the Zoom slider to zoom in on the video (slider right). This minimizes the visible border around the video. When the Zoom slider is moved to the left (zoom-out), a border appears. Excessive zoom-in may result in blur or graininess in the video.
© proDAD GmbH Keep Camera Dynamic The Keep Camera Dynamic option helps to preserve the liveliness of the video. The aim is not to smooth or stabilize intentional movements by the camera operator. If your intention is to convert normal, shaky free-hand footage to tripod-style footage, you should disable the Keep Camera Dynamic option.
© proDAD GmbH Exporting a file (stand-alone mode) In the stand-alone version of Mercalli, the final step is to export the stabilized video to a file. Click the option Export video at the top of the Mercalli window. This will create a video file (for later use) from your stabilized video. The video can be imported into your video editing application, a DVD authoring program or a similar application. Select the desired codec in the Format option. The default setting is WMV.
© proDAD GmbH Next enter the file name and select the target folder. Use the Browse button to define the target folder. Advice on use of the Split Screen can be found in the can be found in the View section. Then click on Start (on the Control panel above) or on Save Video. Creation of the file will start.
© proDAD GmbH Further use of the saved video The file you have created (your stabilized video) is now available for further use (e.g. burning on a DVD or Blu-ray) depending on the export format you have chosen. You can also import the file into video editing applications that are not supported by a Mercalli plug-in.
© proDAD GmbH Windows® NLEs - plug-in support Please note: To check which version of your editing software is supported, refer to the Mercalli section at www.prodad.com. Adobe Premiere When you install Mercalli, the Premiere plug-in is automatically installed. In Premiere, you can find the plug-in in the video effects: This is what you do: 1. Go to the video filters and click the proDAD directory to open it. 2. Click the item Mercalli 2.0 UI and drag it onto the required clip in the timeline. 3.
© proDAD GmbH Adobe After Effects When you install Mercalli, the After Effects plug-in is automatically installed. In Premiere, you can find the plug-in in the video effects: This is what you do: 1. Go to the Effects & Presets and click the proDAD directory to open it. 2. Click the item Mercalli and drag it onto the required clip in the timeline. 3. Click the Options item in the After Effects effect settings to launch Mercalli. 4. Configure the settings in Mercalli (e.g.
© proDAD GmbH Adobe Premiere Elements When you install Mercalli, the Premiere plug-in is automatically installed. In Premiere, you can find the plug-in in the video effects: This is what you do: 1. Go to the Effects/video effects and click the proDAD directory to open it. 2. Click the item Mercalli and drag it onto the required clip in the timeline. 3. The Mercalli settings dialog is now added to Elements. 4. Configure the settings in Mercalli (e.g.
© proDAD GmbH Canopus Edius When you install Mercalli, the Canopus EDIUS plug-in is automatically installed. In EDIUS, you can find the plug-in in the video effects: This is what you do: 1. Go to the video filters. 2. Click the proDAD folder. 3. Click the item Mercalli in the folder and drag it onto the required clip in the EDIUS timeline. 4. To start Mercalli, double-click the item Mercalli in the information panel. 5. The Mercalli settings dialog is now added to EDIUS. 6.
© proDAD GmbH Sony Vegas Pro When you install Mercalli, the Vegas plug-in is automatically installed. In Sony Vegas, you can find the plug-in in the Video FX : This is what you do: 1. Go to the Effects library Video FX. 2. Click the item proDAD Mercalli 2.0 and drag it onto the required clip in the timeline. 3. The Mercalli settings dialog is now added to Sony Vegas (Video Event FX). Next, use the dialog to make the desired settings in Mercalli (e.g. selection of a suitable stabi-cam) 4.
© proDAD GmbH Pinnacle Studio Note: As of now, proDAD Mercalli V2 for Studio will be included in it's full version (Mercalli V2 Pro). Since it is delivered as an activated Plugin, there is no need to activate it on the part of Pinnacle/Avid. When you install Mercalli, the Studio plug-in is automatically installed. In Pinnacle Studio, you can find the plug-in in the video effects: This is what you do: 1. Open the video toolbox in Studio. 2. Open the list of video effects. 3. Click the item proDAD. 4.
© proDAD GmbH Click the OK button to finish the stabilization and return to Studio. Please refer to the introduction to working with Mercalli in the next section for more information.
© proDAD GmbH Avid Studio Note: As of now, proDAD Mercalli V2 for Studio will be included in it's full version (Mercalli V2 Pro). Since it is delivered as an activated Plugin, there is no need to activate it on the part of Avid. When you install Mercalli, the Studio plug-in is automatically installed. In Pinnacle Studio, you can find the plug-in in the video effects: This is what you do: 1. Go to the Effects/video effects and click the proDAD directory to open it. 2.
© proDAD GmbH 69
© proDAD GmbH MAGIX When you install Mercalli, the MAGIX plug-in is automatically installed. In MAGIX, you can find the plug-in in the Effects: 1. Start MAGIX Movie Edit Pro and place a video clip in the timeline, making sure it is highlighted (orange). 2. Now go to the Effects menu. 3. Click on the Additional effects directory to display proDAD Mercalli 2.0. 4. Click proDAD Mercalli 2.0 now. 5. The Mercalli settings dialog is now added to MAGIX.
© proDAD GmbH Corel Video Studio When you install Mercalli, the Corel plug-in is automatically installed. How to proceed: 1. Locate the FX. 2. Activate your clip in the timeline by double-clicking it. 3. In FX, click proDAD. 4. Drag the Mercally 2.0 entry to the selected video clip (via drag & drop) in the Corel Video Studio timeline. 5. Now click on the Customize Filter button. 6. The Mercalli 2.0 Settings dialog starts. Here you can define the settings of your choice. 7.
© proDAD GmbH Mercalli plug-in - general functions Mercalli starts in basic mode without displaying the advanced settings. These are first explained. Compare View (video display in preview) The stabilized video can be played in the preview of the video editing software. Various options are available in the Compare View area. 1. final result First click on Play in the Preview panel to start playback of the stabilized video in the editing software's preview. 2.
© proDAD GmbH 3. vertical splitscreen First click on the Play button in the preview panel to start playback of the stabilized video in the editing software's preview. When the vertical splitscreen option is selected, the video playback is split into two sections. 4. Show Evaluation Grid Click the Show Evaluation Grid option to enable it. A grid then appears in the Preview image to help you judge the effectiveness of the stabilization.
© proDAD GmbH Virtual Stabi-Cam Various Stabi-Cams are available to analyze and correct your shaky video footage. Select a suitable Stabi-Cam by clicking Virtual Stabi-Cam (the default selection is Universal Camera). 1. Advice on using the virtual Stabi-Cam Because every video has different characteristics, we recommend starting an initial video analysis with the Universal Camera Stabi-Cam.
© proDAD GmbH The rolling shutter effect is an unwanted effect inherent in the components called CMOS sensors, which are commonly used in digital single-lens reflex cameras (DSLRs), pocket cams, mobile telephones and video cameras. Rolling shutter effect tends to be undetectable or hardly noticeable in footage before stabilization. But after a video is successfully stabilized in post-production, the rolling shutter effect remains and may slightly or severely impair the quality of the footage.
© proDAD GmbH Pan Shot Smoothing Use the Pan Shot Smoothing slider to adjust the overall smoothing of movements in the video. Moving the slider further to the right increases the degree of stabilization, making the video steadier. The Pan Shot Smoothing slider has the greatest visual effect on the video (smoothing of movement in the footage).
© proDAD GmbH Avoid Border and Signalize frames... The use of the Avoid Border slider is also dependent on the type of shake affecting the video and, of course, differs from video to video. Moving the Avoid Border slider to the right (more zoom-in) improves stabilization (reduces shake), moving the slider to the left reduces stabilization but helps to retain as much of the information and resolution of the original video as possible. You can also disable the Avoid Border slider. The Signalize frames...
© proDAD GmbH 78
© proDAD GmbH Border Handling The Border Handling menu provides various border options. Best Border When the Best Border option is selected, no border appears in the stabilized video. Further advice on Border Handling can be found in the FAQs in the Support section at www.prodad.com. Best Stabilization When the Best Stabilization option is selected, a black border appears around the stabilized video. It may vary from frame to frame depending on the degree of shake in a specific situation.
© proDAD GmbH This border can be filled with video using the Auto-fill colors option, but the added video content will be blurred. This is not a program error, but just a fill option which may be used when appropriate. You can zoom the video using the Zoom slider to further reduce the border.
© proDAD GmbH Fix Border When the Fix Border option is selected, a static black border appears in the stabilized video. This border can be filled with video using the Auto-fill colors option.
© proDAD GmbH But the added video content will be blurred. You can zoom the video using the Zoom slider to further reduce the border.
© proDAD GmbH Avoiding a border with Zoom You can use the Zoom slider to zoom in on the video (slider to the right). This minimizes the visible border around the video. When the Zoom slider is moved to the left (zoom-out), a border appears. Excessive zoom-in may result in negative effects such as blur or graininess in the video.
© proDAD GmbH Auto-fill colors The Auto-fill colors option fills a black border with video content, i.e. the border is filled with video, but it may appear blurred. Adjustments The Adjustments area contains other sliders for detailed optimization of video stabilization. Roll Compensation The Roll Compensation slider controls correction of movement in the video due to rotation about the Z-axis.
© proDAD GmbH You can also disable the Roll Compensation slider. Just click the appropriate checkbox on the Adjustments area. Doing so disables correction of roll (Z-axis). Zoom Compensation The Zoom Compensation slider controls the smoothing of zooming movements in the video. Moving the slider to the right increases the smoothing of changes in zoom. This has the effect of steadying shaky zoom. You can also disable the Zoom Compensation slider. Just click the appropriate checkbox on the Adjustments tab.
© proDAD GmbH Horizontal Tilt Compensation The Horizontal Tilt Compensation slider controls correction of movement in the video due to rotation about the X-axis. Moving the slider Horizontal Tilt Compensation alters the degree of correction for rotation about the X-axis. You can also disable the Horizontal Tilt Compensation slider. Just click the appropriate checkbox on the Adjustments tab. Doing so disables correction of movement about the X-axis.
© proDAD GmbH Vertical Tilt Compensation The Vertical Tilt Compensation slider controls correction of movement in the video due to rotation about the Y-axis. Moving the slider Vertical Tilt Compensation alters the degree of correction for rotation about the Y-axis. You can also disable the Vertical Tilt Compensation slider. Just click the appropriate checkbox on the Adjustments tab. Doing so disables correction of movement about the Y-axis.
© proDAD GmbH Keep Camera Dynamic The Keep Camera Dynamic option helps to preserve the liveliness of the video. The aim is not to smooth intentional movements by the camera operator. If your intention is to convert normal, shaky free-hand footage to tripod-style footage, you should disable the Keep Camera Dynamic option.
© proDAD GmbH Virtual Stabi-Cam Various Stabi-Cams are available to analyze and correct your shaky video footage. The different Stabi-Cams can be found in the Virtual Stabi-Cam area (1). The default selection is Universal Camera. The Rolling-Shutter Compensation option (2) can also be disabled (default setting) and enabled here. Start video analysis after selection of a Stabi-Cam. Pan Shot Smoothing Use the Pan Shot Smoothing slider to adjust the overall smoothing of movements in the video.
© proDAD GmbH Avoid Border All information on Avoid Border can be found in the section Avoid Border and Signalize frames.... Video-Format (Progressive / Top Field First / Bottom Field First (PAL/NTSC)) Mercalli offers the following field order settings: Progressive / Top Field First / Bottom Field First (PAL/NTSC). The video format settings are not included in all plug-ins. They may also vary. The default setting is Progressive. 1.
© proDAD GmbH starting with the first field. 3. Bottom Field First Interlaced video consisting of 2 sets of fields. With Bottom Field First the fields are displayed starting with the second field. IMPORTANT: For Rolling-Shutter Compensation to work correctly, the correct field order for the video must be used, otherwise the rolling shutter correction will have no effect, or may even produce errors. Start Analysis The video is now analyzed and shake is eliminated.
© proDAD GmbH Macintosh® NLEs - plug-in support proDAD Mercalli supports various MAC video editing applications as a plug-in (video effect). To check which editing software and versions are supported, refer to the Mercalli section at www.prodad.com. Detailed information can be found in the Mercalli user guide for the MAC application. What next for Mercalli... As of V2, Mercalli is more than just a stabilizing tool for videos.
© proDAD GmbH © proDAD GmbH www.prodad.