
Use And Care Manual
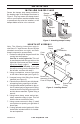
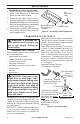
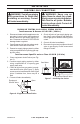
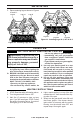

Table Of Contents

www.usaprocom.com
11200064-01A
INSTALLATION
3. Place remaining logs as shown in Figures
10 and 11.
Figure 10 - Installing Logs #3, #4 & #5
Figure 11 - Installing Logs #6-1, #6-2 & #6-3
Log #3
Log #4
Log #5
Log #6-1
Log #6-2
Log #6-3
OPERATION
FOR YOUR SAFETY READ BEFORE LIGHTING
WARNING: If you do not fol-
low these instructions exactly, a
re or explosion may result caus-
ing property damage, personal
injury or loss of life.
A. This appliance has a pilot which must
be lighted by hand. When lighting the
pilot, follow these instructions exactly.
B. BEFORE LIGHTING smell all around the
appliance area for gas. Be sure to smell
next to the oor because some gas is
heavier than air and will settle on the oor.
WHAT TO DO IF YOU SMELL GAS
• Do not try to light any appliance.
• Do not touch any electric switch; do
not use any phone in your building.
• Immediately call your gas supplier
from a neighbor’s phone. Follow the
gas supplier’s instructions.
• If you cannot reach your gas supplier,
call the re department.
C. Use only your hand to push in or turn
the gas control knob. Never use tools.
If the knob will not push in or turn by
hand, don’t try to repair it, call a qualied
service technician. Force or attempted
repair may result in a re or explosion.
D. Do not use this appliance if any part
has been under water. Immediately call
a qualied service technician to inspect
the appliance and to replace any part of
the control system and any gas control
which has been under water.
LIGHTING INSTRUCTIONS
1. STOP! Read the safety information above.
2. Turn the gas shutoff valve to OFF.
3. Wait ve (5) minutes to clear out any
gas. If you still smell gas, STOP! Follow
the safety information above. If you don't
smell gas, go on to the next step.
4. Light a match and lay it on top of the pan
material about 2" from the end of the sup-
ply side of the pan.
5. Slowly turn the gas shutoff valve ON until
the burner ignites. If the burner doesn't
ignite within 10 seconds with the match
burning, turn the shutoff valve OFF and
repeat steps 1 through 4 again.