
Use And Care Manual
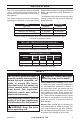
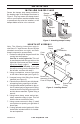
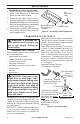
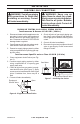
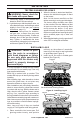
Table Of Contents

www.usaprocom.com
200064-01A
10
INSTALLATION
TESTING BURNER FOR LEAKS
WARNING: Never check for
gas leaks with open ame.
1. Generously apply a noncorrosive leak
detection uid to all connections.
2. Light the burner with the shutoff valve, no
more than half open, and holding a match
slightly in front of the pan (see Lighting
Instructions, page 11).
3. Inspect all connections for bubbles,
raw gas odor, or ame from any area
other than the burner (leaks). If leaks are
detected, shut off the gas valve immedi-
ately. Tighten, or reassemble the loose
connection(s) using pipe joint compound
until burner system is leak free.
4. When the burner is tested and leak free,
observe the individual tongues of ame
on the burner.
Note: Let the burner manifold cool rst
before removing to unclog port blockages.
The burner design includes more ports
on the outside of the bar. Make sure that
all ports are clear and producing ame
evenly across the burner. If any ports
appear blocked, clear them by removing
the burner manifold and reaming the ports
with a modied paper clip or other suit
able tool.
5. When nished testing, turn the gas shutoff
valve OFF to extinguish all ames.
INSTALLING LOGS
WARNING: Failure to posi-
tion the parts in accordance
with these diagrams or failure
to use only parts specically
approved with this heater may
result in property damage or
personal injury.
It is very important to install the logs exactly
as instructed. Do not modify logs. Use only
logs supplied with heater.
Each log is marked with a number. This
number will help you to identify the logs when
installing.
After installing logs, add decorative cinders
around the grate base, do not place any
decorative cinders on logs or burner.
After installation and periodically thereafter,
check to ensure that no yellow ame comes
in contact with any log. With the heater set to
High, check to see if yellow ames contact
any log. If so, reposition logs according to
the log installation instructions in this manual.
Yellow ames contacting logs will create soot.
Note: Leave as much open space between top
logs as possible to minimize ame impinge-
ment and sooting.
Note: Logs may chip if they are handled
roughly or if hit together while being placed.
1. Place vermiculite into burner pan. Pull
glowing ember loosely, and sprinkle
uniformly on the surface of vermiculite.
Insert log #1 into slots in rear log bracket
on grate base (see Figure 8).
2. Insert log #2 into slots in middle grate
bracket (see Figure 9).
Figure 8 - Installing Log #1
Figure 9 - Installing Log #2
Log #1
Log #2
Vermiculite and Glowing Ember