
Installation manual


CM-02-001
TYTANu DI Water Heater
O.I. 6/27/03 Installation, Operation and Maintenance Manual
ECO page 9
1.3 Safety Network: (Continued)
2. High Limit (HSP1). This high-temperature alarm setting is set at 248°F (120°C). If this temperature is detected at
this sensor. the controller will disengage the main load contactor and sound the audible alarm. This will require a
manual reset of the heater once the overheat event has been corrected.
Pressure Relief Valve:
The heating columns are protected from pressures over 100 PSI (6.9 Bar) by a type 316 stainless steel Pressure Relief Valve
(PRV) mounted on the inlet of the heater. If the column pressure exceeds 100 PSI (6.9 Bar), the pressure relief valve will open
and vent excess water pressure to the drain.
Section 2: Pre-Installation:
Note: Before beginning installation of the TYTANu DI Water Heater, carefully read this entire section.
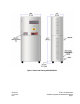
1) Space Requirements: The standard dimensions of the various models are shown in Table 2 (see appendix for custom made
units). Allow additional space on all sides of the unit for the control ventilation and service access. (all dimensions are in
inches).
Table 2
Dimensions
kW Width Depth Height
12-48 29 ½” (750mm) 13 ½” (343mm) 36” (915mm)
72 37 ½” (953mm) 13 ½” (343mm) 36” (915mm)
96-144 28” (712mm) 17” (432mm) 63” (1601mm)
2) Inlet and Outlet Plumbing: The TYTANu DI Water Heater is supplied with customer specified inlet and outlet plumbing
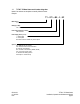
connections. Reference the specific model number ordered and section 1.1 “TYTANu DI Water Heater Model Number
Designation” of this manual to confirm the required plumbing connections.
3) Electrical Connections: The TYTANu DI Water Heater is supplied with customer specified power requirements. Reference
the specific model number ordered and section 1.1 “TYTANu DI Water Heater Model Number Designation” of this manual
for the required power connections. Confirm these requirements by checking the product identification tag located on the
lower right-hand corner of the cabinet (see figures 1-3). Fuse the incoming power line for the rated amperage using an
approved electrical disconnect box.