
Installation manual


CM-02-001
TYTANu DI Water Heater
O.I. 6/27/03 Installation, Operation and Maintenance Manual
ECO page 18
4.2.1 Programming: (Continued)
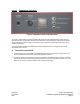
3 ) Identify the over-temperature controller, tagged 1SLC.
4 ) Press the Index key ( ) twice until “SP2” is highlighted.
5 ) Using the “p” or “q” buttons, adjust the SP2 value until it is 18°F (10°C) higher than the set point on the temperature
controller. Note: Do not change any other settings on this controller.
6 ) Close the door to the control portion of the enclosure.
7 ) Follow the procedure for “System Startup” (page 17) to start the heater.
Section 5: Operation:
5.1 Cleaning:
The TYTANu DI Water Heater was thoroughly cleaned before shipment. However, cleaning will be required prior to startup to
remove any contaminants resulting from the shipping and installation process. Process Technology recommends that the
following procedure be followed at a minimum. If the system is to be used with ultra pure DI water (15 Meg ohm or higher)
additional steps may be required in certain applications.
1) Allow the unit to flow to drain with as high as flow rate of DI water as possible for several hours. The recommended
minimum flow rate is 3-5 GPM (11-19 LPM).
2) Operate the TYTANu DI Water Heater for several hours at the greatest DI water flow rate that will allow an exit temperature
not exceeding 60°C(140°F.)
Caution: Ensure that all drain lines are capable of withstanding pressures and temperatures that will be
produced within the TYTANu water heater.
3) Perform normal sanitizing procedure commonly used on existing DI water plumbing network.
4) Perform normal after-sanitizing rinse procedure.
Note: The actual times required for absolute clean up of the system may vary dependent on DI water quality,
flow rates and installation techniques.
5.2 System Start-Up:
After completing installation, the following calibrations must be performed before operating the heater.
1) Check the switch positions on the control interface (if supplied).
Caution: All switches should be in the off position.
2) Turn on water at its supply source. Allow sufficient water to flow through the column to remove any entrapped air pockets.
3) Stop water flow at point of use location and check all plumbing connections and water heater for leaks.
4) Engage electrical supply at customer's source. Ensure that OPTIONAL circuit breaker(s) are in the "ON" position.
Caution: When the enclosure door is open, be careful not to touch the electrified components inside. To avoid shock
hazard, this procedure should only be performed by qualified personnell.