
Installation manual
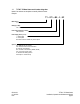


CM-02-001
TYTANu DI Water Heater
O.I. 6/27/03 Installation, Operation and Maintenance Manual
ECO page 10
Section 3: Installation:
3.1 Uncrating and Inspection:
1) The TYTANu DI Water Heaters are crated and shipped in an upright position. If the unit is not upright, return the crate to
an upright position and inspect carefully.
2) Remove front side of the crate.
3) Remove the protective packaging material.
4) Remove the unit from crate by grasping the sides of the cabinet.
5) Inspect the unit for any apparent damage.
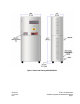
3.2 Mounting Heater and Control:
1) Location: TYTANu DI Water Heaters are designed for remote installation, keeping point of use areas uncluttered and free
of potential contaminants. The unit is designed to use a minimum amount of wall space or floor space making chase areas
suitable location for installation.
2) Mounting: The TYTANu DI Water Heater is designed to be wall mounted or free standing. However the TYTANu DI
Water Heater should be placed in a vertical and level position.
3.3 Plumbing Connections:
DI Water Line Connections:
1) Remove the protective plastic caps from inlet and outlet plumbing on the heater column.
2) Locate the inlet and make the required connection to the customer supplied fitting. (Do not reverse).
3) Tighten the connection as required. Take care not to over-tighten.
4) Repeating the above procedure for the outlet plumbing.
5) Locate the pressure-relief valve (PRV): on the underside of the heater enclosure, adjacent to the inlet for 12-72kW units, or
on the back of the enclosure just above the inlet for 96-144kW units. Plumb the PRV to a zero-pressure drain.
Note: For convenience of draining the heating columns during extended shut down periods, the plumbing
connections to the DI Water Heater Inlet should contain a drain assembly.