Zenoah G26M Gas-Powered Deep-V Boat ® OWNER'S MANUAL Overall Length . . . . . . . . . . . . . . . . . . . 611/2 in Hull Length . . . . . . . . . . . . . . . . . . . . . . . 55 in Beam . . . . . . . . . . . . . . . . . . . . . . . . . 143/4 in Weight . . . . . . . . . . . . . . . . . . . . . . . . . 14.5 lb Speed . . . . . . . . . . . . . . . . . . . . . . . . 39+ mph Engine. . . . . . . . . . . . . . . . Zenoah G26 Marine Propeller . . . . . . . . . . . . . . . . . . . . Prather 270 Radio System . . . . .
Table of Contents Introduction .................................................................................................................................................................................................................................................................2 Warning ......................................................................................................................................................................................................................
Limited Warranty & Limits of Liability Safety Precautions Pursuant to this Limited Warranty, Horizon Hobby, Inc. will, at its option, (i) repair or (ii) replace, any product determined by Horizon Hobby, Inc. to be defective. In the event of a defect, these are your exclusive remedies. This is a sophisticated hobby product and not a toy. It must be operated with caution and common sense and requires some basic mechanical ability.
Limited Warranty & Limits of Liability (cont) Limited Warranty Period via a carrier that provides tracking and insurance for lost or damaged parcels, as Horizon Hobby, Inc. is not responsible for merchandise until it arrives and is accepted at our facility. Include your complete name, address, phone number where you can be reached during business days, RMA number, and a brief summary of the problem. Be sure your name, address, and RMA number are clearly written on the shipping carton. Horizon Hobby, Inc.
Additional Required Items Although the ShockWave™ 55 SS comes fully assembled and ready for action, you will need a few additional items in order to run your boat.
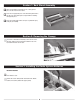
Section 1: Boat Stand Assembly There are 4 plywood boat stand pieces. The 2 short plywood pieces are the ends of the boat stand. Secure the 2 long plywood pieces of the interlocking boat stand to one end of the short plywood pieces. Repeat with the remaining short plywood pieces. Secure the stand together where each piece is joined with epoxy or CA glue (not included). Section 2: Removing the Canopy Unscrew the 2 knurled hatch-mounting screws from the rear of the hatch.
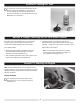
Section 3: Installing the Radio System Batteries (cont.) Reinstall the battery holder into the radio compartment. Secure the radio box cover with the 6 Phillips screws. Transmitter Batteries Remove the transmitter from the box. Remove the battery cover on the bottom of the transmitter. Insert 8 “AA” alkaline batteries into the battery holder. Note proper polarity. Turn on the transmitter and confirm that the LCD illuminates, indicating proper installation of fully charged batteries.
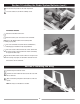
Section 5: Installing the Rudders Carefully remove the rubber bands holding the rudder control arms and the nylon rudder bushings in place. Slide the rudders into the rudder struts with a bushing above and below the strut. Position the rudder control arms at a 90-degree angle to the rudder as shown and tighten the 3mm x 15mm hex screws, securing them with 3mm nuts. Apply screw-locking compound to the threads to lock the nuts in place.
Section 8: Fueling the Tank Use only Zenoah® 2-Cycle Synthetic Oil and premium gasoline mixed 32:1 to power the ShockWave™ 55 Super Sport. Fill the tank completely and secure the fuel cap. Keep fuel in a moisture-free environment, as stale fuel will cause the Zenoah® G26M engine to lose performance. Section 9: Range Checking the JR XR3i Radio System Before the first run of the ShockWave 55 SS, you should check the radio for proper operation and to ensure proper control movement of the rudder and throttle.
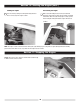
Section 10: Starting the Engine (cont.) Choking the Engine Pull-starting the Engine Close the choke by rotating the small yellow tubing extension. This is not necessary if the engine is warm. With an assistant holding the boat to the boat stand and bracing the engine with one hand, pull the starting cord briskly several times. Once the engine fires (begins to start), open the choke. Prolonged choking will flood the engine with fuel. See Section 15: Troubleshooting Guide to correct the flooding condition.
Section 12: Handling Adjustments Trim Tabs On smooth water conditions, the trim tabs may be bent up further or removed to increase top speed performance. Be sure to reinstall the trim tab mounting bolts to keep water from entering the boat. Be aware that the boat may become less stable and may “blow over” with the increased speed.
Section 14: Clutch The centrifugal clutch automatically engages when the engine rpm is increased. Be sure that the idle speed adjustment is set low enough so that the propeller does not rotate at idle. Periodically disassemble the clutch and clean debris from the clutch shoes and the inner clutch bell with DYN5505 Dynamite Nitro Force.
Section 16: Hull Care The hull of the ShockWave™ 55 Super Sport is finished using the highest quality paints and the most advanced painting methods available. The base coat/clear cote technique delivers an amazing shine that is as durable as it is beautiful.
Section 18: Flex Shaft Lubrication (cont.) Slide the flex shaft out of the boat. Lubricate the flex shaft with flex shaft grease (see your local hobby shop). Reinstall in reverse order. Be sure to reinstall the nylon washers in front and behind the propeller strut. Section 19: ShockWave 55 SS Replacement Parts In the event that you need to purchase replacement parts for your engine or the ShockWave™ 55 SS, please see your local hobby store.
Appendix Photo 1 Photo 4 PRB2661 PRB2657 PRB2660 PRB2666 PRB2659 PRB2665 PRB2679 PRB2662 PRB2658 PRB2655 PRB2664 PRB2693 PRB2663 Photo 2 Photo 4 PRB2669 Water Outlet Water Outlet PRB2670 PRB2651 PRB2676 PRB2681 PRB2667 PRB2689 PRB2673 PRB2675 PRB2672 PRB2281 PRB2674 PRB2677 Water Inlet Water Inlet Engine Pressure Line Photo 3 Photo 6 PRB2685 PRB2686 PRB2682 PRB26887 PRB2656 PRB2683 PRB26888 PRB2668 PRB2678 PRB2652 PRB2653 PRB2654 15