Rev.
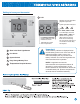
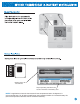
Getting to know your thermostat 1 2 1 LCD Displays the user selectable setpoint temperature. 6 System operation indicators: COOL 3 4 5 2 Glow in the Dark Light Button 3 Fan Switch 4 System Switch 5 Easy Change Battery Door 6 Temperature Setpoint Buttons Low Battery Indicator: Replace batteries when indicator is shown. Indicates the current room temperature. HEAT FAN The COOL, HEAT or FAN icon will display when the COOL, HEAT or FAN is on.
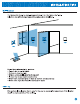
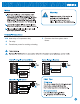
SUBBASE INSTALLATION
Y/W Heat relay or Compressor relay G Fan relay R Transformer power for cooling or heating C Common wire from system transformer
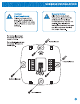
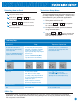
Delay The compressor delay will not allow the compressor to be turned on for 5 minutes after the last time the compressor was on. The cooling icon will flash during the delay period. Select OFF or ON with the jumper pin as desired.
Technician Setup Menu Selecting Heat or Cool Set system switch to on. Hold down and key for 3 seconds to bring up the current mode. Use or This thermostat has a technician setup menu for easy installer configuration. To set up the thermostat for your particular application: to select the mode. Wait 10 sec for the thermostat to return to normal operation. 1. Set system switch to off. 2. Hold down for 3 seconds. and key together 3. Configure the installer options as desired using the table below. 4.
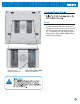
Replace with 2 AA 1.5v batteries. Simple operating instructions are found on the back of the battery door. NOTE: In applications where the thermostat will see temperatures below 40 degrees it is recommended that 1.5V AA lithium batteries be used instead of alkaline for increased battery life. (Extreme temperatures decrease the life of Alkaline batteries.
20ºF to 95ºF (-6ºC to 35ºC) 25ºF to 90ºF (-4ºC to 32ºC) 20ºF 1.5v batteries Pro1 IAQ Inc. 1111 S. Glenstone Suite 2-100 Springfield, MO 65804 Toll-free: 1-888-Pro1iaq (776-1427) Toll Number (Outside the USA): 330-821-3600 Web: http://www.pro1iaq.