
Installation Manual
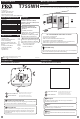


Installation Tips
Getting to know your thermostat
Installation Tips
Thermostat Quick Reference
5
6
9
10
Thermostat Quick Reference
Getting to know your thermostat
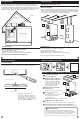
Align the 4 tabs on the subbase with corresponding slots on
the back of the thermostat/base module, then push gently until
it snaps in place.
Note: To ensure a solid t between the thermostat/base module
and the subbase:
1. Mount subbase to a at wall
2. Use screws provided
3. Drywall anchors should be ush with the wall
4. Wires should be pushed into the wall
Mount Thermostat and Base Module
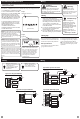
Battery installation is optional if there are no remotes
connected to the Master Thermostat (C terminal con-
nected). If you connect an outdoor remote and/or
indoor remote sensors it is required the
thermostat be hardwired.
Important: High quality alkaline batteries are
recommended. Rechargeable batteries or low quality
batteries do not guarantee a 1-year life span.
Insert 2 AA Alkaline
batteries (included). High
quality alkaline batteries
are recommended.
On the back of the
thermostat insert 2
AA Alkaline batteries
(included).
Battery Installation
Set At
Menu
Em.Heat
AutoCool
Set At
On LHM
Tech Set
Set Sched
Next
Run Sched
Set Time
Hold
Done
Menu
Prev
HOLD
STAGES
1+2+3
COOL ON
HEAT ON
FAN ON
The low battery indicator is displayed when the AA battery power is low. If the user
fails to replace the battery within 21 days, the screen will only show the low battery
indicator but maintain all functionality. If the user fails to replace the batteries after
an additional 21 days (days 22-42 since rst “low battery” display) the setpoints will
change to 55˚F (Heating) and 85˚F (Cooling). If the user adjusts the setpoint away from
either of these, it will hold for 4 hours then return to either 55˚F or 85˚F. After day 63
the batteries must be replaced immediately to avoid freezing or overheating because
the thermostat will shut the unit o until the batteries are changed.
Important
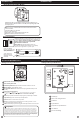
Indicates the current room temperature
Time and day of the week
Setpoint: Displays the selected setpoint temperature.
Hold is displayed when the thermostat program is permanently overridden.
System Operation Indicators:
The COOL ON , HEAT ON or icon will display when the COOL, HEAT, or
(fan) is on. The compressor delay feature is active if these are ashing.
Low Battery Indicator: Replace batteries when this indicator is shown.
Menu Options: Shows dierent options.
Program Time Periods: This thermostat has 4 programmable time periods
per day.
System: Indicates current mode of operation.
Stages: +1 will appear in the display when second stage of heat or cool is
on. +2 will appear for third stage of heat.
1
2
3
7
8
1
2
3
7
8
Globe: Globe is displayed if an energy ecient temperature has been selected.
Auto
Set At
Menu
Glow in the dark light button
Fan Button
System Button
Temperature Setpoint Buttons
User Buttons
LCD Display
Private Label Badge