
Install Instructions
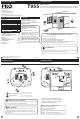

Programming
Programming
Set Time
Follow the steps below to set the day of the week and current time:
1. Press the Menu button.
2. Press Set Time.
3. Day of the week is ashing. Use the or key to
select the current day of the week.
4. Press Next.
5. The current hour is ashing. Use the or key to
select the current hour. When using 12-hour time, make sure
the correct a.m. or p.m. choice is selected.
6. Press Next.
7. Minutes are now ashing. Use the or key to
select current minutes.
8. Press Done when completed.
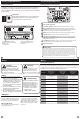
(If using programming)
All our programmable thermostats are shipped with an energy saving default
program. You can customize this default program by following the
instructions in the set program schedule section starting on page 24.
Programming
Your thermostat can be programmed to have each day of the week
programmed uniquely (7 days), all the weekdays the same with a separate
program for Saturday and a separate program for Sunday (5+1+1), or
non-programmable. For the 7-day and 5+1+1 programming modes, there are
three time period options.
1. “4” Residential (WAKE, LEAVE, RETURN, SLEEP)
2. “2C” Commercial (OCCUPIED, UNOCCUPIED)
3. “4C” Commercial (OCCUPIED 1, UNOCCUPIED 1, OCCUPIED 2, UNOCCUPIED 2)
This thermostat has a programmable fan feature, which allows you to run the
fan continually during any time period.
This feature allows you to set a
minimum cooling setpoint limit.
The setpoint temperature cannot
be lowered below this value.
This feature allows you to set a
maximum heating setpoint limit.
The setpoint temperature cannot
be raised above this value.
Heating
Temperature
Setpoint
Limit
Use the or key to
select the maximum heat
setpoint.
This feature allows you to display
temperatures in either Fahrenheit
or Celsius.
˚F or ˚C
˚F
˚F for Fahrenheit
˚C for Celsius
You can select either a 12 or 24
hour clock setting.
12 or 24
Hour Clock
90
74
12H
12
HOUR CLOCK
Cooling
Temperature
Setpoint
Limit
Use the or key to
select the minimum cool
setpoint.
44
44˚F
90˚F
HE
CO
O
F
Use the or key to
select 12 or 24 hour clock.
This feature will start heating
early to bring the building
temperature to its programmed
setpoint by the beginning of the
WAKE, OCCUPIED time period.
Morning
Recovery
ON
Use the or key to
turn on or o.
You can congure this thermostat
to have a 7 day program, a
5+1+1 program or as
nonprogrammable.
Program
Options
5d
Use the or key to
select 7d for 7 day, 5d for
5+1+1, or 0d for
nonprogrammable.
5d
The display light can be
congured to stay on all the
time or come on when any key
is pressed.
NOTE: HARDWIRE ONLY
Keeping the display light
continually “ON” will greatly
reduce battery life.
The pre-occupancy fan settings
will energize the fan before
the occupied time to provide
ventilation prior to scheduled
occupancy.
This feature only shows if the
technician setup step for time
periods is set to 2C or 4C.
Pre-Occupancy
Fan
You can select the
pre-occupancy fan from OFF,
1, 2, or 3 hours.
If 1, 2, or 3 is selected, the
fan will turn on that many
hours prior to the scheduled
occupied time period.
Tech Setup Steps
Allows you to put your phone
number in the display.
You can choose ON or OFF.
Contractor
Call Number
If selected ON, you will
see the input screen after
pressing NEXT STEP.
Use the or key to
select the desired number
and the or key to
move from one character to
another. See note below for
operation.
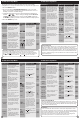
Adjustment Options Default
LCD Will Show
When any key is pressed an
audible beep will sound.
You can choose ON or OFF.
Beep
PRE
OCCUPY
FAN
Always ON
Light
Use the or key to to
turn on or o.
OFF congures the display
light to come on when the
light key or any button is
pressed.
ON congures the display
light to stay on.
Time Periods
You can congure this thermostat
to have 2 or 4 programmable time
periods per day. 4 time periods
are Wake, Leave, Return & Sleep.
2C time periods are Occupied
& Unoccupied. 4C time periods
are Occupied 1, Unoccupied 1,
Occupied 2, & Unoccupied 2.
Use the or key to
select 4, 2c, or 4c time periods
per day.
4
AUTO
OFF
dL
If ON is selected the beep
will sound.
If OFF is selected there is no
sound.
4
OFF
OFF
ON
b
Tech Setup Steps Adjustment Options Default
LCD Will Show
Contractor Call Number Note
If contractor call number is selected ON, the phone number entered will
show in the display if there has been a continuous call for heating or
cooling for 24 hours or if the light button is held down for 3 seconds. To
remove the phone number from the display, hold the light button down
for 3 seconds.
Technician Setup Menu Technician Setup Menu
OFF
Default Programming
Factory Default Program
Day of
the Week
Events Time
Setpoint
Temperature
(HEAT)
Setpoint
Temperature
(COOL)
Weekday
Saturday
Sunday
Wake/OCC1
Leave/UNOCC1
Return/OCC2
Sleep/UNOCC2
Wake/OCC1
Leave/UNOCC1
Return/OCC2
Sleep/UNOCC2
Wake/OCC1
LeaveUNOCC1
Return/OCC2
Sleep/UNOCC2
6 AM
8 AM
6 PM
10 PM
6 AM
8 AM
6 PM
10 PM
6 AM
8 AM
6 PM
10 PM
70˚F (21˚C)
62˚F (17˚C)
70˚F (21˚C)
62˚F (17˚C)
70˚F (21˚C)
62˚F (17˚C)
70˚F (21˚C)
62˚F (17˚C)
70˚F (21˚C)
62˚F (17˚C)
70˚F (21˚C)
62˚F (17˚C)
75˚F (24˚C)
83˚F (28˚C)
75˚F (24˚C)
78˚F (26˚C)
75˚F (24˚C)
83˚F (28˚C)
75˚F (24˚C)
78˚F (26˚C)
75˚F (24˚C)
83˚F (28˚C)
75˚F (24˚C)
78˚F (26˚C)
CLOCK SET
MORN RECOV
PROGRAM
TIME PERIOD
ANY KEY ON
PHONE NUM
AUTO
Select GAS for systems that
control the fan during a call for
heat.
Select ELEC to have the
thermostat control the fan during
a call for heat.
Fan
Operation
GAS
or
ELEC
GAS
GAS
FAN SET