
User`s guide


4) Press and hold the Start/Stop and Up buttons together, simultaneously,
concurrently, and at the same time, on the T-Max® 3A until a”.1” appears
on the display. This should take about 5-6 seconds. Release the buttons.
2) Press and hold the Start/Stop and Up buttons simultaneously on the T-
Max® 3A until a .1 appears on the display. This should take 5-6 seconds.
Release the buttons.
5)
Press the Start/Stop button on the display. A flashing number will
appear. This is the address that the timer currently has programmed. (If it
is a new timer, it will probably show a 5.2 all flashing – press the Up Arrow
button counting up 5.3, 5.4, 5.5, then the counter starts over at .0, .1, etc. In
most cases, counting up from 5.2 is easier than counting down.)
3) Press the Up or Down buttons until the parameter number that you want
is displayed.
4) Press the Start/Stop button to see the current value for that parameter.
6) Press the Up or Down button until the desired address is displayed.
The Display will show a number with a period in the lower center of
the display. The numbers will stop flashing and stay illuminated. The
number shown is the current value for that parameter.
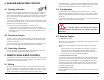
If you have less than 100 beds - Make
sure you have a
solid
period,
flashing
number.
For Lamp Hours, Session Counts, etc. the value displayed can be as
high as 9999. To display this value, the T-Max® 3A will flash two
numbers-three times, then two numbers-three times, pause, two
numbers-three times, two numbers-three times, pause, etc. For
example, if you are checking lamp hours (Parameter 6) and the display
flashes the numbers 53 three times, then 14 three times, pauses then
repeats, then the total lamp hours stored in that T-Max® 3A is 5314.
Note: When setting the addresses, remember these three rules:
5)
Press the Up or Down button to change the parameter to the desired
value.
• Set each T-Max® 3A to a unique address.
• Do not set any T-Max® 3A to address 00.
If you want to clear the value for that parameter, press the Up and
Down buttons at the same time until the display shows “.0”.
• If the period is flashing, you are over address 100.
7)
Once the desired address is displayed, press and release the Start/Stop
button. A solid .1 will be displayed.
6) Press the Start/Stop button.
8) Press and hold both the Up and Down buttons until a 0 is displayed.
Repeat Steps 2-8 for each T-Max® 3A that you are manually addressing.
The display will show the parameter number you just changed and a
solid period in the lower center of the display. You may now change
another parameter by pressing the Up and Down buttons until the
parameter you want displayed. Repeat Steps 2-4.
2.1 Setting Parameters on the T-Max® 3A
7) To exit the Parameter mode and make the T-Max® 3A available for the
next session, press and hold both the Up and Down buttons until the display
shows a 0 with no periods.
Note: If you are using a T-Max® Mgr/Pro and multiple T-Max® 3As,
remove power from the T-Max® Mgr/Pro then unplug the power to each T-
Max® 3A. Keep power removed from the T-Max® Mgr/Pro until all
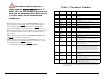
parameter changes are complete. Refer to Table 1, (page 8) for Parameter
Numbers and Descriptions.
1)
Apply power to the T-Max® 3A.
T-Max® Manager/Pro and T-Max® 3A User’s Guide Page 5 T-Max® Manager/Pro and T-Max® 3A User’s Guide Page 6