
User`s guide
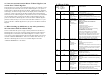

8 TROUBLE SHOOTING
The T-Max® Series has been designed for years of trouble free service.
However, if a problem does arise, please follow these trouble shooting steps
before calling technical support.
1
) No Lights Illuminated on the T-Max® Mgr/Pro.
Make sure that the transformer is plugged into the wall and into the power input
on the T-Max® Mgr/Pro. Try plugging the T-Max® Mgr/Pro into a different
outlet. If you are using a surge suppresser or UPS backup system, try plugging
the T-Max® Mgr/Pro directly into the wall outlet. Check the circuit breaker in
your building to make sure it is on. Use a voltmeter to measure the voltage on
the
transformer on the end which connects to the T-Max® Mgr/Pro.
2)
The T-Max® Mgr/Pro does not show any beds, and the VFD
display shows nothing
.
This is an indication the program loaded in the T-Max® Mgr/Pro is lost or has
been corrupted. Download programming from the Adnet 2000 to the T-Max®
Manager Pro or return the manager for repair. Refer to the Adnet 2000 manual
for downloading instructions.
3)
The T-Max® Mgr/Pro does not see any beds
.
Go through the Quick Installation setup in Section 2. Cycle power on the T-
Max® Mgr/Pro. The T-Max® Mgr/Pro will rescan the network. Make sure each
T-Max® 3A has a unique address.
4)
When going through the Quick Installation set-up, when I
press 888 then Enter on the T-Max® Mgr/Pro to set the
addresses, some or all of the T-Max® 3As do not go to 99 and
buzz.
Check the cable between the T-Max® Mgr/Pro and the first T-Max® 3A or
between the T-Max® 3A that is buzzing and the next T-Max® 3A on the daisy
chain that is not buzzing. Replace communication chips in the T-Max® 3A’s
that are not showing a 99 and buzzing.
T-Max® Manager/Pro and T-Max® 3A User’s Guide Page 24
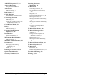
5)
When power is applied to the T-Max® Mgr/Pro, beds 1-5
show on the T-Max® Mgr/Pro, but the rest of my beds do not
show.
Go through the Quick Installation in Section 2. Make sure that power is applied
and modular cables are connected to each T-Max® 3A. Try a new modular
cable between the last T-Max® 3A displayed and the first T-Max® 3A that does
not show on the T-Max® Mgr/Pro in the daisy chain. If you do not have a spare
cable, swap the suspected defective cable with a cable between two T-Max®
3A’s that show on the Mgr/Pro. If the problem follows, the modular cable is
either bad or wired incorrectly. Check the modular cable pin-outs on the
defective cable (refer to Section 12.9, Figure I). If the problem does not follow,
swap the first T-Max® 3A that does not appear on the T-Max® Mgr/Pro in the
daisy chain with one that does. If the problem follows, return the defective T-
Max® 3A for repair. If the problem does not follow, swap the last T-Max® 3A
that appears on the T-Max® Mgr/Pro with one of the other T-Max® 3As that
appears on the T-Max® Mgr/Pro.
6
) The Slave T-Max® Mgr/Pro does not show any beds.
Check and make sure the modular cable is connected to the Slave T-Max®
Mgr/Pro. Recycle power to the Master T-Max® Mgr/Pro. Cycle power to the
Slave T-Max® Mgr/Pro then cycle power to the Master T-Max® Mgr/Pro.
8)
How do I make the T-Max® 3As work as stand-alone
timers?
Remove power from the T-Max® Mgr/Pro. Unplug power from each T-Max®
3A, wait 5 seconds, then plug them back in. On the T-Max® 3A, press the Set
button to set time, and then press the Start/Stop button to start the session.
Power to the T-Max® Mgr/Pro must stay off while the T-Max® 3As are being
used as independent timers.
9)
When I start a session manually, the session time will not
start.
Press the Call/Menu button. The following message will appear: SECURITY #.
Enter your security number for Security Level 1 (See the enclosed Security
Level Sheet). An Asterisk (*) will appear on the lower left corner of the VFD
display. You can then start sessions manually.
T-Max® Manager/Pro and T-Max® 3A User’s Guide Page 23