
User`s guide

T-Max® 3A. Connect the grommets to hold the wires in tight. Plug any
unused holes with the provided plastic plugs. Connect the T-Max® 3A to
the T-Max® Enclosure using the four screws provided with the T-Max®
3A.
7 FIGURES
6.6 ADNET Opto-Isolator (Optional)
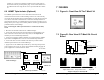
7.1 Figure A - Front View Of The T-Max® 3A
The ADNET Opto-Isolator® is a device that isolates both sides of the
communications between the T-Max® Manager and the rest of the salon. By
converting the data signal from the T-Max® Manager to light, then back to hard
wire, the two sides of the communications connected to the Opto-Isolator are
physically disconnected, yet communication passes through. This helps prevent
damage due to power surges, and remedies problems caused by ground isolation
problems found in some buildings.
6.6.1 Connecting the Adnet Opto-Isolator® in a T-Max® Series Daisy
Chain
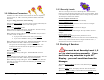
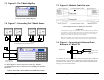
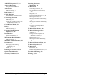
T-Max® 3A
1. Disconnect the modular cable from the T-Max® Manager.
2. Connect the cable that was disconnected from the T-Max® Manager (the
cable connected to the first timer in the daisy-chain) to the Output RJ-22
modular port on the ADNET Opto-Isolator®.
7.2 Figure B - Rear View Of T-Max® 3A Circuit
Board
3. Connect one end of the modular cable that was provided with the ADNET
Opto-Isolator® to Input RJ-22 connector on the ADNET Opto-Isolator®.
4. Connect the other end of the modular cable that was provided with the
ADNET Opto-Isolator® to the T-Max® Manager.
5. Apply Power to the ADNET Opto-Isolator® by connecting both provided
power supplies to the 9-12V AC power input terminals and then plugging the
power supplies into a standard 110VAC outlet.
T
-
Max® Manager
RJ-22 Cables
T
-
Max® 3A
120V AC 120V AC
ADNET O
p
to-
Isolator®
9-12V AC/DC 9-12V AC/DC
Input Output
T-Max® Manager/Pro and T-Max® 3A User’s Guide Page 20
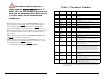
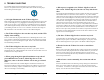
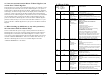
T-Max® 3A Connections
1 2 3 1 2 3 1 2 3
Contact
J100 Jumper Settings
Ext. Start Switch: 2&3 ON
J99 Settings
Sentry: 1-2 ON
TPI: 2&3 ON
Relay
Pwr 9-12V
JP1
IC16C73A
J6
Pin 1
Jumper On Pins 1 and 2 Jumper on Pins 2 and 3 Jumper Off
Jumper Positions for J99 and J100
T-Max® Manager/Pro and T-Max® 3A User’s Guide Page 19