
User`s guide

6 OTHER FEATURES and OPTIONS
6.1 Cool Down Mode
Cool Down mode is used for beds that require a time to cool down before
the next session can be run. High-pressure beds primarily require this.
While the T-Max® 3A is in Cool Down Mode, a session cannot be started
until the cool down time has expired.
To enable Cool Down Mode, set parameter 13 to the time in minutes you
want the cool down time to last. Setting parameter 13 to 0 disables Cool
Down Mode.
After the session ends, the T-Max® 3A will go into Cool Down Mode. A
single period will be displayed on the T-Max® 3A and T-Max® Mgr/Pro
will show a flashing green light for the duration of the cool down time. The
T-Max® Mgr/Pro display will show “Cool”, with the time counting down.
If “Clean Room” is also enabled, the clean room will be displayed. The T-
Max® Mgr/Pro display will show “Dirty” and the light for that room will
be solid red, but the Cool Down time will be shown counting down. If the
room is cleaned before the cool down time has elapsed or if the “Clean
Room” is disabled, a solid period will be displayed on the lower center on
the T-Max® 3A. You cannot start a session until the cool down time has
elapsed.
6.2 T-Max® Monitor/Plus
The T-Max® Monitor/Plus allows the salon owner to check the status of all
the beds at any place in the salon.
The T-Max® Monitor/Plus has 16 LED displays showing remaining
session time. Multiple T-Max® Monitor/Plus’ can be connected for large
salons. The T-Max® Monitor/Plus can be connected anywhere in the T-
Max® chain. You can connect them at the front desk if you want to glance
over and see remaining session time, or you can place them anywhere else
in the salon so the cleaning staff can see how much session time is
remaining for each room. Contact your dealer for more information.
6.3 High Pressure (Single-Side) Beds
The T-Max® 3A has an alarm that will beep for 10 seconds half way
through the session informing the customer to turn over. If you are not
using a T-Max® Mgr/Pro, this option must be enabled at the factory.
T-Max® Manager/Pro and T-Max® 3A User’s Guide Page 18
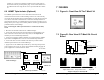
6.4 Installing External Speaker (Optional)
If the speaker on the T-Max® 3A is not loud enough, a T-Max® Speaker
that connects to the T-Max® 3A is available. To install the T-Max®
Speaker, do the following: (see Figure B Section 7.2 for J6 location and J99
and J100 locations and jumper positions).
1) Connect the cable on the T-Max® Speaker to the J6 on the back of the
T-Max® 3A.
2) Place the Jumper on J100 to pins 2 and 3 on the back of the T-Max®
3A.
3) Set Parameter 20 to a 1.
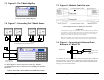
6.4 Connecting a Remote Push Button to the T-
Max® 3A (Optional)
A T-Max® 3A can be used to control another T-Max® 3A. This is ideal
for small salons who are not using a T-Max® Manager. Two T-Max® 3As
are required for remote single bed control.
A remote push button can be connected to the T-Max® 3A to start sessions.
You can get an external start kit from your distributor that provides a 50’
cable with a push button and a wall mounting plate.
Connect the wires from your external push button circuit to the “EXT
START” screw terminals on the back of the T-Max® 3A. Place a jumper
on J100-pins 2 & 3 (See Figure B, Section 7.2 for jumper locations. See
Figure I on page 21 for an example of an External Push Button circuit).
When the external push button is pressed a contact closure is applied to the
Ext. Start screw terminals on the back of T-Max® 3A.
To start a session, press the Up or Down button on the T-Max® 3A to set
the time, then when ready, press the remote push button instead of the
Start/Stop button on the T-Max® 3A.
6.5 T-Max® Enclosure (Optional)
The T-Max® Enclosure allows the T-Max® to either be hung on a wall or
set on a table. Tear drop holes on the back of the T-Max® Enclosure allow
for easy installation.
The T-Max® Enclosure is slanted to make the T-Max® 3A push buttons
and display easy to access and read. The T-Max® 3A can fit so that it is
slanted up or down. Slanted up is ideal for setting the timer on a desk.
Slanted down is great for hanging the T-Max® 3A on a wall.
To install the T-Max® 3A to the T-Max® Enclosure, first run the cable
through the wire holes on the T-Max® Enclosure and connect them to the
T-Max® Manager/Pro and T-Max® 3A User’s Guide Page 17