
User`s guide


4 IN-ROOM SINGLE BED CONTROL
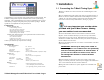
4.1 Starting a Session
If you are using a T-Max® Mgr/Pro and you want to use the T-Max® 3As
manually, you must unplug power from the T-Max® Mgr/Pro, unplug
power from all the T-Max® 3A’s, then plug the timers back in. Power must
stay removed from the T-Max® Mgr/Pro while the T-Max® 3A is being
used independently.
1) Press the Up and Down button on the T-Max® 3A until the session time
is displayed. If the display shows a 0, and you want to count down from the
maximum time, press the Down button.
2) Press and release the Start/Stop button to start the session.
If a delay other than 0 is programmed, the delay time will begin
counting down. A period on the lower right corner of the display will
flash rapidly. When the session starts, the period will flash at a once
per second rate.
4.2 Pausing a Session
To pause a session, press the Start/Stop button. The flashing period on the
lower right corner of the display will stop flashing. The session time will
continue to count down.
To restart the session, press the Start/Stop button on the T-Max® 3A. The
period on the lower right corner of the display will resume flashing.
4.3 Canceling a Session
To cancel a session, press the Start/Stop button to pause the session then
press the Up button. The display will show a solitary 0.
5 REMOTE SINGLE BED CONTROL
A T-Max® 3A can be used to control another T-Max® 3A. This is ideal for
small salons that are not using a T-Max® Mgr/Pro. Two T-Max® 3As are
required for remote single bed control.
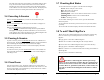
5.1 Wiring
Place one T-Max® 3A in the tanning room and one at the desired remote
location. Connect the 9V @ 200mA power supply to the “power in” on the
back of each T-Max® 3A. Plug each power supply into a 120VAC outlet.
Connect the T-Max® 3A in the tanning room to the tanning bed as
described in Section 1.1. Run the provided modular cable from the tanning
room to the remote T-Max® 3A. Connect the modular cable to one of the
RJ-22 ports on each T-Max® 3A (it does not matter which one.)
T-Max® Manager/Pro and T-Max® 3A User’s Guide Page 16
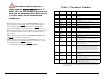
5.2 Configuration
Set the address on the T-Max® 3A in the tanning room to “1”, and the
address on the T-Max® 3A at the front desk to “0” as described in Section
2.0. Disconnect the modular cables when setting the addresses on both T-
Max® 3As.
Use the Front Desk T-Max® 3A to set the Delay. Any delay time set on the
T-Max® 3A in the tanning room will be ignored.
Note: The max. time is controlled by the T-Max®
3A in the tanning room and not by the T-Max® 3A at the
front desk.
5.3 Session Control
5.3.1 Starting a Session
1)
Press the Up or Down button on the T-Max® 3A at the front desk until
the session time is displayed.
2) Press the Start/Stop button on the front desk T-Max® 3A to start the
session.
If a delay other than 0 is set, the delay will count down. A period on
the lower right corner of the display will flash rapidly. When the
session starts, the period will flash at once per second rate. If there is
no delay entered, the session will start immediately.
5.3.2 Pausing During the Session
To pause the session, press the Start/Stop button on the T-Max® 3A in the
tanning room. The flashing period on the lower right corner of the display
will stop flashing and stay illuminated. The session time will continue to
count down and reflect the remaining session time. To restart the session,
press the Start/Stop button on the T-Max® 3A in the tanning room. The
period will continue flashing.
5.3.3 Canceling a Session
Press the Start/Stop and Up buttons on the T-Max® 3A at the front desk at
the same time.
T-Max® Manager/Pro and T-Max® 3A User’s Guide Page 15