INSTRUCTIONS FOR USE Pro-Ject Essential III Flexi-Range
Dear Music Lover, Congratulations and thank you for choosing Pro-Ject Audio Systems record player. Your Essential III turntable has been handcrafted and rigorously tested by skilled technicians to give you years of enjoyable, trouble free service. Please contact your dealer if you require additional assistance. Important: Your turntable was shipped partially disassembled in order to avoid damage to sensitive parts.
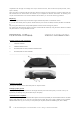
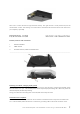
ESSENTIAL III FLEXI-RANGE GENERAL INFORMATIONS Controls, features and connections 1 PLATTER & FELT MAT 2 DRIVE PULLEY 3 DRIVE BELT 4 TONEARM COUNTERWEIGHT 5 TONEARM LIFT LEVER 6 TONEARM REST 7 TONEARM TUBE 8 HEADSHELL WITH FINGER LIFT AND PRE-MOUNTED ORTOFON OM10 9 ANTI-SKATING WEIGHT WITH WIRE 10 ANTI-SKATING WEIGHT SUPPORT HOOP 11 ANTI-SKATING STUB WITH ADJUSTMENT SCALE 12 LID 13 LID HINGES 14 HINGE FASTENERS 15 POWER SUPPLY SOCKET (4a) DOWNFORCE SCALE (66) REMOVABLE TRANSPO
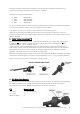
SETUP 1. Platter and drive belt installation Please remove brown paper insert which holds the platter in transport position. Put the felt mat on the top of the platter. Install the drive belt as shown in the following illustration. 2. Cartridge installation, stylus exchange * If you purchased this turntable in a package that included the cartridge, this has already been done for you. 4 © Pro-Ject Audio Systems · Pro-Ject Essential I I I F l e x i - R a n g e · Revision 22.04.
Install the cartridge into the aluminium headshell, using the appropriate hardware included with your cartridge. All cartridges with half inch mounting holes can be fitted. Connect the cartridge as indicated below: • • • • White Red Green Blue left channel L+ right channel R+ right channel Rleft channel L- For correct cartridge alignment, use the two-point cartridge alignment protractor provided with your Essential III accessories. If unfamiliar with two-point setup, please refer to your dealer.
5. Azimuth setting The cartridge needle must be perpendicular to the record in order to trace the groove wall modulations correctly. The azimuth (angle) is precisely set by the factory. In the event that you need to modify this setting, however, follow the instructions below. Loosen the small azimuth screw, again using the 1.5 mm allen key. DO NOT REMOVE THE AZIMUTH SET SCREW COMPLETELY! Loosen the screw just enough to be able to gently rotate the arm tube and set the azimuth to the correct position.
To play 45 r.p.m., put the drive belt over the larger diameter part of the motor pulley. To revert to 33 r.p.m. repeat the proceedings using the smaller step on the pulley. Connection to the amplifier The record player has a captive tonearm signal lead for connection to the amplifier. Use the Phono input on your amplifier. Make sure that the phono input offers correct matching and amplification for the type of cartridge used. Line inputs (such as CD, Tuner, Tape or Video) are not suitable.
amplification for the type of cartridge used. If you choose Line OUT, than use the Line inputs (like CD, Tuner, Tape or Video). Take care about connecting the left and right channel correctly. The right channel is usually marked red, the left channel black or white. Check the manual of your amplifier for relevant information. An earthing wire may be connected to the screw terminal between the sockets if you encounter humming problems.
Take care to connect the left and right channels correctly. The right channel is usually marked red, the left channel black or white. The earthing wire of the tonearm lead should be connected to the earth terminal on your amplifier (if provided).
If your amplifier does not have an input suitable for phono cartridges you will require a separate phono amplifier stage for MM or MC cartridges which is then connected between the record player and a free line level input of the amplifier.
Take care to connect the left and right channels correctly. The right channel is usually marked red, the left channel black or white. The earthing wire of the tonearm lead should be connected to the earth terminal on your amplifier (if provided). The digital output: The record player has digital S/PDIF output through optical connector with switch between 24bit/48kHz and 24bit/96kHz. Use the optical input on your amplifier, AV receiver or D/A converter. Optical cable is not supplied with the record player.
Connection to the amplifier The record player has gold plated female RCA phono sockets (14) and possibility to choose between Phono and LINE output. With LINE OUT on, you can use a line input (such as AUX, CD, Tuner, Tape or Video) on your amplifier. With PHONO OUT on, you can use your own phono pre-amplifier (sometimes labelled gram, disc or RIAA). Take care to connect the left and right channels correctly. The right channel is usually marked red, the left channel black or white.
Switching on and off Pressing the ON/OFF switch alternately starts or stops the motor. Changing replay speed To play 45 r.p.m., put the drive belt over the larger diameter part of the motor pulley. To revert to 33 r.p.m. repeat the proceedings using the smaller step on the pulley. Connection to the amplifier The record player has two possible outputs – Line OUT with integrated preamplifier and Phono OUT for connection to the preamplifier.
Output voltage typically Input impedance Noise floor RIAA-equalisation curve accuracy THD: 500mV/1kHz at 5mV/1kHz 47kohms/120pF 88dB (A weighted) 20Hz-20kHz / max. 0,5d <0,05% Technical specifications Pro-Ject Essential III Flexi-Range / Pro-Ject 8.6 Nominal speeds Speed variance Wow and flutter Signal to noise Effective tonearm mass Effective tonearm length Overhang Power consumption Outboard power supply Dimensions (W x H x D) Weight Dimensions packaging (W x H x D) Weight incl. packaging 33/45 r.p.m.
Potential incorrect use and fault conditions Pro-Ject turntables are manufactured to the highest standards and undergo strict quality controls before leaving the factory. Faults that may possibly occur are not necessarily due to material or production faults but can sometimes be caused by incorrect use or unfortunate circumstances. Therefore the following list of common fault symptoms is included. The platter doesn't turn although the unit is switched on: The unit is not connected to the mains power supply.
© Pro-Ject Audio Systems · Pro-Ject Essential I I I F l e x i - R a n g e · Revision 22.04.
© Pro-Ject Audio Systems · Pro-Ject Essential I I I F l e x i - R a n g e · Revision 22.04.