
User`s manual


912
Turn on the console.
Note: The console requires four 1.5V “D” batteries.
If you have not installed batteries, see assembly
step 5 on page 6.
To turn on the console, press the On/Reset button
or begin pedalling.
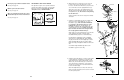
Select the manual mode.
Each time the
console is
turned on, the
manual mode
will be select-
ed. If a workout
program has
been selected,
select the manual mode by pressing the Program
button repeatedly until the upper right corner of
the display is blank.
Begin pedalling and adjust the resistance of
the elliptical crosstrainer.
As you pedal, adjust the resistance of the ellipti-
cal crosstrainer as desired by pressing the + and
– buttons. There are ten resistance levels; level
10 is the most challenging. Note: After the but-
tons are pressed, it will take a few seconds for the
selected setting to be reached.
Follow your progress with the feedback modes
and the left pace indicator.
When the con-
sole is turned
on, the scan
mode will be
selected. As
you pedal, the
display will
show your cur-
rent speed, the elapsed time, the distance that
you have pedalled, the current resistance level,
and the approximate numbers of calories and of
fat calories you have burned (see FAT BURNING
on page 16). In addition, your heart rate will be
shown when you use the handgrip pulse sensor
or the optional chest pulse sensor. Note: Each
time the resistance level changes, the console
will show the resistance level for six seconds.
When a program is selected, the display will
show the time remaining in the program instead
of the elapsed time.
If desired, you can select a single feedback mode
for continuous display. Press the Display button
repeatedly until only the MPH (or Km/H), Time,
Miles (or Kms), Resist., Cals., or Fat Cals. indica-
tor appears in the display. Make sure that the
Scan indicator does not appear.
In addition, the left pace indicator will appear in the
display. As you increase or decrease your pace,
the indicator will increase or decrease in height.
Measure your heart rate if desired.
Note: If you wear the optional chest pulse
sensor and hold the handgrip pulse sensor at
the same time, the console may not display
your heart rate accurately.
Note: If there
are thin sheets
of plastic on
the metal con-
tacts on the
handgrip pulse
sensor, peel off
the plastic.
To use the handgrip pulse sensor, place your
hands on the metal contacts. Your palms must be
on the upper contacts and your fingers must be
touching the lower contacts. Avoid moving your
hands. When your pulse is detected, the heart-
shaped indicator in the display will flash each
time your heart beats. After a moment, two dash-
es (– –) will appear and then your heart rate will
be shown.
5
4
3
2
1
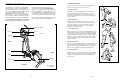
HOW TO USE THE MANUAL MODE
This corner
should be blank
Metal
Contacts
HOW TO USE THE ELLIPTICAL CROSSTRAINER
HOW TO ADJUST THE PEDALS AND THE UPRIGHT
The motion of the elliptical crosstrainer is determined
by the positions of the pedals and the upright. Follow
the instructions below to adjust the motion of the ellip-
tical crosstrainer.
To adjust the
pedals, first
remove the
pedal knob
beneath each
pedal. Slide the
pedals forward
or backward and
reattach each
pedal using one
of the five holes
in the pedal and
one of the three
holes in the
pedal spring.
Make sure that
both pedals are
in the same position.
To adjust the upright, first turn the upright knob counter-
clockwise a few turns to loosen it. Next, pull the knob,
raise or lower the upright to the desired height, and
then release the knob. Move the upright up and
down slightly until the pin on the knob snaps into
one of the four adjustment holes in the upright.
Make sure that the upright is not resting on top of
the pin. Then, turn the knob clockwise until it is tight.
HOW TO USE THE HANDLEBARS
The handlebars
are designed to
add upper-body
exercise to your
workouts. As you
exercise, push
and pull the han-
dlebars to work
your arms, shoul-
ders, and back.
To exercise only
your lower body,
hold the handgrip pulse sensor as you exercise.
HOW TO EXERCISE ON THE ELLIPTICAL
CROSSTRAINER
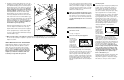
To mount the
elliptical cross-
trainer, hold the
handgrip pulse
sensor and step
onto the pedal
that is in the
lowest position.
Then, step onto
the other pedal.
Push the ped-
als until they
begin to move
with a continu-
ous motion.
Note: The
pedal disks
can turn in
either direc-
tion. It is rec-
ommended
that you move the pedal disks in the direction
shown by the arrow; however, for variety, you may
turn the pedal disks in the opposite direction.
To dismount the elliptical crosstrainer, wait until the
pedals come to a complete stop. Note: The elliptical
crosstrainer does not have a free wheel; the ped-
als will continue to move until the flywheel stops.
When the pedals are stationary, step off the highest
pedal first. Then, step off the lowest pedal.
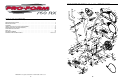
Pedals
Pedal Disk
Handgrip
Pulse Sensor
Handlebars
Handgrip
Pulse
Sensor
Pedal
Knob
Upright
Knob
Pedal
Spring
Upright
Pedal