
User`s manual


138
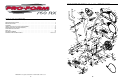
10. Make sure that all parts of the elliptical crosstrainer are properly tightened. Note: Some hardware may
be left over after assembly is completed. To protect the floor or carpet from damage, place a mat under the
elliptical crosstrainer.
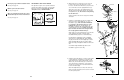
9. Identify the Left Rear Spring Bracket (12) on the left
Pedal Spring (11). Apply a light coat of grease inside of
the Pedal Arm Bushings (37) in the Left Rear Spring
Bracket and to the axle on the left Disc Crossbar (16).
Slide a Spring Spacer (63) onto the axle; make sure
that the Spring Spacer is turned so the flat side is
facing the elliptical crosstrainer. Next, slide the Left
Rear Spring Bracket onto the axle. Slide a Spring
Bracket Washer (35) onto an M10 x 27mm Patch
Screw (40), and tighten the Patch Screw into the axle.
Next, hold the lower end of the left Handlebar Leg (5)
inside of the Front Spring Bracket (76) on the left Pedal
Spring (11). Apply grease to an M10 Bolt Set (74).
Attach the Handlebar Leg to the Front Spring Bracket
with the Bolt Set. Do not overtighten the Bolt Set;
the Handlebar Leg must pivot freely.
Attach the right Pedal Spring (not shown) to the right
side of the elliptical crosstrainer in the same way.
Tighten the M6 x 25mm Screw (7) into the Upright (2).
Turn the Upright Knob (43) clockwise until it is tight.
See step 7. Tighten the M8 x 45mm Button Bolts (50)
in the Handlebar Legs (5).
37,
Grease
Grease
74
11
11
40
35
63
12
74
5
43
7
2
76
For the most accurate heart rate reading, continue
to hold the handgrips for about 15 seconds. Note:
When you first hold the handgrips, the display will
show your heart rate continuously for 15 seconds.
The display will then show your heart rate along
with the other feedback modes.
When you are finished exercising, the console
will automatically turn off after a few minutes.
If the pedals are not moved and the console but-
tons are not pressed for a few minutes, the con-
sole will automatically turn off to conserve the
batteries.
Turn on the console.
See step 1 on page 12.
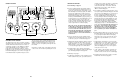
Select one of the six preset programs.
Each time the
console is turned
on, the manual
mode will be
selected. To
select a preset
program, press
the Program but-
ton repeatedly until the number 1, 2, 3, 4, 5, or 6
appears in the upper right corner of the display.
The profiles on the right side of the console show
how the resistance of the elliptical crosstrainer
and the target pace will change during the pro-
grams. For example, profile number 3 shows that
during program 3, both the resistance and the tar-
get pace will gradually increase during the first
half of the program, and then decrease during the
last half.
Start the program.
To start the program, simply begin pedaling. Each
program consists of either twenty or thirty, one-
minute periods. One resistance setting and one
pace setting are programmed for each period.
(The same resistance setting and/or pace setting
may be programmed for consecutive periods.)
During the program, the resistance of the elliptical
crosstrainer will automatically change as shown
by the applicable profile on the console. If the cur-
rent resistance level is too high or too low, you
can change the resistance level by pressing the +
and – buttons. However, when the current period
of the program is completed, the resistance level
will automatically change if a different resistance
setting is programmed for the next period.
The target pace
settings for the
program will be
shown by the
right pace indica-
tor in the display.
(The left indicator
will show your
actual pedaling pace.) As the right indicator
changes in height during the program, simply
adjust your pace so that both indicators are at the
same height. If your pace is slower than the cur-
rent target pace, the increase arrow will appear in
the display to prompt you to increase your pace; if
your pace is faster than the target pace, the
decrease arrow will appear. Important: The tar-
get pace settings for the program are intended
only to provide a goal. Your actual pace may
be slower than the target pace settings, espe-
cially during the first few months of your exer-
cise program. Make sure to pedal at a pace
that is comfortable for you.
During the program, the display will show the time
remaining in the program. If you continue ped-
alling after the program is completed, the display
will continue to show your exercise feedback.
3
2
1
6
HOW TO USE A PRESET PROGRAM
Increase Arrow
9
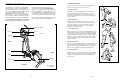
HOW TO MOVE THE ELLIPTICAL CROSSTRAINER
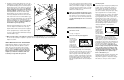
Stand behind the elliptical crosstrainer, hold the Rear
Stabiliser (9) firmly, and lift the elliptical crosstrainer
until it can be moved on the Wheels (22). Carefully
move the elliptical crosstrainer to the desired location
and then lower it. CAUTION: To decrease the possi-
bility of injury, bend your legs and keep your back
straight as you lift the Rear Stabiliser; make sure
to lift with your legs rather than your back.
22
9
16, Grease