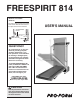
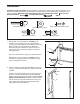
FREESPIRIT 814 Model No. PCTL60070 Serial No. The serial number is found in the location shown below. Write the serial number in the space above for future reference. USER'S MANUAL Serial Number Decal QUESTIONS? As a manufacturer, we are committed to providing complete customer satisfaction. If you have questions, or find that there are missing or damaged parts, we will guarantee you complete satisfaction through direct assistance from our factory.
TABLE OF CONTENTS IMPORTANT PRECAUTIONS . . . . . . . . . . . . . . . . . . . . . . . . . . . . . . . . . . . . . . . . . . . . . . . . . . . . . . . . . . . . . . . . .2 BEFORE YOU BEGIN . . . . . . . . . . . . . . . . . . . . . . . . . . . . . . . . . . . . . . . . . . . . . . . . . . . . . . . . . . . . . . . . . . . . . . .4 ASSEMBLY . . . . . . . . . . . . . . . . . . . . . . . . . . . . . . . . . . . . . . . . . . . . . . . . . . . . . . . . . . . . . . . . . . . . . . . . . . . . . . .
14. Never start the treadmill while you are standing on the walking belt. Always hold the handrails while using the treadmill. 15. The treadmill is capable of high speeds. Adjust the speed in small increments to avoid sudden jumps in speed. 16. To reduce the possibility of the treadmill overheating, do not operate the treadmill continuously for longer than 1 hour. 17. Never leave the treadmill unattended while it is running. Always remove the key when the treadmill is not in use. 18.
BEFORE YOU BEGIN Thank you for selecting the PROFORM® FREESPIRIT 814 treadmill. The FREESPIRIT 814 treadmill combines advanced technology with innovative design to let you enjoy an excellent form of cardiovascular exercise in the convenience and privacy of your home. And when you’re not exercising, the unique FREESPIRIT 814 can be folded up, requiring less than half the floor space of other treadmills. at 1-888-936-4266, Monday through Friday, 9 a.m. until 5 p.m. Eastern Standard Time (excluding holidays).
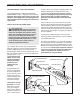
ASSEMBLY Assembly requires two people. Set the treadmill in a cleared area and remove all packing materials. Do not dispose of the packing materials until assembly is completed. Refer to the drawings below to identify the parts used in assembly. Assembly requires the following tools: The included allen wrench and your own phillips screwdriver and adjustable wrench . Handrail Bolt (15)–2 Base Screw/Latch Screw (13)–6 Handrail Washer (16)–2 Handrail Screw (32)–2 1.
3. With the help of a second person, hold the Console Base (6) and the other Handrail (2) near the right Upright (14) as shown. Note: It may be helpful to rest the other side of the Console Base on the left Handrail. 3 Connect the Console Wire Harness (88) to the two plugs on the Upright Wire Harness (26). Refer to the upper inset drawing. Locate the 7 1/2” Wire Ties (10) on the Console Wire Harness (88) and the Upright Wire Harness (26). Slide the Wire Ties against the plugs as shown.
OPERATION AND ADJUSTMENT THE PERFORMANT LUBETM WALKING BELT Your treadmill features a walking belt coated with PERFORMANT LUBETM, a high-performance lubricant. Important: Never apply silicone spray or other substances to the walking belt or the walking platform. They will deteriorate the walking belt and cause excessive wear. HOW TO PLUG IN THE POWER CORD DANGER: Improper connection of the equipment-grounding conductor can result in an increased risk of electric shock.
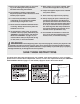
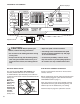
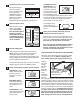
DIAGRAM OF THE CONSOLE Speed Control Clip CAUTION: Before operating the console, read the following precautions. • Do not stand on the walking belt when turning on the power. • Always wear the clip (see the drawing above) while using the treadmill. When the key is removed from the console, the walking belt will stop. 8 Monitor Displays Key • Adjust the speed in small increments. • The training zones marked beside the speed control are general guidelines only. See page 14 for more information.
1 Insert the key fully into the power switch. CALORIES/FAT CALArrows ORIES display—This display shows the approximate numbers of calories and fat calories you have burned. (See FAT BURNING on page 14 for an explanation of fat calories.) Every seven seconds, the display will change from one number to the other. Arrows in the display will indicate which number is currently shown. Inserting the key will not turn on the displays.
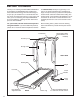
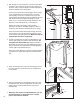
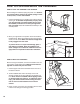
HOW TO FOLD AND MOVE THE TREADMILL HOW TO FOLD THE TREADMILL FOR STORAGE Before folding the treadmill, unplug the power cord. Caution: You must be able to safely lift 45 pounds (20 kg) in order to raise, lower, or move the treadmill. 1. Hold the treadmill with your hands in the locations shown at the right. To decrease the possibility of injury, bend your legs and keep your back straight. As you raise the treadmill, make sure to lift with your legs rather than your back.
HOW TO LOWER THE TREADMILL FOR USE 1. Hold the upper end of the treadmill with your right hand as shown. Using your left thumb, press the storage latch and hold it. Pivot the treadmill until the frame and foot rail are past the storage latch. 2. Hold the treadmill firmly with both hands, and lower the treadmill to the floor. To decrease the possibility of injury, bend your legs and keep your back straight.
TROUBLE-SHOOTING AND MAINTENANCE Most treadmill problems can be solved by following the simple steps below. Find the symptom that applies to your treadmill and follow the steps listed. If further assistance is needed, please call our Customer Service Department at 1-888-936-4266, Monday through Friday, 9 a.m. until 5 p.m. Eastern Standard Time (excluding holidays). 1. SYMPTOM: THE POWER DOES NOT TURN ON a.
4. SYMPTOM: THE WALKING BELT SLOWS WHEN WALKED ON a. Use only a CUL-listed surge protector, rated at 15 amps, with a 14-gauge cord of five feet or less in length. b. If the walking belt is overtightened, treadmill performance may decrease and the walking belt may be permanently damaged. Remove the key and UNPLUG THE POWER CORD. Using the allen wrench, turn both rear roller adjustment bolts counterclockwise, 1/4 of a turn.
CONDITIONING GUIDELINES WARNING: Before beginning this or any exercise program, consult your physician. This is especially important for individuals over the age of 35 or individuals with pre-existing health problems. The following guidelines will help you to plan your exercise program. Remember—these are general guidelines only. For more detailed exercise information, obtain a reputable book or consult your physician.
Training Zone Exercise After warming up, increase the intensity of your exercise until your pulse is in your training zone for 20 to 60 minutes. (During the first few weeks of your exercise program, do not keep your pulse in your training zone for longer than 20 minutes.) Breathe regularly and deeply as you exercise—never hold your breath. to cool down. This will increase the flexibility of your muscles and will help to prevent post-exercise problems.
REMOVETHIS THIS EXPLODED PART LIST/EXPLODED REMOVE DRAWING FROM THE MANUAL! ANDDRAWING PART LIST FROM THE MANUAL 34 Save this EXPLODED DRAWING and PART LIST for future reference. Note: Specifications are subject to change without notice. For information about ordering replacement parts, see page 1of the User’s Manual.
PART LIST—Model No. PCTL60070 Key No. Qty.
71 16 74 32 71 72 73 1 75 16 31 89 3 64 63 47 76 62 2 5 66 22 13 13 6 68 47 35 46 27 78 39 69 35 66 8 35 65 5 35 39 7 67 62 77 35 64 63 46 EXPLODED DRAWING—Model No. 831.
61 15 R1097A 4 35 10 14 17 9 26 11* 88 15 16 12 28 19* 18 13 29 20 21 41 25 16 37 30 38 77 45 39 87 86 39 30 35 83 49 82 22 84 24 23 85 77 46 63 55 16 16 81 39 80 34 45 79 44 33 46 35 77 43 70 35 47 41 42 34 51 35 47 47 4 48 39 36 38 35 35 47 58 59 50 16 37 91 30 46 40 30 52 30 35 61 36 53 60 91 57 22 30 54 56 90 30 36 36 91 91 30
R1197A EXPLODED DRAWING—Model No. PCTL60070 71 16 74 32 71 72 73 1 75 16 31 89 3 64 63 47 76 62 2 5 66 22 13 13 6 68 47 35 46 27 78 39 69 35 66 8 35 65 5 35 39 7 67 62 77 35 64 63 46 EXPLODED DRAWING—Model No. 831.
CUSTOMER RECORD Model No.: Serial No.
ORDERING REPLACEMENT PARTS To order replacement parts, call our Customer Service Department toll-free at 1-888-936-4266, Monday through Friday, 9 a.m. until 5 p.m EST (excluding holidays). When ordering parts, please be prepared to give the following information: • The MODEL NUMBER OF THE PRODUCT (PCTL60070). • The NAME OF THE PRODUCT (PROFORM® FREESPIRIT 814 treadmill). • The SERIAL NUMBER OF THE PRODUCT (see the front cover of this manual).
LIMITED WARRANTY ICON OF/DU CANADA INC., (ICON), warrants this product to be free from defects in workmanship and material, under normal use and service conditions, for a period of ninety (90) days from the date of purchase. This warranty extends only to the original purchaser. ICON's obligation under this warranty is limited to replacing or repairing, at ICON's option, the product at one of its authorized service centers.