
Installation and Operating Instructions


5
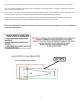
Step 2 - Check the battery pack with a volt meter to determine which two posts provide the entire battery pack voltage.
Step 3 - The cable leading from the battery pack to the Battery Fuel Gauge comes in two parts. Connect the part with the
ring terminals to the batteries first.
Step 4
–
After confirming that the connections to the battery pack are correct, “mate” that cab
le with the cable that comes
from the gauge using the JST Connector Tab and housing that are already attached to the cables.
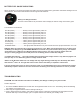
Once you connect your PCS Battery Fuel Gauge, the gauge will begin working automatically. State of charge will be
displayed by illumination of the Light Emitting Diodes (LEDS) located on the front of the unit.
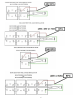
Follow the instructions below for the proper order of connection and how to connect to different
battery configurations: