Safety, Installation and Operating Instructions Instructions importantes concernant la sécurité Manual for the following Battery Fuel Gauge models: BFGOV12V, BFGOV24V, BFGOV36V, BFGOV48V, BFGOV64V and BFGOV72V 06/23/20-70326 IMPORTANT NOTICE: Please save and read these safety, operating, and installation instructions before installing or using your Pro Charging Systems (PCS) product. Contact technical support at PCS with any product, installation, or service questions (800.742.2740).
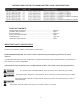
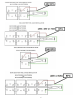
INSTRUCTIONS FOR THE FOLLOWING BATTERY PACK CONFIGURATIONS: TABLE OF CONTENTS Important Safety Instructions ....................................................................... Pages 2-3 Installation and Preparation ......................................................................... Page 4 General Operation ....................................................................................... Pages 4-6 Battery Fuel Gauge Indications… ...............................................................
PERSONAL SAFETY PRECAUTIONS Always read all instructions before using your product! 1. Wear complete eye protection and clothing protection. Avoid touching eyes while working near battery. Have plenty of fresh water and soap nearby in case battery acid contacts skin, clothing, eyes, or other surfaces. If battery acid contacts skin or clothing, wash immediately with soap and water. If acid enters eye, immediately flood eye with running cold water for at least 10 minutes and seek medical attention promptly.
13. Check for damaged parts. Before using any PCS product, carefully check any part that appears damaged to determine that it will operate properly and perform its intended function. Check for broken parts and any other condition that may affect proper operation. Any part that is damaged should be properly repaired or replaced by a qualified technician. Do not use the product if any part does not operate properly. 14. Replacement parts and accessories.
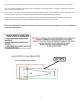
Step 2 - Check the battery pack with a volt meter to determine which two posts provide the entire battery pack voltage. Step 3 - The cable leading from the battery pack to the Battery Fuel Gauge comes in two parts. Connect the part with the ring terminals to the batteries first. Step 4 – After confirming that the connections to the battery pack are correct, “mate” that cable with the cable that comes from the gauge using the JST Connector Tab and housing that are already attached to the cables.
BATTERY FUEL GAUGE INDICATIONS When your Battery Fuel Gauge is activated, the battery fuel gauge provides battery pack status information utilizing three red LED indicators, three amber LED indicators and three green LED indicators. Battery Fuel Gauge Indicators A total of 9 LED indicators are provided in order to display the state of charge of the battery pack. The indications are as follows: 9th LED (amber) ...................... Battery Pack is approximately 100% full 8th LED (amber) ..................
PROBLEM: No LED indicators illuminated on Battery Fuel Gauge. Solution Sequence: 1. Confirm that wires are connected properly to the battery pack. 2. Check for corrosion on the battery post. Corrosion can cause a bad connection 3. Call technical support for further assistance (800.742.2740). PROBLEM: After charging the battery pack, the 12th LED does not illuminate, but a lower light does. Solution Sequence: 1.
RF Exposure Statement This equipment complies with the FCC RF radiation exposure limits set forth for an uncontrolled environment. This equipment should be installed and operated with a minimum distance of 20cm between the radiator and any part of your body.
LIMITED WARRANTY Pro Charging Systems, LLC (PCS) makes this Limited Warranty only to the original retail purchaser. PCS warrants this Battery Fuel Gauge for one year from the date of retail purchase against defective materials and/or workmanship. If such defects should occur, this unit will either be repaired or replaced at the discretion of the manufacturer.