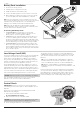
® 36-INCH SELF-RIGHTING DEEP-V BRUSHLESS RTR Battery and Charger Not Included Scan the QR code and select the Manuals and Support quick links from the product page for the most up-to-date manual information. Scannen Sie den QR-Code und wählen Sie auf der Produktseite die Quicklinks Handbücher und Unterstützung, um die aktuellsten Informationen zu Handbücher.
EN NOTICE All instructions, warranties and other collateral documents are subject to change at the sole discretion of Horizon Hobby, LLC. For up-to-date product literature, visit www.horizonhobby.com or www.towerhobbies.com and click on the support or resources tab for this product.
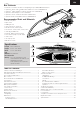
EN Box Contents • • • • • • Pro Boat® Sonicwake® V2 36-Inch Self-Righting Deep V RTR (PRB08032V2T1/T2) Spektrum™ Firma Smart 120A Brushless Marine ESC 3–6S (SPMXME1120) Spektrum™ SR315 DSMR® 3-Channel Sport Receiver (SPMSR315) Spektrum™ 9KG Waterproof Servo (SPMS605) Spektrum™ SLT3™ 3-Channel Transmitter (SPMSLT350) Spektrum Firma 1900KV Marine Motor (SPMXMM3300) Recommended Tools and Materials • • • • • • • • • • • • Needle nose pliers Paper towel Rubbing alcohol Open-end wrench: 10mm (2) Nut driver: 4
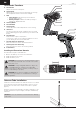
EN Transmitter Functions A A. Throttle Trim Adjusts the throttle neutral point B. Steering Trim Adjusts the steering center point. Normally, the steering trim is adjusted until the vehicle tracks straight. C. LED • Solid red lights: Indicates the power is ON and adequate battery power • Flashing red lights: Indicates the battery voltage is critically low. Replace batteries D. Steering Wheel E. Throttle/Brake F. Steering Rate On-The-Fly knob for travel adjustment on the steering G.
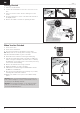
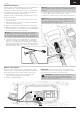
EN Battery Pack Installation 1. 2. 3. 4. 5. Loosen the 4 canopy screws. Carefully lift the canopy from the hull. Install the batteries in the battery tray. Connect the battery packs to the ESC power connectors. Before placing your boat in the water, secure the canopy on the hull. Apply clear tape (DYNM0102), if desired. TIP: Place the canopy flat onto the hull and secure the two front screws simultaneously. Then secure the two rear screws simultaneously.
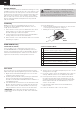
EN Getting Started 1. Power on the transmitter. 2. Connect the two batteries to the IC5® connectors on the ESC. 3. Power on the ESC switch. The ESC arming tones will sound. 4. Test the transmitter’s control of the boat with the boat on the display stand. 5. Remove the rudder cover before operating the boat. 1 50/75 /10 0 TH/LIM 2 TH/R X2 3 ST/R 4 ST TH S/R STATUS A B When You Are Finished 1 1. Power off the ESC. 2. Power off the transmitter. 3. Disconnect and remove the battery from the boat.
EN Boating Tips During the first run, we recommend calm wind and water conditions to ensure that the boat is properly set up. Maximum speeds of 50 MPH/+ can be achieved once you have set up the boat for your specific conditions. Top speed will also be determined by the battery’s ability to efficiently deliver power to the motor via the ESC. Consult local laws and ordinances before choosing a location to pilot your boat. 1. Carefully place the boat in the water. 2.
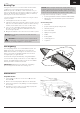
EN Trim Tab Adjustment The trim tabs come installed from the factory to stabilize the boat as it rides across the water. They are set for consistent performance and stability in most water conditions. However, you can tune out chime walk or porpoise effect by adjusting the trim tabs so they are at least 1–1.5 mm below the ride surface of the boat. 5. Tighten the adjustment lock nut to prevent further movement of the adjustment screw. 6.
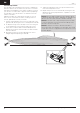
EN Drivetrain Lubrication Always replace the drivetrain parts when they are damaged or show visible wear or injury and damage may result. Lubricating the drive shaft is vital to the life of the drivetrain. The lubricant also acts as a water seal, keeping water from entering the hull through the stuffing tube. Lubricate the drive shaft and all moving parts after every 20 minutes of operation. 1. In the hull, use two 10 mm open-end wrenches to loosen the motor coupler. 2.
EN General Information Receiver Antenna The SR315 receiver features a coaxial antenna design for easy installation in almost any model. The last 1 inch (32mm) on the tip of the antenna is the active portion of the antenna. Install the antenna so the active portion is positioned as high as possible in the vehicle and not “in the shadow” of any carbon fiber or metal. The receiver case can accept an antenna tube directly, making optimal antenna placement easy (antenna tube not included).
EN Failsafe In the unlikely event that the radio connection is lost during use, the receiver will drive the servo and ESC to their preprogrammed failsafe positions (normally no throttle and straight steering). If the receiver is powered on before powering on the transmitter, the receiver will enter this failsafe mode. When the transmitter is powered on, normal control is resumed. ESC and Transmitter Calibration 1. Begin with the transmitter and receiver binding complete. 2.
EN Troubleshooting Guide Problem Possible Cause Solution Boat will not respond to throttle but responds to other controls Throttle channel is reversed Reverse throttle channel on transmitter Damaged propeller, shaft or motor Replace damaged parts Propeller is out of balance Balance or replace propeller Boat squeals or makes a high pitch sound when applying power to motors Lubricate flex shafts Boat battery charge is low Completely recharge battery Boat battery is damaged Replace boat battery
EN Problem Motor power pulses then motor loses power Boat blows over upon acceleration Possible Cause Solution ESC uses default soft Low Voltage Cutoff (LVC) Batteries are too far back in the battery tray Recharge boat battery or replace battery that is no longer performing Postpone until weather is warmer Replace battery Move the batteries forward to adjust the boat’s center of gravity Struts have too much positive angle, causing the nose of the boat to lift and blow over Adjust a more neutral or n
EN Horizon for service, you are agreeing to Horizon’s Terms and Conditions found on our website http://www.horizonhobby. com/content/service-center_render-service-center. Non-Warranty Service — Should your service not be covered by warranty, service will be completed and payment will be required without notification or estimate of the expense unless the expense exceeds 50% of the retail purchase cost. By submitting the item for service you are agreeing to payment of the service without notification.
EN FCC Information FCC ID: BRWSRIRVINGV1 FCC ID: BRWSPMSLT300 This equipment complies with FCC and IC radiation exposure limits set forth for an uncontrolled environment. This equipment should be installed and operated with minimum distance 20cm between the radiator and/or antenna and your body (excluding fingers, hands, wrists, ankles and feet). This transmitter must not be co-located or operating in conjunction with any other antenna or transmitter.
IT Replacement Parts / Ersatzteile / Pièces de rechange / Pezzi di ricambio Part # English Deutsch Français Italiano PRB281074 Canopy, Black Verdeck, Schwarz Verrière, Noire Capottina, Nera PRB281068 Canopy, White Verdeck, Weiß Verrière, Blanche Capottina, Bianca PRB281118 Pro Boat Water Resistant Receiver Box Pro Boat Wasserdichte Empfänger-Box Récepteur Pro Boat résistant à l’eau Scatola ricevitore resistente all’acqua Pro Boat PRB281124 Trim Tab Set Trimmklappen-Satz Ensemble vole
Optional Parts / Diverse Teile / Pièces optionnelles / Pezzi opzionali Part # IT English Deutsch Français Italiano DYN2803 Nut Driver: 5.5mm Dynamite Steckschlüssel:5.
130241 Created: 06/2021 ©2021 Horizon Hobby, LLC. Pro Boat, the Pro Boat logo, Sonicwake, Dynamite, EC5, IC5, DSMR, Firma, and the Horizon Hobby logo are trademarks or registered trademarks of Horizon Hobby, LLC. The Spektrum trademark is used with permission of Bachmann Industries, Inc. US 9,930,567. US 10,419,970. US 10,849,013. Other patents pending.