® PRB08029 BRUSHLESS RTR CATAMARAN Owners Manual • Bedienungsanleitung Manuel de l’utilisateur • Manuale dell’utente
EN NOTICE All instructions, warranties and other collateral documents are subject to change at the sole discretion of Horizon Hobby, LLC. For up-to-date product literature, visit www.horizonhobby.com or www.towerhobbies.com and click on the support or resources tab for this product.
EN Water-Resistant Boat with Waterproof Electronics Your new Horizon Hobby boat has been designed and built with a combination of waterproof and water-resistant components to allow you to operate the product in calm, fresh water conditions. While the entire boat is highly water-resistant, it is not completely waterproof and your boat should NOT be treated like a submarine.
EN Recommended Tools and Materials • • • • • • • • • • • • (2) Spektrum 7.4V 5000mAh 2S 100C Smart Hardcase LiPo Battery: IC5 (SPMX50002S100H5) -or(2) Spektrum 11.1V 5000mAh 3S 100C Smart Hardcase LiPo Battery: IC5 (SPMX50003S100H5) Spektrum Smart S2100 AC Charger, 2x100W (SPMXC1010) Needle nose pliers Paper towel Rubbing alcohol Open-end wrench: 10mm (2) Nut driver: 4mm, 7mm, 8mm Phillips screwdriver: #1 Hex wrench: 1.5mm, 2mm, 2.
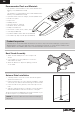
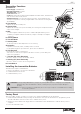
EN Canopy Removal 1. Loosen the 4 screws located at each corner of the canopy. 2. Remove the canopy from the hull starting with the 2 rear screws. Ensure that the 4 screws have disengaged from their bases before carefully lifting the canopy. Installing the Battery Packs The included electronics are rated for 2S–6S LiPo batteries; however, running the stock propeller nonstop on a 6S battery could overheat your electronics or damage your batteries.
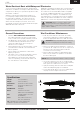
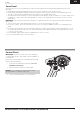
EN Transmitter Functions Specifications A. Power Supply: 4 AA Batteries Operating Frequency: 2.4GHz Transmit Power: <100mw Control Protocol: SLT Control: Proportional Steering and Throttle/Brake with Trim Knobs, Third Channel with 3 Position Momentary Switch Auxiliary Functions: 3 Position Throttle Limit Switch, Steering Rate Knob to Change Steering Travel on-the-fly, Programmable Servo Travel for Steering and Throttle/Brake B. C. D. E. A. Throttle Trim F. Adjusts the throttle neutral point B.
EN Battery Charger Choose a charger designed to charge the recommended (2) Spektrum 7.4V 5000mAh 2S 100C Smart Hardcase LiPo Battery: IC5 (SPMX50002S100H5), or (2) Spektrum 11.1V 5000mAh 3S 100C Smart Hardcase LiPo Battery: IC5 (SPMX50003S100H5)We recommend the Spektrum Smart S2100 AC Charger, 2x100W (SPMXC1010). Refer to your charger manual for charging instructions and safety information. Low Voltage Cutoff (LVC) Battery Chemistry Discharging a Li-Po battery below 3V per cell may damage your battery.
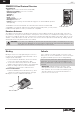
EN SPMSR315 Dual Protocol Receiver Specifications Type: Dual Protocol 3 Ch Receiver* (SLT/DSMR) Dimensions (LxWxH): 32.5 x 21.5 x 12.4mm Antenna Length: 90mm Channels: 3 Weight: 6g Band: 2.4GHz Voltage Range: 3.5–9.6V Bind Type: Bind Button Failsafe: Hold the steering wheel and throttle trigger in the desired failsafe positions during binding *SPMSR315 receivers included with the SLT3 transmitter include SLT and DSMR compatibility.
EN Servo Travel The servo travel on the Steering and Throttle channels can be adjusted through a special programming mode in the transmitter. 1. Begin with the transmitter binding process to the receiver complete. Power ON the receiver. 2. Hold full right and full brake while powering the transmitter ON to put the transmitter into programming mode. The LED on the transmitter will flash 4 times to indicate it is in programming mode. 3.
EN Testing Your Boat in the Water Tip: Before placing your boat in the water, secure the canopy on the hull. Apply clear tape (DYNM0102) around the canopy seam, if desired. 1. Carefully place the boat in the water. 2. Operate the boat at slow speeds near the shoreline. Avoid objects in the water at all times. When the boat is moving forward, ensure water flows out of the coolant outlet.
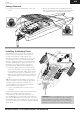
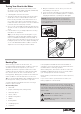
EN When You Are Finished 1. Power off the receiver. 2. Power off the transmitter. 3. Disconnect and remove the batteries from the boat. 1 2 Tip: Always remove the canopy before storage or moisture may allow mold and mildew to grow in the boat. 3 X2 After Boating and Maintenance • • Drain water from inside the hull using the drain plug Fully dry the inside and outside of the boat, including the water cooling lines and jacket around the motor.
EN Water Cooling System If water does not stream out of the water outlets while the boat is moving forward, immediately return the boat to shore and clean any obstructions or remove kinks from the water cooling lines/system. 1. Disassemble and clean the water cooling system to remove blockage and prevent overheating. 2. Replace damaged parts. Rudder Service 1. Disconnect the water tube from the rudder. 2. Remove the nut, screw and linkage from the rudder arm. 3.
EN Drivetrain Lubrication Always replace the drivetrain parts when they are damaged or show visible wear or injury and damage may result. Lubricating the flex shaft is vital to the life of the drivetrain. The lubricant also acts as a water seal, keeping water from entering the hull through the stuffing tube. Lubricate the flex shaft and propeller strut after every 30 minutes of operation and/or everytime you change the batteries.
EN Troubleshooting Guide Problem Possible Cause Solution Boat will not respond to throttle but responds to other controls Throttle channel is reversed Reverse throttle channel on transmitter Damaged propeller, shaft or motor Propeller is out of balance Boat battery charge is low Boat battery is damaged Blocking or friction on shaft or propeller Replace damaged parts Balance or replace propeller Completely recharge battery Replace boat battery and follow battery instructions Disassemble, lubricate an
EN Limited Warranty What this Warranty Covers Horizon Hobby, LLC, (Horizon) warrants to the original purchaser that the product purchased (the “Product”) will be free from defects in materials and workmanship at the date of purchase.
EN Warranty and Service Contact Information Country of Purchase North America Horizon Hobby Phone Number/Email Address Horizon Service Center (Repairs and Repair Requests) Horizon Product Support (Product Technical Assistance) servicecenter.horizonhobby.com/ RequestForm/ productsupport@horizonhobby.com 877-504-0233 websales@horizonhobby.com 800-338-4639 service@horizonhobby.
DE HINWEIS Allen Anweisungen, Garantien und anderen zugehörigen Dokumenten sind Änderungen nach Ermessen von Horizon Hobby, LLC vorbehalten. Aktuelle Produktliteratur finden Sie unter www.horizonhobby.com oder www. towerhobbies.com im Support-Abschnitt für das Produkt.
DE Spritzwassergeschützes Boot mit wasserdichter Elektronik Ihr neues Horizon Hobby Boot wurde mit einer Kombination von wasserdichten und spritzwassergeschützten Komponenten entwickelt die es ihnen ermöglichen das Modell bei ruhigen Bedingungen in Süßwasser zu betreiben. Obwohl das Boot spritzwassergeschützt ist es nicht vollständig wasserdicht und darf keines Falls wie ein U-Boot behandelt werden.
DE Erforderliches Werkzeug und Materialien • • • • • • • • • • • • (2) Spektrum 7.4V 5000mAh 2S 100C Smart LiPo-Akku, Hartschale: IC5 (SPMX50002S100H5) -or(2) Spektrum 11.1V 5000mAh 3S 100C Smart LiPo-Akku, Hartschale: IC5 (SPMX50003S100H5) Spektrum Smart S2100 Wechsel-/Gleichstrom-Ladegerät, 2x100W (SPMXC1010) Spitzzange Papiertücher Reinigungsalkohol Maulschlüssel: 10mm (2) Steckschlüssel 4mm, 7mm, 8mm Phillips Schraubendreher: #1 Inbusschlüssel: 1.
DE Abnehmen der Kabinenhaube 1. Lösen Sie die vier Schrauben an den Seiten der Kabinenhaube. 2. Entfernen Sie die Kabinenhaube vom Rumpf beginnend mit den beiden hinteren Schrauben. Bitte achten Sie darauf, dass alle vier Schrauben gelöst sein müssen bevor Sie die Kabinenhaube vorsichtig anheben könneny. Einsetzen der Akkupacks Die mitgelieferte Elektronik ist für die 2S-6S LiPoAkkus bewertet.
DE Senderfunktionen Spezifikationen Netzteil: 4 AA-Akkus Betriebsfrequenz: 2,4 GHz Senderleistung: < 100 mW Steuerprotokoll: SLT Steuerung: Proportionalsteuerung und Gas/Bremse mit Trimmungsknöpfen, dritter Kanal mit 3-Positionen-Schalter Zusatzfunktionen: Gasbegrenzer mit 3 Positionen, Steuerratenknopf zum spontanen Ändern des Steuerverfahrwegs, programmierbarer Servo-Verfahrweg für Steuerung und Gas/Bremse A.Gastrimmung Zur Anpassung des Gasnullpunktes B.
DE Akku Ladegerät Wählen Sie ein Ladegerät, das für das Aufladen des empfohlenen (2) Spektrum 7.4V 5000mAh 2S 100C Smart LiPo-Akkus mit Hartschale ausgelegt ist: IC5 (SPMX50002S100H5) oder (2) Spektrum 11.1V 5000mAh 3S 100C Smart LiPo-Akku mit Hartschale: IC5 (SPMX50003S100H5) Wir empfehlen das Spektrum Smart S2100-Wechselstrom-Ladegerät, 2x100W (SPMXC1010). HINWEIS: Laden Sie niemals ein Akku im Boot, da sonst ein Schaden auftreten könnte.
DE SPMSR315 Empfänger mit Dual-Protokoll Spezifikationen Typ: Empfänger mit Dual-Protokoll und 3 Kanälen* (SLT/DSMR) Abmessungen (L x B x H): 32,5 x 21,5 x 12,4 mm Antennenlänge: 90 mm Kanäle: 3 Gewicht: 6 g Band: 2,4 GHz Spannungsbereich: 3,5–9,6 V Bindungstyp: Bindungsschalter AKKU Failsafe: Das Steuerrad und den Gasauslöser während des Bindens in den gewünschten Failsafe-Positionen halten STEUER GAS AUX 1 *Die mit dem SLT3-Sender mitgelieferten SPMSR315-Empfänger weisen eine Kompatibilität mit SLT3 und D
DE Servo-Verfahrweg Der Servo-Verfahrweg auf den Kanälen Steuerung und Gas kann über einen speziellen Programmiermodus im Sender angepasst werden. 1. Damit beginnen, wenn das Binden des Senders am Empfänger abgeschlossen ist. Den Empfänger einschalten. 2. Ganz nach rechts und Vollbremsung halten, während der Sender eingeschaltet wird, um den Sender in den Programmiermodus zu bringen. Die LED auf dem Sender wird 4-mal blinken, um anzuzeigen, dass er sich im Programmiermodus befindet. 3.
DE Testen des Bootes im Wasser Tipp: Sichern Sie die Kabinenhaube auf dem Rumpf bevor Sie das Boot ins Wasser setzen. Fixieren Sie die Ränder des Verdecks mit durchsichtigem Klebeband (DYNM0102), falls gewünscht. 1. Fahren Sie das Boot zuerst langsam in Ufernähe. 2. Vermeiden Sie die Nähe von allen Objekten. Fährt das Boot vorwärts achten Sie bitte darauf dass aus dem seitlichen Kühlwasserauslass Wasser austritt.
DE Nach dem Fahren 1. Schalten Sie den Empfänger aus. 2. Schalten Sie den Sender aus. 3. Trennen und entfernen Sie den Akku aus dem Boot. 1 2 Tipp: Nehmen Sie immer vor dem Einlagern die Kabinenhaube ab, da sich sonst durch Restfeuchte Schimmel im Boot bilden kann. 3 X2 Wartungsarbeiten nach dem Fahren • • • • • Ziehen Sie den Verschlusstopfen und lassen Wasser aus dem Rumpfinneren austreten Lassen Sie das Boot vollständig inklusive Kühlsystem vollständig trocknen.
DE Kühlwassersystem Sollte bei einer Vorwärtsbewegung des Bootes kein Wasser aus den Wasseraustrittsöffnungen strömen, steuern Sie das Boot unverzüglich wieder zum Ufer und befreien Sie die Wasserkühlung und die zugehörigen Leitungen von Blockaden und Knicken. 1. Trennen und reinigen Sie das Kühlwassersystem um Verstopfungen zu entfernen und ein Überhitzen zu verhindern. 2. Ersetzen Sie beschädigte Teile. Wartung des Ruders 1. Trennen Sie die Kühlwasserleitung vom Ruder. 2.
DE Fetten der Welle Das Schmieren der Flexwelle ist für die Lebenserwartung des Antriebes sehr wichtig. Das Schmiermittlel dient ebenfalls als Dichtmittel und sorgt dafür dass kein Wasser in den Rumpf gelangt. Schmieren Sie die Welle, das Stevenrohr und alle beweglichen Teile alle 2 bis 3 Betriebsstunden. Ersetzen Sie bitte Teile die Abnutzungen oder Schäden aufweisen. Flex-Welle und Propellerstrebe nach jeweils einem Betrieb von 30 Minuten schmieren und/oder jedes Mal, wenn die Akkus ausgetauscht werden.
DE Problemlösung Problem mögliche Ursache Lösung Boot reagiert nicht auf Gas, aber auf andere Kontrollen Gaskanal ist reversiert Reversieren Sie den Gaskanal auf dem Sender Starkes Geräusch oder Vibration Reduzierte Fahrzeit, Boot hat keine Leistung Boot will sich nicht binden (während des Bindevorganges) Beschädigter Propeller, Welle oder Motor Ersetzen Sie beschädigte Teile Propeller hat eine Unwucht Wuchten oder ersetzen Sie den Propeller Akkuladung ist zu gering Laden Sie den Fahrakku vol
DE Garantie und Service Informationen Warnung Ein ferngesteuertes Modell ist kein Spielzeug. Es kann, wenn es falsch eingesetzt wird, zu erheblichen Verletzungen bei Lebewesen und Beschädigungen an Sachgütern führen. Betreiben Sie Ihr RC-Modell nur auf freien Plätzen und beachten Sie alle Hinweise der Bedienungsanleitung des Modells wie auch der Fernsteuerung. Garantiezeitraum Exklusive Garantie Horizon Hobby LLC (Horizon) garantiert, dass dasgekaufte Produkt frei von Material- und Montagefehlern ist.
DE Garantie und Reparaturen Garantieanfragen werden nur bearbeitet, wenn ein Originalkaufbeleg von einem autorisierten Fachhändler beiliegt, aus dem der Käufer und das Kaufdatum hervorgeht. Sollte sich ein Garantiefall bestätigen wird das Produkt repariert oder ersetzt. Diese Entscheidung obliegt einzig Horizon Hobby. Kostenpflichtige Reparaturen Liegt eine kostenpflichtige Reparatur vor, erstellen wir einen Kostenvoranschlag, den wir Ihrem Händler übermitteln.
FR REMARQUE Toutes les instructions, garanties et autres documents de garantie sont sujets à la seule discrétion de Horizon Hobby, LLC. Veuillez, pour une littérature produits bien à jour, visiter www.horizonhobby.com ou www.towerhobbies.com et cliquer sur l’onglet de support de ce produit.
FR Bateau équipé d’une électronique étanche Votre nouveau bateau Horizon Hobby a été conçu et fabriqué en combinant des composants étanches et des composants résistants à l’eau vous permettant d’utiliser ce produit en eau douce par conditions calmes.
FR Outils et matériaux recommandés • (2) Batterie Li-Po Spektrum Smart 7,4 V 5 000 mAh 2S 100C, boîtier rigide : IC5 (SPMX50002S100H5) -or(2) Batterie Li-Po Spektrum Smart 11,1 V 5 000 mAh 3S 100C, boîtier rigide : IC5 Chargeur Spektrum Smart S2100 CA/CC, 2 x 100 W (SPMXC1010) Pince à becs fins Papier absorbant Alcool dénaturé Clé plate : 10 mm (2) Clé à douille hexagonale : 8mm, 7mm et 4mm Tournevis cruciforme : #1 Clé BTR : 1.5mm, 2mm, 2.
FR Ouverture du cockpit 1. Dévissez les 4 vis situées dans chaque angle du cockpit. 2. Enlevez le cockpit de la coque en commençant avec les 2 vis arrière. Assurez-vous que les 4 vis soient bien désengagées avant de soulever le cockpit avec précaution. Installation des batteries Les composants électroniques sont adaptés à des batteries Li-Po 2S–6S.
FR Fonctions de l’émetteur Spécifications Alimentation électrique : 4 piles AA Fréquence de fonctionnement : 2,4 GHz Puissance d'émission : <100 mw Protocole de contrôle : SLT Contrôle : direction et gaz/freinage proportionnels avec des boutons de compensateur, troisième canal avec interrupteur à rappel à 3 positions Fonctions auxiliaires : interrupteur de fin de course des gaz à 3 positions, bouton du taux de direction pour modifier la course de direction à la volée, course de servo programmable pour la di
FR Chargeur de batterie Choisissez un chargeur conçu pour charger la(les) (2) batterie(s) Li-Po Spektrum Smart 7,4 V 5 000 mAh 2S 100C à boîtier rigide recommandée(s) : IC5 (SPMX50002S100H5) ou la(les) (2) batterie(s) Li-Po Spektrum Smart 11,1 V 5 000 mAh 3S 100C à boîtier rigide : IC5 (SPMX50003S100H5)Nous recommandons le chargeur CA Spektrum Smart S2100, 2x100 W (SPMXC1010). Consultez le manuel du chargeur pour les instructions relatives à la charge et les consignes de sécurité.
FR Récepteur double protocole SPMSR315 Spécifications Type : récepteur 3 canaux double protocole* (SLT/DSMR) Dimensions (L × l × H) : 32,5 × 21,5 × 12,4 mm Longueur d’antenne : 90 mm Canaux : 3 Poids : 6 g Bande : 2,4 GHz Plage de tension : 3,5 à 9,6 V Type d'affectation : bouton d’affectation Sécurité intégrée : maintenez le volant et la manette des gaz dans les positions de sécurité intégrée souhaitées pendant l'affectation *Les récepteurs SPMSR315 inclus avec l'émetteur SLT3 assurent la compatibilité SLT
FR Course de servo La course de servo sur les canaux de direction et des gaz peut être ajustée par le biais d'un mode de programmation spécial dans l'émetteur. 1. Commencez une fois que le processus d'affectation de l'émetteur au récepteur est terminé. Allumez le récepteur. 2. Maintenez les commandes entièrement à droite et en freinage complet tout en allumant l'émetteur pour mettre l'émetteur en mode programmation.
FR Test de votre bateau dans l’eau Conseil: Avant de placer votre bateau sur l’eau, sécurisez le couvercle du cockpit à la coque en utilisant de l’adhésif transparent (DYNM0102). 1. Placez le bateau dans l’eau avec précaution. 2. Faites fonctionner le bateau à vitesse réduite près de la rive. Évitez toujours les éventuels objets qui se trouvent dans l’eau. Quand votre bateau navigue en marche avant, contrôlez qu’il y a bien de l’eau à sortir par l’évacuation du circuit de refroidissement.
FR Après la navigation 1. Mettez le récepteur hors tension. 2. Mettez l’émetteur hors tension. 3. Déconnectez et retirez la batterie du bateau. 1 2 Conseil: Rangez toujours le bateau avec le cockpit ouvert afin d’éviter la formation de moisissure à l’intérieur de la coque. 3 X2 Maintenance après utilisation • • • • • Vidangez l’eau présente dans la coque en retirant le bouchon d’évacuation Séchez totalement l’intérieur et l’extérieur de la coque, incluant le circuit de refroidissement.
FR Circuit de refroidissement Si l’eau ne s’échappe pas par les évacuations lorsque le bateau se déplace vers l’avant, ramenez immédiatement le bateau vers la berge et nettoyez le circuit de refroidissement. Inspection du gouvernail 1. Déconnectez la durite du gouvernail. 2. Retirez l’écrou, la vis et la tringlerie du gouvernail. 3. Pivotez le gouvernail et desserrez la vis sans tête assurant la liaison avec l’axe. 4. Retournez le bateau et tapez légèrement sur l’axe pour le retirer. 5.
FR Lubrification de la transmission Toujours remplacer le flexible quand il est endommagé ou qu’il présente des trace d’usure. Un non respect de cette consigne vous expose à un risque de blessures corporelles ou des dégâts matériels. Assurez-vous de laisser un écart de 2mm entre l’entraîneur et la chaise d'hélice pour compenser le raccourcissement du flexible sous la charge. La lubrification du flexible est vitale pour la durée de vie de la transmission.
FR Guide de dépannage Problème Cause possible Le bateau ne répond pas à la commande des gaz La voie des gaz est inversée mais répond aux autres commandes Hélice, arbre ou moteur endommagés Vibration ou bruit excessif L’hélice est déséquilibrée La charge de la batterie du bateau est faible La batterie du bateau est endommagée Temps de navigation réduit ou manque de puissance du bateau Il est impossible d’affecter le bateau à l’émetteur (durant l’affectation) Échec de la liaison entre le bateau et l’émet
FR Garantie et Réparations Durée de la garantie Garantie exclusive – Horizon Hobby, LLC (Horizon) garantit que le Produit acheté (le « Produit ») sera exempt de défauts matériels et de fabrication à sa date d’achat par l’Acheteur. La durée de garantie correspond aux dispositions légales du pays dans lequel le produit a été acquis. La durée de garantie est de 6 mois et la durée d’obligation de garantie de 18 mois à l’expiration de la période de garantie.
FR acquitté au revendeur. Pour les réparations payantes, nous facturons au minimum 30 minutes de travail en atelier ainsi que les frais de réexpédition. En l’absence d’un accord pour la réparation dans un délai de 90 jours, nous nous réservons la possibilité de détruire le produit ou de l’utiliser autrement. ATTENTION: Nous n’effectuons de réparations payantes que pour les composants électroniques et les moteurs.
IT AVVISO Tutte le istruzioni, le garanzie e gli altri documenti pertinenti sono soggetti a cambiamenti a totale discrezione di Horizon Hobby, LLC. Per una documentazione aggiornata sul prodotto, visitare il sito horizonhobby.com o towerhobbies.com e fare clic sulla sezione Support del prodotto.
IT Scafo resistente all’acqua con elettronica waterproof Il vostro nuovo scafo Horizon Hobby è stato sviluppato e costruito con una combinazione di componenti resistenti all’acqua ed impermeabili in modo da rendere il vostro scafo adatto per l’uso in acque calme e dolci. L’intero scafo è resistente all’acqua, ma questo non significa che sia del tutto impermeabile e quindi NON deve essere usato come un sottomarino.
IT Attrezzi e materiali consigliati • • • • • • • • • • • • (2) Batteria Spektrum 7,4 V 5000 mAh 2S 100C Smart Hardcase LiPo: IC5 (SPMX50002S100H5) -or(2) Batteria Spektrum 11,1V 5000 mAh 3S 100C Smart Hardcase LiPo: IC5 (SPMX50003S100H5) Caricabatterie Spektrum S2100 CA/CC Smart, 2 x 100 W (SPMXC1010) Pinze a becchi stretti Fazzoletto di carta Alcol denaturato Chiave aperta: 10 mm (2) Chiave per dadi: 4 mm, 7 mm, 8 mm Cacciavite Phillips n.
IT Rimozione della capottina 1. Allentare le 4 viti in ogni angolo della capottina. 2. Rimuovere la capottina dallo scafo, iniziando con le 2 viti posteriori. Assicurarsi che le 4 viti siano allentate dalla loro base prima di alzare con attenzione la capottina.
IT Funzioni della trasmittente Specifiche Alimentazione: 4 Batterie AA Frequenza di funzionamento: 2,4 GHz Potenza di trasmissione: <100mW Protocollo di controllo: SLT Controllo: sterzo e gas/freno proporzionali con manopole trim, terzo canale con interruttore temporaneo a 3 posizioni Funzioni ausiliarie: interruttore limitatore gas a 3 posizioni, manopola tasso di sterzata per modificare “al volo” la corsa dello sterzo, servocorsa programmabile per sterzo e gas/freno A.
IT Caricabatterie Scegliere un caricabatterie progettato per caricare le batterie (2) Spektrum 7,4 V 5000 mAh 2S 100C Smart Hardcase LiPo consigliate: IC5 (SPMX50002S100H5), oppure (2) Spektrum 11,1 V 5000 mAh 3S 100C Smart Hardcase LiPo: IC5 (SPMX50003S100H5)Si consiglia il caricabatterie Spektrum Smart S2100 CA, 2x100 W (SPMXC1010). Si faccia riferimento al manuale del caricatore per le informazioni sulla carica e la sicurezza.
IT Récepteur double protocole SPMSR315 Spécifications Type : récepteur 3 canaux double protocole* (SLT/DSMR) Dimensions (L × l × H) : 32,5 × 21,5 × 12,4 mm Longueur d’antenne : 90 mm Canaux : 3 Poids : 6 g Bande : 2,4 GHz Plage de tension : 3,5 à 9,6 V Type d'affectation : bouton d’affectation Sécurité intégrée : maintenez le volant et la manette des gaz dans les positions de sécurité intégrée souhaitées pendant l'affectation *Les récepteurs SPMSR315 inclus avec l'émetteur SLT3 assurent la compatibilité SLT
IT Course de servo La course de servo sur les canaux de direction et des gaz peut être ajustée par le biais d'un mode de programmation spécial dans l'émetteur. 1. Commencez une fois que le processus d'affectation de l'émetteur au récepteur est terminé. Allumez le récepteur. 2. Maintenez les commandes entièrement à droite et en freinage complet tout en allumant l'émetteur pour mettre l'émetteur en mode programmation.
IT Test dell’imbarcazione in acqua Consiglio: Prima di mettere il Veles 29 in acqua, fissare bene la capottina allo scafo. Applicare il nastro trasparente (DYNM0102) intorno alla giunzione della capottina, se necessario. 1. Collocare l’imbarcazione in acqua prestando attenzione. 2. Azionare l’imbarcazione a basse velocità vicino a riva. Evitare sempre eventuali oggetti presenti nell'acqua.
IT Quando si finisce 1. Spegnere il ricevitore. 2. Spegnere il trasmettitore. 3. Scollegare la batteria e toglierla dallo scafo. 1 2 Consiglio: togliere sempre la capottina prima di riporre lo scafo, altrimenti l’umidità consentirebbe la formazione di muffa e funghi al suo interno. 3 X2 Manutenzione generale e dopo l’utilizzo • • • • • Manutenzione del motore • 56 AVVISO: quando si termina di navigare, non lasciare lo scafo al sole.
IT Sistema di raffreddamento ad acqua Se l’acqua non fuoriesce dalle valvole di uscita mentre la barca è in marcia, riportare subito la barca a riva e rimuovere eventuali ostruzioni o strozzature dal sistema di raffreddamento ad acqua. 1. Smontare e pulire il sistema di raffreddamento per evitare le ostruzioni ed il surriscaldamento. 2. Sostituire le parti danneggiate. Manutenzione del timone 1. Scollegare dal timone il tubo dell’acqua. 2. Togliere dado, vite e rinvio dalla squadretta del timone. 3.
IT Lubrificazione della trasmissione Sostituire sempre l’albero flessibile quando è danneggiato o mostra evidenti segni di usura, altrimenti si potrebbero fare danni maggiori. La lubrificazione dell’albero flessibile è di importanza vitale per la durata della trasmissione. Il lubrificante agisce anche come guarnizione per impedire l’ingresso dell’acqua nello scafo attraverso il premistoppa.
IT Guida alla risoluzione dei problemi Problema Possibile causa La barca non risponde al motore, Il canale del motore è invertito ma risponde agli altri comandi Elica, albero o motore danneggiati Rumore o vibrazioni fuori dal comune L’elica è sbilanciata La batteria della barca è quasi scarica La batteria della barca è danneggiata Qualche impedimento o attrito sull’albero o sull’elica Tempo di funzionamento ridotto La temperatura ambientale è troppo bassa o barca sottopotenziata La capacità della batteri
IT Durata della Garanzia di restituire il prodotto intatto, mai usato e immediatamente presso il venditore. Periodo di garanzia Indicazioni di sicurezza Garanzia esclusiva - Horizon Hobby, LLC (Horizon) garantisce che il prodotto acquistato (il “Prodotto”) sarà privo di difetti relativi ai materiali e di eventuali errori di montaggio alla data di acquisto. Il periodo di garanzia è conforme alle disposizioni legali del paese nel quale il prodotto è stato acquistato.
IT CONTATTI PER LA GARANZIA E L'ASSISTENZA Paese di acquisto Germania Horizon Hobby Telefono/indirizzo e-mail Indirizzo Horizon Technischer Service service@horizonhobby.
Replacement Parts / Ersatzteile / Pièces de rechange / Pezzi di ricambio Part # English Deutsch Français Italiano DYNM3831 3650 6 Pole Marine Motor 2000Kv 3650 6-poliger Bootsmotor 2000 kV Moteur 3650 6 Pôles Marine 2000Kv Motore marino 6 poli 3650 2000 Kv DYNM3875 120A BL Marine ESC 2-6S 120 A bürstenloser Geschwindigkeitsregler 2-6S 120A BL Marine ESC 2-6S ESC marino brushless 120 A 2-6S PRB281058 Hull: Veles 29-inch Rumpf: Veles 29-inch Coque : Veles 29-inch Scafo: Veles 29” PRB281059
Optional Parts / Diverse Teile / Pièces optionnelles / Pezzi opzionali Part # English Deutsch Français Italiano DYN2801 Nut Driver: 4mm Mutterndreher: 4mm Tournevis p/écrou: 4mm Cacciavite a bussola: 4 mm DYN2803 Nut Driver: 5.5mm Mutterndreher: 5,5mm Tournevis p/écrou: 5,5mm Cacciavite a bussola: 5,5 mm DYN4401 GPS Speed Meter GPS-Tachometer Tachymètre GPS Tachimetro GPS DYNB3855EC Reaction HD7.
65812 PRB Created: 11/2020 ©2020 Horizon Hobby LLC. Pro Boat, the Pro Boat logo, Veles, DSMR, EC5, Dynamite, Reaction, Passport and the Horizon Hobby logo are trademarks or registered trademarks of Horizon Hobby, LLC. The Spektrum trademark is used with permission of Bachmann Industries, Inc. All other trademarks, service marks and logos are property of their respective owners. US 9,930,567. US 10,419,970. Other patents pending.