
User Manual

Set the Tear Bar Distance
349
Set the Tear Bar Distance
To set the tear bar distance, do the following steps:
1. Make sure the printer is offline.
2. Press ENTER key to enter Menu mode.
3. Press the right arrow until the PRINTER CONTROL icon is highlighted.
4. Press ENTER to go into PRINTER CONTROL.
5. Press the down arrow until “ZTP SETTINGS” is highlighted.
6. Press ENTER to go into the “ZTP SETTINGS” submenu.
7. Press the down arrow until “ZTP TearDistance” is highlighted.
8. Press the left arrow or right arrow to decrease or increase the tear
bar distance in increments of 1/144th of an inch.
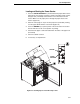
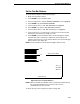
9. Press ENTER to select the desired value. An asterisk appears next the
selected value and a scale prints to indicate the tear bar distance in
relation to the tear bar. For correct tear bar distance, the zero should align
with the tear bar. See Figure 60.
NOTE: The Tear Distance value must be changed to print the scale.
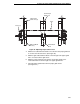
Figure 60. Correct Tear Bar Distance
NOTE: When a new ZTP Tear Bar Dist value is selected, the printer will lose
the current print position until you reset the top of form to
automatically save the new value.
10. Reset the top of form using the procedure on page 350.
+50
-50
0
P
rint Stati
on
Correct
TearBar
D
istan
ce
P
hysical TearBa
r
P
ositi
on