Encender/Apagar .............................................................................. 2 Usar la pantalla digital ...................................................................... 2 Interfaces ......................................................................................... 3 1. Escritorio .................................................................................... 3 2. Pantalla bloqueada (modificada) ................................................ 4 Programas operativos ......
Encender/Apagar Para encender: mantenga pulsada por cinco segundos la tecla de encendido Para apagar: mantenga pulsada por cinco segundos la techa de encendido→ haga clic en Apagar → haga clic en OK Bloquear/ desbloquear la pantalla: pulse la tecla de encendido suavemente para bloquear/desbloquear la pantalla. Apagado forzoso: Si no responde el dispositivo, pulse la tecla reiniciar, para reiniciar el dispositivo obligatoriamente Nota: No use el apagado forzoso a menos que sea necesario.
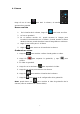
Interfaces 1. Escritorio 3 4 2 5 1 6 8 7 9 10 11 12 1.: Ver todas las aplicaciones 2: Acceso directo para búsqueda por voz búsqueda google 4.: Volver5.: Volver al escritorio 6: Seleccione maltitaxk 7.: Acceso directo al menú 8: logo USB 9: TF estado de la tarjeta 10: Hora 11: 3G/WIFI status 12: Estado de la batería En el escritorio, use la tecla menú 3: para mostrar la lista de funciones desde las que puede operar.
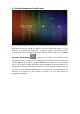
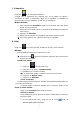
2. Pantalla bloqueada (modificada) Si no se utiliza durante un tiempo, o cuando presione la tecla de encendido, el dispositivo estará en modo de espera. Hay dos modos de espera, uno es dormido, la pantalla está apagada y si pulsa cualquier tecla estará activo nuevamente, como se muestra en la foto. En este modo, haga clic en el icono bloquear/desbloquear , entonces los iconos en posición A\B\C aparecerán como se muestran en la fotografía.
Programas operativos 1. Reproductor ☆ AVI, WMV, RM, RMVB, 3GP, MKV, MP4, ASF, VOB, MPG, MOV hasta 1080P HD-Alta Definición Reproducir un vídeo ☆ Formatos de imagen permitidos: JPEG, BMP, GIF, PNG. 1. Haga clic para entrar en el interfaz del reproductor. 2. Seleccione un archivo de vídeo y el sistema pasará a la interfaz de reproducción de vídeos.
para volver al escritorio mientras sigue oyendo la música. Puede escuchar música usando el menú principal. El interfaz es como se muestra a continuación: 3.Grabación Haga clic en el icono Haga clic clic para entrar en modo grabación (vea la imagen). para empezar la grabación, y aquí para pararla. Haga para escuchar la grabación de audio. Los archivos grabados se nombran según la hora de grabación. Puede seleccionar cualquiera de ellos para oírlos.
4. Cámara Haga clic en el icono para abrir la cámara, el interfaz aparecerá en pantalla. Hacer una foto 1. 2. 3. En la interfaz de la cámara, haga clic para hacer una foto. 4. La foto se guardará. En el sistema versión 4.1, puede arrastrar la imagen para introducirla directamente en un álbum. Cuando accede al álbum desde la cámara, puede visualizar hasta 3 fotografías en miniatura. Haga clic en Volver para ir al álbum. 5. Haga clic para entrar en el interfaz de la cámara. Grabando un vídeo. 1.
5. Navegador Haga clic en el icono para entrar en el navegador. 1.: Puede seleccionar y ver la página anterior; 2: Página actual; 3.: Añadir nueva página 4: Tecla Menu Nota: El sistema versión 4.1 incluye navegador google. Se le preguntará que elija el navegador cuando lo use por primera vez, y puede seleccionar el que desee. El icono del nuevo navegador es 6. Tienda Google Play Abra para ver y bajarse aplicaciones.
7. Calendario Haga clic en el icono del calendario. Cuando use el calendario por primera vez, se le pedirá su registro. Introduzca su email y contraseña, haga clic en siguiente y complete los ajustes según la guía. Después, puede usar el calendario. Nuevo evento 1. En el interfaz del calendario, haga clic en la fecha en la que desea añadir un nuevo evento. 2. Seleccione la hora del evento →introduzca los detalles del evento en cada campo. 3. Haga clic en Finalizar. 4.
2. Haga clic para reactivar. Editar la alarma Haga clic en el icono del reloj,→Clic . Clic e introduzca la hora de alarma que quiere establecer → . Introdúzcala. Borrar la alarma 1. Haga clic en el icono del reloj,→Clic . 2. Clic e introduzca la hora de alarma que quiere borrar. 3. Haga clic en Borrar Alarma. Haga clic para volver al escritorio. 9. Calculadora 1.Haga clic en el icono de la calculadora. 2. Haga clic en los números y operaciones para calcular. 3.
. Email ☆Admite POP3 and SMTP. Añadir una cuenta de email: Puede introducir una o más direcciones de email que quiera usar en el dispositivo. 1. Haga clic en el icono de Email. 2. En el interfaz de Su cuenta, haga clic en Siguiente. 3. Haga clic en la opción de dirección de email → Introduzca su dirección de email. 4. En la apartado contraseña → Introduzca su contraseña. 5. Haga clic en Finalizar. 6. Ajuste manual (opcional): el servidor seleccionará un proveedor (gmail.com, etc.
Bandeja de entrada 1. Haga clic en el icono de Email. 2. Si sólo ha introducido una cuenta de email, se abrirá directamente. Si tiene más de un email, verá el listado de cuentas de email. 3. Haga clic en la cuenta de email que quiere abrir → Haga clic en Bandeja de entrada. Abrir un email 1. Una vez en la bandeja de entrada, haga clic en un email para abrirlo. 2. Haga clic en el adjunto (si hay alguno) para abrir la aplicación correspondiente, o puede hacer clic en Guardar y guardarlo en su tarjeta SD.
será la principal. 1. Haga clic en el icono de Email. 2. 3. 4. 5. Una vez en la bandeja de entrada, haga clic en Menu →Cuenta. Haga clic y mantenga pulsado la cuenta que desea borrar. En la ventana opción de cuenta, haga clic en borrar cuenta. Haga clic en Sí para confirmar su eliminación. Establecer la cuenta principal Debe tener siempre una cuenta principal. Por ello, si tiene más de una cuenta, puede seleccionar cuál quiere que figure como principal. 1. Haga clic en el icono de Email. 2.
Copiar archivos entre dispositivos. Puede utilizar un explorador de archivos, para copiar archivos en almacenamientos externos, internos y un PC. Para copiar un archivo en un dispositivo, primero debe copiarlo en la tarjeta SD o en el USB. 1. Haga clic o para mostrar los archivos guardados en el almacenamiento. 2. Haga clic y mantenga pulsado el archivo que quiere copiar → Haga clic en Copiar. 3.
Pantalla rotante. Si se confirma esta opción, la pantalla cambiará de horizontal a vertical, según la dirección de rotación. Hibernar Ajuste tiempo de hibernación. Tamaño fuente de la Ajuste el tamaño de la letra en el interfaz. Seleccione las coordenadas. Algunos juegos las requieren. Coordenadas Adaptación pantalla. Almacena miento. de Ajuste el tamaño de la pantalla para algunos juegos. Muestra el estado de almacenamiento. Formatear tarjetaSD la Borre todos los datos guardados en la tarjeta SD.
desarrolla dores Sobre el dispositiv o Ver el sistema, batería, info legal, modelo, versión Android y número. Ajustes Wi-Fi Muchas funciones exigen conexión Wi-Fi, por lo que le sugerimos que use la red Wi-Fi preestablecida. 1. Clic → Ajustes → Red inalámbrica 2. Permitir la conexión Wi-Fi. El dispositivo buscará todas las redes Wi-Fi disponibles junto Wi-Fi significa que necesita automáticamente. El icono una contraseña para acceder. 3.
datos, y seleccione el punto de acceso, seleccione Menú y luego: Añada APN para ajustes de red.
Descargar, instalar/desinstalar aplicaciones ☆Puede encontrar muchas aplicaciones gratuitas para Android en internet. Simplemente abra su explorador y busque «aplicaciones Android». Las aplicaciones Android que compre o descargue pueden instalarse vía Gestión de archivos de forma rápida y fácil. 1. Copie el archivo .apk que quiere instalar en la tarjeta SD o en el disco USB →Inserte la tarjeta o conecte el USB. 2. Haga clic 3. Haga clic en el icono Gestión de Archivos.
Conectar al PC 1. Conecte el dispositivo al PC, así este dispositivo puede usarse como dispositivo de almacenamiento móvil. Cuando use un cable USB para conectarse al PC, conecte un extremo del cable al puerto USB OTG del dispositivo, y el otro extremo al puerto USB del ordenador. 2.
Cargue completamente la batería regularmente. No mantenga la batería vacía durante mucho tiempo. Precauciones Por favor, siga las indicaciones de seguridad cuando use el dispositivo.当 No exponga el producto a la lluvia o la humedad. Mantenga el dispositivo lejos de la luz directa del sol o una fuente de calor. Proteja el cable de conexión. Cuando use el cable de conexión, no lo pise ni ponga nada encima ni lo presione con fuerza. Tenga especial cuidado con los conectores del cable.
DECLARACIÓN DE CONFORMIDAD Primux Trading S.L., Tecnópole, Edificio CEI, 32900 Ourense. Declara que este producto: PRIMUX LOGIC L1 TABLET Cumple con las disposiciones de la Directiva 1999/5/CE sobre Equipos de Terminales de Radio y Telecomunicaciones (R&TTE), de la Directiva 95/2006/CE de Seguridad Eléctrica de Equipos de Baja Tensión y de la Directiva 2004/108/CEE de Compatibilidad Electromagnética. - Para ver la declaración completa visite la página web: http://www.primux.
22
ENGLISH USER'S MANUAL 23
24
Power on/off................................................................................... Using touch screen .......................................................................... Interfaces ....................................................................................... 1. Desktop .................................................................................... 2. Locked screen (modified) ......................................................... Operating programs ......................
Power on/off Power on: press and hold the power key for 5 seconds Power off: press and hold the power key for 5 seconds→ click Power off → click OK Lock/unlock screen: press the power key swiftly to lock/unlock the screen Forced shutdown: in case of no response of the device, press the Reset key to reset the device by force Note: do not use forced shutdown unless necessary. Shutdown the device following power off steps. Reset key: press this key to reset the device.
Interfaces 5. Desktop 3 4 2 5 1 6 8 7 9 10 11 12 1: View all applications 2: Shortcut to voice search 3: google search 4: Return 5: Return to desktop 6: Select maltitaxk 7: Shortcut to menu 8: USB logo 9: TF card status 10: Time 11: 3G/WIFI status 12: Battery status On the desktop, use the Menu button to display function list where you can operate accordingly.
2. Locked screen (modified) If there is no operation for a long time, or when you press the power key, the device will enter standby mode. There are two standby modes, one is sleep mode, the screen is off in this mode, and if you press the button key, it will wake up and enter nap mode, as shown in the picture. In this mode, click and hold Lock/unlock icon , there identifiers at A\B\C positions will appear as shown in the picture.
2. Select a video file to play and the system will enter video playing interface. Click icons on the screen to adjust the video accordingly (volume +/-, playing process bar, storage play, brightness +/-, pause/play, next video, screen size, desktop play, return, menu). Note: System ver. 4.1 supports desktop multi-menu video playing mode. You can simply desktop-play the video by selecting the desktop playing menu. With this function more than one video can be played at the same time on the same device. 3.
3. Recorder Click icon Click to enter recorder mode (see the picture). to start recording, and click to stop. Click to play the recorded audio. The recorded files are named according to the recording time. You can select any one to play. In the above picture, the finger shows the sound wave intensity and the time shows the recording time. 4. Camera Click icon to enable the camera, the interface will appear.a Taking a photo 1. In camera interface, click to take a photo. 2. 3. 4.
Recording a video 6. Click to switch to video. You can record video. 7. Click to start recording and click to stop. 8. The video file will be saved. 9. Click the thumbnail to play this video. 10. Click Return to return to camera. 11. Click 12. Click to switch back to camera interface. to enter recorder settings. Note: you can click to switch between front and rear camera (only available in models with double cameras). 5.
select any one you like. The new browser icon is 6. Play store Open to view and download applications. When running play store for the first time, you will be asked to login with your google account, (if you don’t have a gmail account, apply one at http://gmail.google.com). 7. Calendar Click calendar icon. When running the calendar for the first time, you will be asked to login. Input your email address and password, click next, and complete the settings according to the guide.
4. Click Activate clock. 5. Click Complete. Closing alarm clock When reaching the set alarm time, a window with the name of the alarm clock will pop up. If want the clock to alarm again after 10 minutes, click Pause and alarm again. Click Cancel to stop the alarm. Activating alarm clock If the alarm clock is set to repeat, you may want to pause the alarm instead of deleting it. 1. In alarm clock interface, click the icon after the alarm clock you want to activate. 2. Click to reactivate.
11. Map ☆To use this function, make sure you have an Internet access. When there is an internet access, click icon to open the map where you locate. You can search for the information you want as shown in the picture. 12. Email ☆Support POP3 and SMTP. Adding email account You can input one or more email addresses you want to use on the device. 1. 2. 3. 4. 5. 6. Click Email icon. In Your account interface, click Next. Click Email address option→ Input your email address.
9. Input name to display when sending message → Click Complete. 10. After setting, if you cannot connect to a free email account, please confirm with your email provider if their server support POP and SMTP or not. Inbox 1. Click Email icon. 2. If you set only one email account, it will open directly. If you set more than one email accounts, you will see the email account list. 3. Click the email account you want to open → Click Inbox. Opening an email 1. In Inbox interface, click an email to open it.
3. Click Email icon. 4. In Inbox interface, click Menu→ Account. 5. Click and hold the account you want to delete. 6. In the pop up Account option window, click Delete account. 7. Click Yes to confirm to delete. Setting default account You must always have a default account. Therefore, if you have more than one email accounts, you can select one as default. 1. Click Email icon 2. In Inbox interface, click Menu→ Account setting. 3. Click Default account to select it.
SD card or USB disk. 1. Click or to display files saved in the storage device. 2. Click and hold the file or folder you want to copy → click Copy. 3. Click icon to return to internal storage of the device →click the folder you want to copy to → click Paste. Deleting a file Click and hold the file or folder you want to delete → Click Delete → Click Yes to confirm to delete. Settings Wireless network Wi-Fi Set and manage wireless access point (refer to WIFI setting for details).
Storage Display storage status. Format SD card Delete all data saved in SD card. Battery Display battery status. Applicatio ns Manage and display status of applications in the device. Personal Account and sync Add and manage accounts in the device. Location service Set Google location service and Google search applications. Security Screen saver Set screen saver Password Password input settings. Device management 1. Add or delete device manager. 2. Unknown source APK installation settings.
6. Click the Wi-Fi network you want to connect to → if there is password, you need to enter the password → Click Connect. After connecting to WIFI network, you will see icon 7. Click on the desktop. to return to desktop. ☆ If your Wi-Fi is set to hidden, it will not be searched automatically. You need to click Add Wi-Fi network, and then enter required information to add your Wi-Fi. 3G settings 1. Before connecting to a 3G network, make sure you are using a 3G network card supported by the device.
Use of extended storage 1. Using USB disk Insert the USB disk into OTG connection wire, → then insert the OTG connection wire into the USB OTG port of the device. You can use the U disk when it is ready. ☆ Do not insert and remove USB disk repeatedly in a short time, otherwise it may damage the USB disk. 2. Using TF card ☆The device supports up to 32GB storage card. Insert the storage card into the card slot, and press it down with your finger, the message Preparing for SD card will display on screen.
4. Select a .apk file → Install. After installing, the icon of the application will display in the interface where all applications are displayed. 5. Click to run the application directly, or click Complete to return to File manager interface. Downloading and installing application from internet You can download Android applications from internet or other e-market directly and install them into your device quickly and conveniently. 1. Click Browser icon to connect to internet. 2.
Charging Connect one end of the power adaptor to supply socket, and the other end to the power socket of the device for charging. During charging, the icon of battery will be completes, the icon will be , and when charging . You can charge the device via USB cable. You can still use the device while charging, but this will prolong the charging time. Use the device at least once every week. Fully charge the battery regularly. Don’t keep the battery empty for a long time.
DECLARATION OF CONFORMITY Primux Trading S.L., Tecnópole, Edificio CEI, 32900 Ourense. Warrants that this product: PRIMUX LOGIC L1 TABLET Complies with the provisions of Directive 1999/5/CE on Radio and Telecommunications Terminal Equipment (R&TTE) of Directive 95/2006/CE on the Electrical Safety of Low Voltage Equipment and Directive 2004/108/CEE on Electromagnetic Compatibility with the standars. - For full statement please visit: http://www.primux.
44