Contenido Contenido .............................................................................................................................................................................. 1 1 Prólogo ............................................................................................................................................................................... 3 1.1 Información ...............................................................................................................
7.2 Email...................................................................................................................................................................... 28 8 Otras aplicaciones ............................................................................................................................................................ 30 8.1 Reloj ..............................................................................................................................................
Prólogo 1.1 Información Gracias por elegir nuestro Smartphone. Éste se trata de un Smartphone con funciones completas bajo Android 4.2 proporcionando diversas aplicaciones. El Smartphone dispone de 3G, Wireless, BT, GPS, FM, llamada de voz y otras funciones para que pueda navegar por Internet en cualquier momento y en cualquier lugar. El módulo GPS incorporado proporciona la función de navegación si se instala una Aplicación de Mapas.
ni la supervisión de un adulto. Por favor, cumpla las Leyes y regulaciones pertinentes cuando use su Smartphone y respete los derechos privados y legales. Utilice el cable USB de acuerdo con las instrucciones del manual para evitar daños en su Smartphone o PC. No use su Smartphone en lugares húmedos tales como baños. Manténgalo también alejado de líquidos para evitar que se viertan sobre ella por accidente.
2 Introducción al Smartphone 2.1 Accesorios Contenido de la caja Encontrará los siguientes artículos en la caja: Smartphone Cargador USB cable Manual Tarjeta de garantía Certificado del producto 2.2 Uso y preparación del Smartphone Cargar batería Cargue la batería antes de usar el producto por primera vez. Utilice el cargador que incorpora la caja para ello. 2.
Panel de notificaciones Aparecerá una notificación cuando recibas un email, esté el Wireless habilitado, o estén en proceso actividades como pueden ser descargas. Podrá abrir el panel de notificaciones para ver la información de forma detallada. Abrir el panel de notificaciones Cuando un nuevo icono de notificaciones aparezca en la columna de notificaciones, haga click en él para abrir dicho panel.
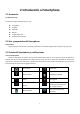
3 Inicio rápido 3.1 Botones Función de los botones Encendido Presione para suspender/despertar el Smartphone y mantenga pulsado hasta que el Smartphone se apague/encienda. Volumen + Aumentar volumen. Volumen – Disminuir volumen. Inicio Si pulsa este botón, volverá desde cualquier interface a la pantalla de Inicio.
Figura 3.1 3.4 Manejo del Panel Táctil Operando en el Smartphone. Podrá ver la pantalla de Inicio, Menú y las diversas aplicaciones de diferentes maneras. Click: Con un simple click podrá entrar en las aplicaciones del Smartphone o en cualquier otro ítem del Menú. También podrá acceder al teclado en pantalla y manejarlo de forma táctil. Mantenga pulsado: Pulse durante dos segundos para abrir las opciones de un objeto (tales como links o páginas web), o muévalo a acceso directo a la página de Inicio.
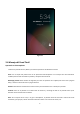
3.5 Inicio La figura 3.2 muestra la pantalla de Inicio. Presione cualquier espacio vacío para abrir apps, definir accesos directos en el fondo de pantalla etc. Cobertura Barra de notificaciones Batería Hora Buscar Figura 3.
Interface extensible de Inicio La interfaz de inicio se extiende al lado de la pantalla para proporcionar más espacios para que usted coloque nuevos atajos y herramientas. Presione el espacio en blanco de la pantalla y deslice rápidamente hacia la izquierda o derecha para mover a la izquierda o a la derecha fuera de la pantalla. Hay más de dos pantallas en la interfaz principal, como se muestra en la Figura3-2.1. Figura 3-2.1 Administrar los iconos de la aplicación en el escritorio Para Android 2.
2. Luego haga clic en este icono para mostrar todos los iconos de aplicación que ha arrastrado en él, como se muestra en la figura 3-2.3. Haga clic en la carpeta "Sin nombre" en el borde inferior de la columna de negro para que aparezca el teclado oculto, donde se puede cambiar el nombre de esta carpeta (similar con IOS); haga clic y mantenga pulsado cualquier icono de la carpeta para cambiar su lugar. Figura 3-2.3 Borrar iconos del escritorio 1.
3.6 Aplicaciones de Inicio Pulse la tecla para entrar en el Menú (ver figura 3.3) y seleccione la aplicación que desee utilizar. Figura 3.3 3.7 Conexión USB Ajustes de almacenamiento del Smartphone Antes de transferir un archivo, debe convertir los ajustes del Smartphone en modo almacenamiento. 1. Conecte el teléfono al PC a través del cable USB. Rápidamente, le aparcera un aviso en la Columna de Notificaciones. 2. Abra el Panel de Notificaciones. Para más detalles de cómo abrirlo, vaya al punto 2.
Figura 3.4 Copiar el archivo en la tarjeta de almacenamiento 1. Conecte el Smartphone y PC a través del cable USB. 2. Complete el ajuste del almacenamiento del smartphone para conectarse al PC con éxito. 3. Haga clic en Mi PC en su PC para ver el contenido en " Disco extraíble (x)". 4. Busque el archivo que desea copiar y copiarlo en " Disco extraíble (x)". 5. Después de la copia, haga clic en " Cerrar los dispositivos USB" para eliminarlo.
Uso y cambiar el método de entrada ① ⑤ Figura 3.5 ② ③ 3 1 Carácter de arriba de la tecla y mayúsculas pulsando al mismo tiempo ambas. 2 Cambiar el modo de entrada del texto 3 Espacio 4 Cambiar el modo de entrada del texto 5 Borrar hacia la izquierda del cursor ④ 3.9 Consejos para el uso Introduce el interfaz del Widget En la interfaz de la aplicación, haga clic en "Widget" en la parte superior de la pantalla y deslícela a la izquierda para cambiar la interfaz de widgets.
4 Ajustes 4.1 Conexiones Inalámbricas Establecer conexión Wireless 1. Pulse Ajustes en el Menú principal. 2. Pulse WLAN para activar Wireless, y el smartphone buscará red automáticamente tal y como muestra la Figura 4.1. 3. Seleccione la red Wi-Fi a la que desee conectarse e introduzca la contraseña en la ventana que le aparecerá. A continuación haga click en conectar. Figura 4.1 4.2 Bluetooth 1. Haga click en Ajustes en el Menú principal. 2. Haga click en Bluetooth para activarlo. 3.
4. Pulse en el dispositivo Bluetooth encontrado e introduzca la contraseña en la ventana que le aparecerá, y la conexión entre ambos se establecerá correctamente. 4.3 Pantalla Ajuste el brillo de la pantalla 1. Entre en ajustes. 2. Presione en Pantalla, y a continuación en Brillo. 3. En la ventana que le aparecerá, arrastre la Barra de brillo a la izquierda o derecha para ajustar el brillo de la pantalla tal y como muestra la Figura 4.4. Figura 4.4 Ajuste el tiempo de espera de la pantalla 1.
4.4 Gestión de apps 1. 2. Seleccione Ajustes en la Lista de aplicaciones. Seleccione una App y podrá manejar o eliminar la app instalada. Ver figura 4.6. Figura 4.6 4.5 Tarjeta SD y almacenamiento del Smartphone Ver el espacio disponible en la Tarjeta SD 1. Ajustes. 2. Almacenamiento. 3. Ver el espacio disponible en la tarjeta SD. 4. Ver el almacenamiento interno del smartphone. Mover la Tarjeta SD de forma segura 1. Ajustes. 2. Almacenamiento. 3. Mover tarjeta SD. Figura 4.
4.6 Fecha y hora El sistema utilizará la fecha, la zona horaria y la hora proporcionada por la red. Fecha, hora y zona horaria Ajuste manual. 1. Haga clic en Configuración. 2. Mueva la pantalla hacia abajo y haga clic en Fecha y hora. 3. Desactivar la fecha y hora que aparecen por defecto. 4. Desactivar zona horaria automatizada. 5. Haga clic en Seleccionar zona horaria y seleccione una zona horaria en la lista. 6.
4.8 Acerca del Smartphone Ver el Estado del Smartphone 1. Vaya a Ajustes. 2. Pulse en Estado del Smartphone. Podrá ver el estado, modelo y la versión (número) del dispositivo. Actualizar sistema 1. Ajustes. 2. Estado del Smartphone. 3. Pinche en Actualizaciones del sistema y siga las instrucciones (asegurese de que la tarjeta SD insertada contiene la última versión). Ver la versión del sistema 1. Ajustes. 2. Haga clic en Acerca del Smartphone. 3. Podrá ver el modelo, batería y versión interna. 4.
Patrón de desbloqueo 1. Haga clic en Configuración en la interfaz principal. 2. Haga clic en Seguridad. 3. Haga clic en la pantalla de bloqueo. 4. Seleccione Patrón en la ventana emergente. 5. Seleccione Siguiente 6. En la interfaz de patrón de desbloqueo de ventanas emergentes, hay 9 puntos de contacto. Conecte al menos 4 puntos en las direcciones verticales, horizontales o diagonales, como se muestra en la figura 4.10. El sistema registrará su patrón cuando quite el dedo de la pantalla. 7.
5 Multimedia 5.1 Música Entre en el reproductor de música: piche en el icono Música en el Menú principal o en el escritorio para empezar a reproducir música. Seleccione la canción deseada en la Lista de reproducción tal y como muestra la Figura 5.1: Figura 5.1 Repetir Portada Album Reproducción aleatoria Título canción Pausa/Play /播放 Artista Album Anterior Figura 5.2 Siguiente Arrastre la barra de reproducción en curso para acceder al instante de la reproducción deseado.
5.2 Vídeo Entre en el reproductor de video: haga click en el Menú principal y seleccione el video deseado como se muestra en la Figura 5.3. Figura 5.3 Play/Pausa Figura 5.4 5.3 Álbum La aplicación de álbum puede buscar imágenes y vídeos almacenados en la tarjeta SD de forma automática. Se clasificará estas fotos y videos en diferentes carpetas. Puede ver y editar las fotos, establecer como fondo de pantalla y ver las imágenes. Ver imágenes 1. Haga clic en Álbum en el menú principal. 2.
haga doble clic en la pantalla. Consejos: al visualizar la imagen, se puede deslizar a izquierda o derecha para cambiar a la anterior o la siguiente. Presentación de diapositivas 1. Abra una imagen, haga clic en el botón del menú para ver las opciones de menú. 2. Haga clic en Presentación de diapositivas para reproducir las imágenes de forma automática (también puede hacer clic en la foto de la carpeta). Recortar 1. Entre en Menú para ver las opciones. 2.
5.5 FM Radio Pinche icono para entrar en Radio: Lista de canales Marcador Frecuencia actual Siguiente Anterior Figura 5.6 Ajustes RDS: haga clic en el botón de menú en la esquina superior derecha de la imagen de arriba, haga clic en el botón de ajuste de RDS para entrar en la interfaz de configuración de RDS seleccione el elemento que desee agregar. Buscar canal: haga clic en el botón Menú en el radio y haga clic en Buscar, el sistema buscará los canales de forma automática.
6 Comunicación 6.1 Teléfono 1 Seleccione Dial para marcar el número. 2 Siga la figura 6.1. Historial de llamadas Contactos Número a llamar Números Llamar Figura 6.1 6.2 SMS 1 Entre en el Menú principal y seleccione Nuevo mensaje Figura 6.
2 Seleccione nuevo mensaje Añadir contacto (destinatario) Introducir número Enviar Mensaje Figura 6.3 6.3 Contactos Haga click en el Menú para acceder a sus Contactos. Véase figura 6.4. Figura 6.4 Búsqueda de contactos: Pulse Añada una nueva entrada: Pulse para comenzar la búsqueda. e introduzca el nuevo contacto.
7 Internet 7.1 Navegador Cuando el Wireless o la red del móvil esté conectado (ver 4.1 Wireless and network), haga click en el buscador en el Menú principal o escritorio para acceder a Internet. Ver figura 7.1 Marcadores Ver Marcadores e Historial Figura 7.1 Clicar en la barra de direcciones para introducir el URL y pulsar en Ir para visitar dicha dirección de Internet. Ver figura 7.2 Figura 7.
7.2 Email La aplicación Email proporciona un asistente de configuración de correo electrónico. Podrá añadir Cuentas POP3 o IMAP cuentas de correo electrónico de los proveedores de servicios de correo electrónico Web comunes (como Yahoo, Gmail, 163, etc.) Como se muestra en la figura 7.3. Figura 7.3 a. Ajustes de Email 1. Haga click en 2. 3. 4. 5. y el asistente de configuración te ayudará con los ajustes. Introduzca su dirección de correo electrónico y su contraseña.
4. Pinche sobre 5. 6. 7. 8. 9. en la esquina superior derecha para escribir el nuevo email. Introduzca la dirección de correo del receptor. Introduzca asunto y el mensaje. Haga click en añadir adjunto. Seleccione el documento adjunto que desee enviar (ej: fotos, vídeos, etc…) Pulse en Enviar para enviar el mensaje. Añadir adjunto Figura 7.
8 Otras aplicaciones 8.1 Reloj Pinche en Reloj para entrar en su interfaz tal y como muestra la figura 9.1. Podrá ver los botones de Reloj, Foto, Música e Inicio. Figura 9.1 8.2 Calculadora 1. Pinche en 。 2. Entre en la interfaz de la calculadora. 3. Pulse en los números y opere para realizar los diferentes cálculos. 4. Figura 9.
8.3 Gestión de archivos En la gestión de archivos, podrá copiar, cortar, borrar y renombrar los archivos y carpetas en la tarjeta TF. También podrá compartir e instalar archivos apk. En el Menú principal o Escritorio, piche en el icono para entrar en Gestión de archivos. Figura 9.3 a. Para copiar, cortar, borrar o cambiar el nombre del archivo o carpeta: seleccione un archivo o una carpeta, haga clic y mantenga pulsado para entrar en la interfaz como se muestra en la figura 9.
Figura 9.5 c. Instalar archivo apk: seleccione el archivo .apk en la Gestión de archivos y le aparecerá un asistente de instalación. A continuación, podrá instalar la aplicación deseada siguiendo las instrucciones. d. Nueva carpeta: seleccione el directorio donde quiera crear la carpeta, haga click en en la esquina superior derecha, seleccione la nueva carpeta y continue siguiendo las instrucciones. 8.4 Grabador de sonidos En el Menú principal o en el Escritorio.
9 Instalación de Apps 9.1 Instalar Instalar aplicaciones de terceros Usted puede instalar aplicaciones de terceros a través de Internet e instalarlo en el Smartphone. Copie el archivo apk de la aplicación en la tarjeta SD e insertarla en el Smartphone. 1. Haga clic en "Administrador de archivos", a continuación, seleccione la aplicación que desea instalar. 2. Haga clic y mantenga la aplicación que desea instalar. 3. En la opción de instalación en las ventanas emergentes, haga clic en Instalar apk. 4.
10 Solución de problemas 1. El primer arranque tarda más tiempo Cada vez, y después de la actualización del sistema del Smartphone, el sistema volverá a instalar aplicaciones necesarias después de la primera puesta en marcha, y este proceso puede tardar de 2 a 3 minutos. En el futuro, este problema no ocurrirá de nuevo. 2. El Smartphone no se puede conectar a Wireless Asegúrese de que el router inalámbrico funciona correctamente.
11 Declaración de Conformidad Primux Trading S.L., Tecnópole, Edificio CEI, 32900 Ourense. Declara que este producto: Smartphone Primux Beta (6.
Las especificaciones de este manual son válidas salvo error tipográfico y pueden estar sujetas a pequeñas modificaciones por parte de Primux sin previo aviso con el fin de mejorar el producto.
USER MANUAL ENGLISH 37
38
Table of Contents Table of Contents ................................................................................................................................................................ 39 1 Foreword .......................................................................................................................................................................... 41 1.1 Acknowledgement ...........................................................................................................
7.2 Email...................................................................................................................................................................... 66 8 Other Apps ....................................................................................................................................................................... 68 8.1 Clock ...........................................................................................................................................
1 Prologue 1.1 Acknowledgement Thank you for choosing our Smartphone. This is a Smartphone with complete functions under Android 4.2 providing diversified third party apps. The product supports 3G, WIFI, BT, GPS, FM , voice call, wireless communication and wireless network functions for you to surf the internet anytime and anywhere; the built-in GPS module provides navigation function if map app is installed.
Keep the Smartphone out of the reach of the kids. Do don’t allow the attended kids to use the Smartphone. Please obey laws and regulations when using the Smartphone and respect other’s privacy and legal rights. Use the USB cable in strict accordance with the instructions in this manual to avoid damage to your Smartphone or PC. No not use the Smartphone in humid environment such as the bath room. Keep the Smartphone away from any liquid.
2 Introduction to Smartphone 2.1 Accessories Packing list You will find the following articles in the package of the Smartphone: Smartphone Power adaptor USB cabl User manual Waranty card Product certificate 2.2 Using and preparing Smartphone Charging the battery Please charge the battery before using the Smartphone for the first time. 1. Charge the Smartphone using the power adaptor. 2.
Notification panel The notification will notify you when new email is received, Wireless is enabled, and the undergoing activities. You can open the notification panel to view detailed information. Open notification panel When new notification icon appears in the notification column, click it to open the notification panel.
3 Quick Start 3.1 Buttons Button functions Power Press to sleep/wake the Smartphone, press and hold to turn the Smartphone on/off Volume + button (up) Increase volume Volume – button (down) Decrease volume HOME button Click it in any interface to return to main interface, click and hold it to view the history Return button (back) Menu button Setting button Click it in any interface go back to previous menu This button displays in the app menu Click it to make settings to the system or menu 3.
Figure 3.1 3.4 Using the touch screen Operating in the Smartphone You can view the main screen, menu and apps of the Smartphone in different ways. Click: Simply click the to enter through the on-screen keypad or select the apps and other items in the home menu. Click and hold: Click and hold to open the available options of an item (such as the links in the textbox or webpage), or move the shortcuts or apps in the home menu.
3.5 Home Refer to figure 3.2 for the Home interface. Press any where blank on the main screen, you can open apps, shortcuts, define the wallpaper, etc. Prompt Notification column Battery Time Search Figure 3.
Entendible home interface Home interface is extended to out side of the screen to provide more spaces for you to place new shortcuts and tools. Press in the blank of the screen and swiftly slide left or right to move to left or right outside the screen. There are more than two screens on the main interface, as shown in Figure 3-2.1. Figure 3-2.1 Manage the App icons on desktop For Android 2.3 and below, you can create folder on the desktop, and put the icons in the same folder. For Android 4.
2. Then click this icon to display all app icons you have dragged into it, as shown in Figure 3-2.3. Click the “Unnamed folder” at the lower edge of the black column to popup the hidden keypad, where you can rename this folder (similar with IOS); click and hold any icon in the folder to change its place. Figure 3-2.3 Delete the icons on the desktop 1. Click and hold the icon you want to delete, you will see the Delete icon. 2.
3.6 Starting Apps Click the button to enter the main menu interface, as shown in figure 3.3; select the app you want to start. Figure 3.3 3.7 USB Connection Smartphone storage setting Before transferring a file, you must complete the storage mode setting of your Smartphone: 1. Connect the Smartphone and PC via USB cable. A prompt will appear in the notification column. 2. Open the notification panel, for details about how to open it please refer to 2.3 Smartphone status and notification. 3.
Figure 3.4 Copy the file into the storage card 1. Connect the Smartphone and PC via USB cable. 2. Complete Smartphone storage setting to connect to PC successfully. 3. Click My Computer in your PC to view the contents in “Removable disk (x)”. 4. Find the file you want to copy and copy it to “Removable disk (x)”. 5. After copy, click “Close USB Device” to remove it.
Use and switch input method ① ⑤ ② Figure 3.5 ③ 3 1 Switch upper and lower cases 2 Switch texts input mode 3 Click to insert space 4 Click the execute the inputs 5 Delete one character left to the cursor. Click and hold to delete all characters left to the cursor. ④ 3.9 Tips for use Enter widget interface In the App interface, click “Widget” on the top of the screen or slide left on the screen to switch to the Widget interface. Click and hold any widget to create a shortcut on the desktop.
4 Basic Setting 4.1 Wireless and network Establish Wireless connection 1. Click Setting in the main menu. 2. Click WLAN to enable Wireless, the Smartphone will scan available Wi-Fi network, as shown in Figure 4.1. 3. Select the Wi-Fi network you want to connect to, and enter the password in the popup password window, then click connect. Figure 4.1 4.2 Bluetooth Application of Bluetooth function 1. Click Setting in the main menu. 2. Click Bluetooth to enable it. 3.
4. Click the found Bluetooth device and enter the password in the popup paring window, conform at the Bluetooth device the connection will be successful. 4.3 Display Adjust brightness of the screen 1. Click Setting. 2. Click Display, and than click Brightness. 3. In the popup bright setting interface, drag the brightness bar left or right to adjust the brightness of the screen. As shown in figure 4.4. Figure 4.4 Adjust standby time of the screen 1. Click Setting. 2. Click Display. 3. Click “Screen delay”.
4.4 Manage the app 1. 2. Select Setting in the App list. Select an App, now you can manage and delete the installed app (as shown in figure 4.6). Figure 4.6 4.5 SD card Smartphone storage View available space on SD card Smartphone storage 1. Click Setting. 2. Click Storage. 3. View available space of the SD card. 4. View internal storage of the Smartphone. Safely remove the SD card 1. Click Setting. 2. Click Storage. 3. Click Remove SD card. Figure 4.
4.6 Date and time The system will use the date, time zone and time provided by the network according to the setting. Adjust date, time and time zone manually. 1. Click Setting. 2. Roll the screen down and click Date and time. 3. Disable auto date and time. 4. Disable auto time zone. 5. Click Select time zone, then select one time zone in the list. Roll the list down to view more time zones. 6. Click Set date, then click up or down to adjust the date, month and year, and then click Setting to confirm.
4.8 About the Smartphone View Smartphone status 1. Click Setting. 2. Click About the Smartphone. You can view the status, model and version number of the device. System update 1. Click Setting. 2. Click About the Smartphone. 3. Click System upgrade, and follow the instructions (make sure the SD card with the latested version is inserted). View system version 1. Click Setting. 2. Click About the Smartphone. 3. You can view the model, battery and internal version. 4.9 Schedule power on/off 1. 2. 3.
Set unlock pattern 1. Click Setting in the main interface. 2. Click Security. 3. Click Lock screen. 4. Select Pattern in the popup window. 5. Select Next according to the prompt. 6. In the popup unlock pattern interface, there are 9 touch points. Connect at least 4 points in the vertical, horizontal or diagonal directions, as shown in figure 4.10. The system will record your pattern when you finger removes from the screen. 7. Click Continue. 8.
5 Multimedia 5.1 Music Enter music player: click music icon in the main menu or desktop to start music player. Click the desired music in the list to play it. As shown in figure 5.1: Figure 5.1 Album cover Repeat Track name Random play Artist Pause/Play /播放 Album Previous Figure 5.2 Drag the progress bar to adjust play progress For operation of the music player, refer to figure 5.
5.2 Video Enter video player: click in the main menu and select a video to play it, as shown in figure 5.3 Figure 5.3 Play/Pause Figure 5.4 5.3 Album The Album app can search for pictures and videos stored in the SD card automatically. It will classify these pictures and videos in different folders. You can view and edit the photos, set as wallpaper and view the pictures. View picture 1. Click Album in the main menu. 2. Enter the album and click a folder to view the pictures in it. 3.
Tips: when viewing the picture, you can slide it left or right to switch to previous or next one. Editing and setting pictures When the picture is displayed in full screen, click the menu button to display menu options, you can select to edit and set the pictures according to need. Slide show 1. Open a picture, click the menu button to display menu options. 2. Click Slide show to play the pictures in loop automatically (you can also click in the picture folder). Cutting 1.
5.5 FM Radio Click icon in the main menu or desktop to enter main interface of radio: Channel list Radio Bookmark Current frequency Previous Next Figure 5.6 RDS setting: click Menu button in the top right corner of the above picture, click RDS setting button to enter RDS setting interface select the item you want to add. Search channel: click Menu button in the radio and click Search, the system will search for channels automatically. The found channels will be saved in channel list.
6 Communication 6.1 Telephone 1. Select Dial to dial a number. 2. Follow figure 6.1. Call history Contacts Display number Numbers Dial Figure 6.1 6.2 SMS New message 1. Enter the main menu and select Figure 6.
2. Select New message Add receiver Enter number Send the message Figure 6.3 6.3 Contacts Click in the main menu to enter Contacts. As shown in figure 6.4. Figure 6.4 Search for contacts: click Add new entry: click button to start searching. button to enter relevant interface.
7 Internet 7.1 Browser When Wireless or mobile network is connected (refer to 4.1 Wireless and network), click the browser in the main menu or desktop to enter IE interface, as shown in figure 7.1 Bookmark View bookmark and history Figure 7.1 Click the address bar to enter the URL and then click start to visit and browse the website. As shown in figure 7.2 Figure 7.
7.2 Email The Email app provides a email setup wizard. You can add POP3 or IMAP email accounts of the common Web email service providers (such as Yahoo, Gmail, 163, etc.). As shown in figure 7.3 Figure 7.3 a. Email setting 1. Click icon, the email setup wizard will help you through the setting. 2. Enter your Email address and Password. 3. Click Next to check whether the email server is available. 4. Enter the account name and the display name, then click Complete.
5. 6. 7. 8. 9. Input the email address of the receiver. Input subject and message. Click Add attachment. Select the attachment you want to send (such as picture, video, etc.) Click Send to send the email. Add attachment Figure 7.
9 Other Apps 9.1 Clock Click Clock to enter the interface as shown in figure 9.1. You can see Clock, Picture, Music and Home buttons. Figure 9.1 9.2 Calculator 1. Click 。 2. Enter calculator interface. 3. Click the numbers and operators on the calculator to make calculations. Figure 9.
9.3 File manager In the file manager you can copy, cut, delete, and rename the files or folders in the TF card. You can also share and install apk files here. In the main menu or desktop, click the File manager icon to enter it. Figure 9.3 a. To copy, cut, delete or rename the file or folder: select a file or folder, click and hold it to enter the interface as shown in figure 9.4, where you can conduct relevant operations to such file or folder. Figure 9.4 b.
Figure 9.5 c. Install apk file: select a .apk file in the file manager, a installation wizard will popup, then you can install such third party app following the instructions. d. New folder: select the directory where you want to create a new folder, click in to top right corner, select new folder, and continue according to the instructions. 9.4 Audio recorder In the main menu or desktop, click the icon start recording. Click the Stop button to enter audio recording interface.
10 Installing Apps 10.1 Install Install third party apps You can acquire third party Android app via Internet and install it into the Smartphone. Copy the .apk file of the app into the SD card and insert into the Smartphone. 1. 2. 3. 4. Click “File manager”, then select the app you want to install. Click and hold the app you want to install. In the popup installation option, click Install apk. Follow the installation wizard. Note: the third party apps acquired from the Internet are all .apk files. 10.
11 Troubleshooting 1. The first startup takes longer time Each time after system upgrade of Smartphone, the system will reinstall necessary apps after first startup, and this process may take about 2 to 3 minutes. In the future this problem will not occur again. 2. Smartphone can not connect to Wireless Make sure the wireless router works properly. The Smartphone should not be too far away from the wireless router, and there should not be all separations between them, such as walls.
12 Declaration of Conformity Primux Trading S.L., Tecnópole, Edificio CEI, 32900 Ourense. Warrants that this product: Smartphone Primux Beta Complies with the provisions of Directive 1999/5/CE on Radio and Telecommunications Terminal Equipment (R&TTE) of Directive 95/2006/CE on the Electrical Safety of Low Voltage Equipment and Directive 2004/108/CEE on Electromagnetic Compatibility with the standards: Health (SAR): EN 50360:2001 EN 62209-1:2006 EN 62479:2010 EMC: EN301 489-1 V1.9.
74