510991.
510991.qxd 6/15/2007 10:07 AM Page ii Notices: The information in this document is subject to change without notice. NO WARRANTY OF ANY KIND IS MADE WITH REGARD TO THIS MATERIAL, INCLUDING, BUT NOT LIMITED TO, THE IMPLIED WARRANTIES OF MERCHANTABILITY AND FITNESS FOR A PARTICULAR PURPOSE. No liability is assumed for errors contained herein or for incidental or consequential damages in connection with the furnishing, performance, or use of this material.
510991.qxd 6/18/2007 7:12 AM Page iii Table of Contents Section 1: Getting Started......................................................................................1 A. Choosing a Good Location ......................................................................1 B. Unpacking and Inspection.......................................................................2 C. Identifying the Parts .................................................................................
Interactive.qxd 9/6/2005 3:30 PM Page 1 Interactive Feature in this PDF Document There are interactive features that will allow you to jump to different locations within the document. Each listing in the Table of Contents is interactive. Place the cursor on either the words or the page number. A small hand with a pointing finger icon appears. Click on the line with the icon and the document will jump to that page.
10991.qxd 6/15/2007 10:07 AM Page 1 TOC INDEX Section 1: Getting Started THANK YOU… ...for purchasing the Bravo XRn Network Publisher. XRn is the perfect all-in-one solution for producing professional looking CD, DVD, and Blu-ray (if equipped) discs in a networked environment. A wide variety of disc formats are supported, including audio CDs, DVD video, data discs and more. Operation is simple and completely automatic once a job has been submitted.
510991.qxd 6/15/2007 10:07 AM Page 2 TOC INDEX B. UNPACKING AND INSPECTION The following items are inside the box: • • • • • • • • • • Bravo XRn Network Publisher 2 Gray Plastic Input and Output Bins (Located inside cardboard insert) Power Cord One Three-Color (CMY) Ink Cartridge One Monochrome Black Ink Cartridge Client Installation Disc 7' Ethernet Cable Warranty Card 2 Keys The Operator's Manual, Quick Start Guide and Other Printed Information Remove all packing tape from the unit.
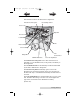
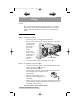
510991.qxd 6/15/2007 10:07 AM Page 3 INDEX TOC C. IDENTIFYING THE PARTS This illustration shows the XRn and its components. Robotic Disc Transporter Ink Cartridge Carrier Cover Lock Right Bin Front Cover Left Bin CPU Black Cartridge Color Cartridge LCD Control Panel Output Bin CD/DVD Recorders Recorder Tray Button The Robotic Disc Transporter moves discs from the left or right Bin, to a CD/DVD Recorder, to the printer, and finally to the Output Bin.
510991.qxd 6/15/2007 10:07 AM Page 4 INDEX TOC The Output bin is located on the front of the unit. The output bin hold up to 50 discs. The Front Cover is a durable plastic cover that will protect the unit from dust and interference. The Cover Lock allows you to lock the unit to prevent access to the blank discs and cartridges. The Ink Cartridge Carrier holds the color and black ink cartridges.
510991.qxd 6/15/2007 TOC 10:07 AM Page 5 INDEX The Power Input Port connects to the included power cable. The internal power supply is a switching 100V~240V power supply. The Power Switch shuts off all power to the unit. The Ethernet Port connects with the cable included to your network. Please Note: The equipment's Ethernet connection is intended for indoor connection only. Do not connect to an outdoor cable system. The USB Connection is connected at the factory and should not be removed.
510991.qxd 6/15/2007 10:07 AM Page 6 TOC INDEX Section 2: Hardware and Software Setup Setup This section will describe the step-by-step process of setting up your unit. This includes information on how to load the supplies (ink and disc media) necessary to start producing discs. A. HARDWARE SETUP Step 1: Applying Power • • • • Locate the power cord supplied with the unit. Place one end of the power cord into the plug on the back of the unit and the other end into a surge protected outlet.
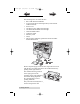
510991.qxd 6/15/2007 10:07 AM Page 7 INDEX TOC • Insert the ink cartridges into the carrier, copper end first and snap the cartridge cover in place. Insert the color in the left holder, monochrome black in the right cartridge holder. Color Black 2 1 1. Push in 2. Lift Up • Close and lock the unit’s front cover. Note: The unit will not function unless the front cover is closed and locked! Both LED lights inside the cover will be lit when the cover is locked and closed.
510991.qxd 6/15/2007 10:07 AM Page 8 TOC INDEX • The Printer will automatically position the cartridge carrier and Robotic Disc Transporter to the center position allowing for easy access to the bins. • Load the right and left bins with CDs, DVDs, DVD-DL or a combination. (Each bin can hold only one type of media) Note the type of media that you are loading in each bin. You can add this information to the description of the unit using the Administrator Utility.
510991.qxd 6/15/2007 10:07 AM Page 9 INDEX TOC B. INSTALL THE PTPUBLISHER CLIENT SOFTWARE Place the Installer CD in the client computer's CD/DVD Drive. The Installer application will automatically launch in a few moments. Click Install Client to begin the installation. By default, any computer with the PTPublisher Client software will be allowed to send jobs to the XRn. This setting can be edited using the Administrator Utility. Note: If the Installer does not start, open My Computer on your desktop.
510991.qxd 6/15/2007 10:07 AM Page 10 TOC INDEX To disable the Guest account follow this procedure: 1. From any computer that can access the XRn, open a remote desktop connection. Go to Start - All Programs - Remote Desktop Connection. Note: You may also hook up a monitor and keyboard to the XRn to gain access. If this is the case, skip to step 4. 2. In the window that appears type the name of the XRn.
510991.qxd 6/15/2007 10:07 AM Page 11 TOC INDEX Section 3: Sending Jobs to the XRn A. TUTORIAL: COPY A CD OR DVD Copy CD or Copy DVD can be used to copy any CD or DVD master. This project reads the master disc from your computer's drive to the hard drive of the XRn computer. The master is stored in the Global Image format (*.gi) in a temporary location on the XRn. The XRn uses this temporary file to make all subsequent copies that are requested.
510991.qxd 6/15/2007 10:07 AM Page 12 TOC 4. INDEX Select the print label file by clicking the select a label button. When you have selected print label file, click the next arrow. There are several ways to select a print file. See the explainations below for more information. For any job type you choose you will be prompted to select a label file to print. You may select an existing label, create a label or choose to print nothing. Simply click the next arrow to print nothing on the disc.
510991.qxd 6/15/2007 10:07 AM TOC Page 13 INDEX Locations. Click on the Locations tab to display favorite locations such as Desktop, My Documents or My Computer. Browse. Click on the Browse tab to display files in tree view on the left side of the screen. Open and close folders by clicking the + or - next to each folder. Click on the folder to view the contents on the right side of the window. Find. Click on the Find tab to search for print label files.
510991.qxd 6/15/2007 10:07 AM Page 14 TOC INDEX Choose the 120mm DiscTemplate from the window that appears. Using the buttons on the left navigation window, you may add your own background, choose a pre-made background, choose from several text effects or insert a picture. Click the down arrow on the button to view all options. Once you have designed the label go to the file menu and choose save. 4B2 - Close the SureThing program.
510991.qxd 6/15/2007 10:07 AM Page 15 TOC 5. INDEX You can edit the print settings for this file by changing the settings that appear. Several preset media types that correspond with the media availabe at our webstore are available from the Media drop down box. When you select a media type from this box the Print Quality, Outer Margin and Inner Diameter are automatically adjusted to fit that media.
510991.qxd 6/15/2007 10:07 AM Page 16 TOC INDEX When the job starts the Status window will appear. Here you can view the status of the printer, the robot, and the drive. You can also view a log of all activity or cancel the job while its in progress. B. USING PTPUBLISHER The PTPublisher program is divided into six areas. Refer to the following for a description of each area. 1. Open Project Panel This panel allows you to open a previously saved project.
510991.qxd 6/15/2007 10:07 AM TOC Page 17 INDEX 4. Robot Status Panel This panel displays a picture of currently connected robot. The current status is also displayed. Important errors such as low ink will be displayed here. Click "more status" to view status regarding the printer, recorder drive, currently running jobs and job history log. You may also click "Change Robot" to change the robot that this particular job will be submitted to.
510991.qxd 6/15/2007 10:07 AM Page 18 INDEX TOC 6. Project Detail Window This screen changes depending on the selected panel option. It can display project steps such as Adding data and Adding a print file. It can also display robot status. Finally, the support center is displayed here any time you click on the help icon. Navigate through the project steps by clicking the next arrow at the bottom right. Support Center. Help can be accessed at any time by clicking the ? icon.
510991.qxd 6/15/2007 10:07 AM Page 19 TOC INDEX 1. Open the SureThing program. Choose the 120mm DiscTemplate from the window that appears. 2. Open the background panel by click the arrow on the background button. Add your own background to the label by choosing Select Backgound. 3A. Browse to the location of your background image. To avoid skewed or blurry printing make sure your image is 120mm square and of sufficient resolution. We recommend 300 dpi. 3B.
510991.qxd 6/15/2007 10:07 AM Page 20 TOC INDEX 4B. You may also choose from several SureThing smart designs. These design templates automatically position your text and use certain text effects to give your label a professional look. You can easily toggle through smart designs by using the middle toggle button on the toggle bar below the label. 5. Finally, Open the picture panel by clicking the arrow on the Pictures/Clipart button. Add any logos, graphics or symbols to the label.
510991.qxd 6/15/2007 10:07 AM Page 21 TOC INDEX 3. On the Summary screen you will notice an Archive Job check box. Check the Archive Job box. Three text fields will appear below the check box. Fill them out with the information requested. 4. Click Go to start the job. Once the Go button has been pressed the data is sent to the XRn. This process can take a few moments or several minutes depending on the size of your job. A progress window is displayed while the data is being sent to the XRn.
510991.qxd 6/15/2007 10:07 AM Page 22 TOC INDEX 5. Once the data has been completely transferred to the XRn the archive job screen will be displayed. 6. Choose the name of the job that you submitted and click Go again. Note: Archiving Jobs on the XRn takes up hard drive space. Only archive jobs that you perform regularly. Accessing an Archived Job. To access and submit previously archived jobs follow this procedure: From the client software 1. Select Other Project from the Starter Window. 2.
510991.qxd 6/15/2007 10:08 AM Page 23 INDEX TOC 3. The archive job screen will be displayed. Choose the name of the job that you submitted, set the number of copies and click Go. From the LCD Control Panel Choose Archived Job from the main menu. Browse the available jobs using the buttons. Select the job with the . > Software Disc Marketing Disc Music CD Promotional DVD Choose the number of copies using the . By default the original number of copies specified in the archive job is displayed.
510991.qxd 6/15/2007 10:08 AM Page 24 TOC INDEX Section 4: Administrator Utility and Advanced Functions A. ADMINISTRATOR UTILITY Install the administrator utility only for users who will need to change XRn system settings such as adding/ removing authorized users, bin/media designation, viewing system logs, deleting archived jobs and designation users to be notified of system errors/warnings.
510991.qxd 6/15/2007 TOC 10:08 AM Page 25 INDEX Users Manage which users can send jobs to the XRn. There are three methods of user administration. You can choose the one that fits your situation best. The first method is set by default. 1. Allow All Users to Submit Jobs - Any users with PTPublisher installed can submit jobs to the XRn (default). 2. Select Users that can submit Jobs - Only users selected below with PTPublisher installed will be allowed to submit jobs to this XRn. 3.
510991.qxd 6/15/2007 10:08 AM Page 26 TOC INDEX Notifications It is recommend that one or more persons are designated as XRn custodian who is responsible for refilling bins, changing cartridges, and generally making sure that the system is ready for jobs. To help with this responsibility you can create a list of users to notify of system errors or warnings. For each user you can choose what types of events they will be notified for. These settings will be specific to each user that has been selected.
510991.qxd 6/15/2007 TOC 10:08 AM Page 27 INDEX If a job calls for media that has not been designated in the admin utility, the user will be prompted of this fact but will be allowed to send the job anyway. The XRn will then pick from the default bin as specified in this window. Below are a few scenarios that may provide some clarification: Scenario One: The left bin is designated as DVD and the right bin is designated as CD. The user submits a job that requires a DVD.
510991.qxd 6/15/2007 10:08 AM Page 28 TOC INDEX Logging View and sort logs for all jobs submitted to the XRn. Archived Jobs View job details or delete jobs that have been archived by users. Using the slide bar at the bottom of the screen you can also adjust the amount spaced reserved for non-archived jobs. This conversely affects space available for archived jobs so that any remaining space can be used for archived jobs. This makes sure that at least 20 GB are always available for normal jobs.
510991.qxd 6/15/2007 10:08 AM Page 29 INDEX TOC B. ADVANCED PRINTER DRIVER SETTINGS The most popular driver settings such as print quality, inner diameter and outer margin can be modified through the PTPublisher client software. The rest of the settings can be accessed in the following manner. Remote Desktop Instructions In order to access the printer driver you will need to connect to the XRn via remote desktop. You may also hook up a monitor and keyboard to the XRn to gain access. 1.
510991.qxd 6/15/2007 10:08 AM Page 30 TOC INDEX Click on the Disc Publisher XR icon with the right mouse button and select Printing Preferences. Paper Size This setting is automatically set to CD/DVD from the PTPublisher client software and should not be set on the XRn. Resolution This setting can be set from the PTPublisher client software and should not be set on the XRn. Cartridge Type The Print Black with Black Cartridge setting will print discs using both the color and black cartridges.
510991.qxd 6/15/2007 TOC 10:08 AM Page 31 INDEX Color Matching Click on the Color Matching down arrow and choose the color matching option that's right for you. Select None if you are more interested in print speed rather than color accuracy, if you have already color corrected your image for printing, or if you are using some other third party color matching software. Select Algebraic if you would like the printer driver to make very simple color balance adjustments based on an RGB color model.
510991.qxd 6/15/2007 10:08 AM Page 32 INDEX TOC Centering Test Print NOTE: Your printer comes from the factory pre-calibrated to print the image in the center of the CD. You can use this adjustment if you need to fine-tune this location. If you ever wish to verify your factory-calibrated Vertical and Horizontal calibration settings, you can run a simple calibration procedure to assure that your images will be centered when printed on a CD. To do this, refer to the following steps: 1.
510991.qxd 6/15/2007 TOC 10:08 AM Page 33 INDEX 5. Along the Vertical axis of the printed disc, find the number whose lines touch. For example, in the above illustration, the number would be 2. Enter that number into the Vertical box of the Calibration window and 0 would be entered for the Horizontal axis. 6. Select the OK button. Your images should now be centered when printed on a disc. After your selections have been made, close out of the printer setup window.
510991.qxd 6/15/2007 10:08 AM Page 34 TOC INDEX Select Clean button to send a simple test pattern to the printer. Be sure to have a disc in the Bravo's input bin and the front cover closed. The test pattern, shown below, purges ink through nozzles of your ink cartridge to clear any blockages. The test pattern will show if the nozzles require any further cleaning.
510991.qxd 6/15/2007 10:08 AM Page 35 INDEX TOC Disc Output Location Do not change this setting! It should be left in the Kiosk mode setting. Enable Bi-di Printing When enabled the Bravo will print bi-directional for faster printing. The default is uni-directional printing. When you enable bi-directional printing, you should perform the Alignment Calibration described later in this section.
510991.qxd 6/15/2007 10:09 AM Page 36 INDEX TOC C. LCD CONTROL PANEL OPERATION Using the LCD Control Panel you can change the cartridge(s), run archived jobs, access utilities, restart the system or view errors and warnings. Below is a description of the basic operation and a description of the menus. Press to browse through the menus. Press or to select a function. Press to return to the previous menu. Press time.
510991.qxd 6/15/2007 10:09 AM Page 37 INDEX TOC Main Menu The Main Menu allows access to all of the functions of the LCD Control Panel. Press the to select the function. > Archived Jobs Install Cartridges Tools Shutdown / Re-start Archived Jobs The Archived Jobs function allows access to any of the archived jobs stored on the unit. If no jobs are stored this screen will be empty. Browse the available jobs using the buttons. Select the job with the .
510991.qxd 6/15/2007 10:09 AM Page 38 TOC INDEX Install Cartridges This function allows you to change the color, black or both cartridges. See Section 2 - Step 2 for the complete cartridge change procedure. Once the cartridges has been installed you must tell the XRn which cartridge was installed by selecting it using the LCD Control Panel. Choose new color, new black, new color and black or used cartridge. Choose used cartridge if you have installed the same cartridges.
510991.qxd 6/15/2007 10:09 AM Page 39 INDEX TOC Cancelling Jobs When Jobs are running you may cancel them from the LCD Control Panel. The Busy status screen is displayed when jobs are in progress. Press the to access the cancel jobs sub-menu. Jobs Remaining: 1 Discs Remaining: 2 Ink: C=100% B=100% Press for Menu > Main Menu Cancel Jobs Use the to move the cursor down to "Cancel Jobs". Press the to select. A list of jobs currently running and an option to "Cancel All Jobs" will be displayed.
510991.qxd 6/15/2007 10:09 AM Page 40 TOC INDEX Important notes: • • The LCD goes into power save mode after 90 minutes of non-use. This means the screen becomes very dim. Simply press any button to return the brightness level to normal. The LCD screen will automatically revert to the Idle or Busy Status screen after 30 seconds of non-use.
510991.qxd 6/15/2007 10:09 AM Page 41 INDEX TOC Section 5: Maintenance and Troubleshooting A. LCD ERROR MESSAGES There are several error messages or warnings that will appear on the LCD Display. Below is a descriptions of each and their possible solutions. Input Empty. The left or right bin is out of discs. Add the discs specified in the control panel. The LCD will only show you which discs to load if bin selection has been enabled. (See 4A for more information on bin selection).
510991.qxd 6/15/2007 10:09 AM Page 42 TOC INDEX B. CLEANING THE XRN Use a clean, lint-free rag with a small amount of ammonia window cleaner to clean the XRn's outside case and trays. This type of cleaner is very effective on inks that may accumulate on the printer tray. Stronger cleaning solutions are NOT recommended because they may damage the paint and plastic materials from which the parts are manufactured. Always disconnect the XRn’s power cords before cleaning.
510991.qxd 6/15/2007 10:09 AM Page 43 INDEX TOC D. CLEANING THE INK CARTRIDGES It may be necessary to clean the ink cartridge nozzles if you notice reduced print quality, or if you suspect an cartridge nozzle has become slightly dried out or clogged. If you are having print quality problems, follow the steps below: 1. Remove the print cartridges. 2. Moisten a lint-free cloth with water. 3. Hold the cloth against the nozzles for three seconds.
510991.qxd 6/15/2007 10:09 AM Page 44 INDEX TOC Section 6: Technical Specifications Model Bravo XRn Network Publisher Printing Method Ink-Jet Processor Celeron D 2.
510991.qxd 6/18/2007 10:37 AM Page 45 TOC Index Administrator..............................................................................9, 10 Alignment Calibration............................................................30, 35 Archived Job .................................................................20, 22, 28, 37 Bin selection ...................................................................8, 26, 27, 41 BMP ..................................................................................
510991.