LX900.qxd 6/22/2011 6:40 AM Page i 062211-511271 User's Manual © 2010 All rights reserved For the most recent version of this manual please visit http://www.primera.com/manuals.
LX900.qxd 6/22/2011 6:40 AM Page ii Notices: The information in this document is subject to change without notice. NO WARRANTY OF ANY KIND IS MADE WITH REGARD TO THIS MATERIAL, INCLUDING, BUT NOT LIMITED TO, THE IMPLIED WARRANTIES OF MERCHANTABILITY AND FITNESS FOR A PARTICULAR PURPOSE. No liability is assumed for errors contained herein or for incidental or consequential damages in connection with the furnishing, performance, or use of this material.
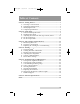
LX900.qxd 6/22/2011 6:40 AM Page iii Table of Contents Section 1: Getting Started ...............................................................................1 A. Choosing a Good Location ................................................................1 B. Unpacking and Inspection.................................................................2 C. Identifying the Parts ...........................................................................3 D. Computer Specifications ............................
Interactive.qxd 9/6/2005 3:30 PM Page 1 Interactive Feature in this PDF Document There are interactive features that will allow you to jump to different locations within the document. Each listing in the Table of Contents is interactive. Place the cursor on either the words or the page number. A small hand with a pointing finger icon appears. Click on the line with the icon and the document will jump to that page.
LX900.qxd 1/14/2010 12:39 PM Page 1 INDEX TOC Section 1: Getting Started THANK YOU… ...for choosing an LX900 Color Label Printer. The LX900 Printer will print razor-sharp text and barcodes, vibrant colors, and even stunning photo-realistic photographs directly onto rolls of labels, card stock and a variety of other approved media. This User's Manual is your complete step-by-step guide to quickly and easily setting up and printing with your new Color Label Printer! A.
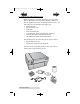
LX900.qxd 4/21/2010 12:38 PM Page 2 INDEX TOC B. UNPACKING AND INSPECTION While unpacking your printer, inspect the carton to ensure that no damage has occurred during shipping. Make sure that all supplied accessories are included with your unit.
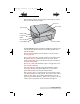
LX900.qxd 1/14/2010 12:39 PM Page 3 TOC INDEX C. IDENTIFYING THE PARTS This illustration shows the front of the printer with its control buttons and LED indicator lights. Top Cover Pause LED Pause Button Power LED Load/Feed Button Ink Low LED Unload Button Label Tear Bar The Pause Button pauses the printer AFTER the printing of the current label has finished to allow for loading of label stock and ink cartridge. The Power LED indicates that the printer is on and ready to receive print jobs.
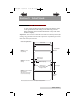
LX900.qxd 1/14/2010 12:40 PM Page 4 INDEX TOC This illustration shows the input ports and power switch found on the rear panel of the printer. USB Port Auxilary Port Power Switch Power Input Port This illustration shows the interior of the printer. Fixed Throat Guide Roll Stop Roll Arm Movable Throat Guide Roll Guide Sensor Position Adjustment D.
LX900.qxd 1/14/2010 12:40 PM Page 5 INDEX TOC Section 2: Label Stock A. LABEL AND ROLL SPECIFICATIONS A wide variety of label stock can be used in the Printer. Refer to the specifications and settings in the following sections before ordering custom stock from Primera or any stock from another company. Important! Test all custom made label stock with the intended printer before ordering large quantities! Primera will only assume responsibility for custom label stock ordered from Primera.
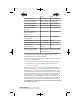
LX900.qxd 4/21/2010 12:39 PM Page 6 INDEX TOC Max Min Label width 8.25" (209mm) 0.75" (19mm) Liner/media width 8.375" (212mm) 1.5" (38mm) Label height/length 17" (431mm) 0.75" (19mm) Gap between labels 10" (253mm) 0.10 (2.5mm) Width of thru-hole opening 0.5" (12.65mm) 0.25" (6.325mm) Distance from edge of media to edge of thru-hole 2.25" (57mm) 0.20" (5.06mm) Reflective/Black Mark Width* N/A 0.1" (2.54mm) Max Outer Diameter (OD) 6.0"(152.4mm) N/A Inner Core Diameter (ID) 3.
LX900.qxd 1/14/2010 12:40 PM Page 7 INDEX TOC Roll Specifications Label Side Out Roll O.D. Label Stock 3” 6” Core I.D. Core O.D.
LX900.qxd 1/14/2010 12:40 PM Page 8 INDEX TOC B. INSTALLING LABEL STOCK The following steps will guide you through loading label stock in your printer: Make sure power is connected and printer is on. 1. Open the Top Cover. Lift Here 2. Lower the Roll Guide and pull it outward to make room for your label stock.
LX900.qxd 1/14/2010 TOC 12:40 PM Page 9 INDEX 3. Remove any shipping tape from your label stock roll to ensure that it can unroll freely, making certain that no adhesive portion is exposed. It is important to note that any exposed adhesive surface can attach itself the the inner workings of the print mechanism and cause a media jam. 4. Place your roll of label stock on the Roll Arm and push it inward until it touches the Roll Stop. Roll Stop Roll Guide DO NOT PINCH Roll Arm 5.
LX900.qxd 1/14/2010 12:41 PM Page 10 INDEX TOC 6. Pull the Movable Throat Guide outward to make room for the label stock. 7. Place the leading edge of the label stock under Label Stock the "label stock" symbols on the Throat Guides. The label stock should be placed far enough into the throat of the printer to correctly position the Movable Throat Guide but not yet into the printer itself. Movable Throat Guide Fixed Throat Guide DO NOT PINCH 8.
LX900.qxd 1/14/2010 12:41 PM Page 11 INDEX TOC C. ADJUSTING THE LABEL STOCK TOF (TOP OF FORM) SENSOR If you are using label stock other than standard square / rectangular diecut labels such as circular die-cut labels or through-hole stock use the instructions below to adjust the position of the label stock sensor. The sensor can be adjusted using the slide bar on the inside of the printer.
LX900.qxd 1/14/2010 12:41 PM Page 12 INDEX TOC The sensor can only be moved a maximum of 2.3 inches from the left side of the printable area. This means that the maximum diameter circular label that can be printed is 4.6 inches. For circular labels larger than 4.6 inches in diameter, you must have a black mark printed on the back of the label stock. This means that you must change the Stock Sensor Mode to Reflective.
LX900.qxd 1/14/2010 12:41 PM Page 13 INDEX TOC D. SET THE STOCK SENSOR MODE The stock sensor mode refers to the method the printer will use to detect the print starting position for each label. To adjust the stock sensor mode, open the PTStatus program. PTStatus automatically installs with your printer driver and can be accessed through the printer driver or as program that is accessible in the same manner as all other programs. Important Note: Set the Stock Sensor Mode BEFORE loading label stock! 1.
LX900.qxd 1/14/2010 12:41 PM Page 14 INDEX TOC Continuous. (Sensor off) If you have continuous stock with no die-cut, reflective mark or holes, set the sensor type to Continuous. This will turn off the stock sensor. It this mode there is no way to set the print starting position. The printer will simply start printing the first label and print each subsequent label immediately after that previous one.
LX900.qxd 1/14/2010 12:41 PM Page 15 TOC INDEX There are two different output modes: Present labels? - Yes (Default). This setting will cause the printer to feed the last label printed forward so that it and the previously printed labels can be torn off using the tear bar. If no other jobs are sent to the printer within one second after the last label has printed, the last printed label will present for tear off. Present labels? - No (Use with Rewinder).
LX900.qxd 1/14/2010 12:41 PM Page 16 INDEX TOC Section 3: Ink Cartridges (Status Monitor) PTStatus or Status Monitor is used to interact with the printer for gathering ink levels, maintenance, alignment, cost calculation and several other functions. PTStatus automatically installs with your printer driver and can be accessed through the printer driver preferences or as a program on your Windows start menu. 1. Connect the printer via USB and turn on the power.
LX900.qxd 1/14/2010 12:41 PM Page 17 TOC INDEX A: MONITORING INK LEVELS Ink levels can be monitored at any time by using the Status Monitor. Immediately after printing starts the Status Monitor will display the ink levels in the lower right corner of your screen. The print status will also be displayed on the top bar. In the example above the label name "Strawberry.lbl" and status "Page 3 of 3" will also be displayed.
LX900.qxd 1/15/2010 8:08 AM Page 18 TOC INDEX B. USING THE COST ESTIMATOR The cost estimator is found on the last tab of the Status Monitor. The Status Monitor automatically opens as soon as you begin printing. However, you can also access it at any time as long as the printer is turned on and communicating by going to Start Programs - Primera Technology - PTStatus. Ink cost is automatically and continuously calculated based on the black and color cartridge costs entered.
LX900.qxd 1/14/2010 TOC 12:41 PM Page 19 INDEX C. REPLACING INK CARTRIDGES / LOW INK WARNING You can replace cartridges at any time or wait for the Low Ink Warning to prompt you to replace cartridges. Low Ink Warnings occur at the following levels: 10% - If any cartridge is lower than 10% at the beginning of a job you will be prompted to change that cartridge. At this point you can change or ignore. • 0% - If any cartridge reaches 0% during a job you will be prompted to change that cartridge.
LX900.qxd 1/14/2010 12:41 PM Page 20 INDEX TOC 2. Remove the cartridge by pressing the corresponding colored tab on the back of the printhead. The cartridge will pop up slightly. 3. Remove the cartridge. 4. Locate a new cartridge and remove it from its packaging. Remove the foil outer package and the clear plastic shrink wrap. Also remove the cartridge cap.
LX900.qxd 1/14/2010 TOC 12:41 PM Page 21 INDEX 5. Place the new cartridge into its corresponding colored slot. Press down near the back of the cartridge until it clicks into position. Important Note: Make sure the cartridge is securely in place. An improperly positioned cartridge will cause no ink of that color to be printed.
LX900.qxd 1/14/2010 12:41 PM Page 22 INDEX TOC Section 4: Printing A. USING NICELABEL Your printer ships with a basic version of Niceware's NiceLabel software. This easy-to-use software is designed to allow you to create full color labels with text and barcodes quickly and simply. The following is a tutorial to guide you through creating and printing a sample label. Launch NiceLabel from your computer's Start Menu. Note: You are not required to print from the NiceLabel software.
LX900.qxd 1/14/2010 12:41 PM Page 23 INDEX TOC b. Select your printer. This should be the Color Label Printer 900. Click Finish. 3. Now you will see your label in the Document Window. You can start to design your label using Tools from the Tool Box. First, we will use the Text Tool. a. Click the Text Tool Icon in your Toolbox, then move the text cursor over the Document Window and click in the location where you want to enter text.
LX900.qxd 1/14/2010 12:42 PM Page 24 INDEX TOC 4. Now, insert a barcode. a. 24 Printing Click the Barcode Tool Icon from the Toolbox. You will now have a Barcode Cursor that can be positioned anywhere within the Document Window. Position your cursor in the general area where you wish your barcode to print and click to start entering your barcode information. There is no need to be exact, once you create your barcode it can easily be moved and/or resized.
LX900.qxd 1/14/2010 12:42 PM Page 25 INDEX TOC b. The first screen in the Barcode Wizard will allow you to select the type of Barcode you wish to print. You can also enter the data to be used in the barcode. For this we are doing a simple UPC-A barcode. For more information on other types of barcodes, please see Section 3B. Creating Barcodes in NiceLabel. c. Click OK, then click Finish and your Barcode will be placed on your label with "Edit Handles" to allow you to move and resize your barcode.
LX900.qxd 1/14/2010 Page 26 INDEX TOC 5. 12:42 PM Now insert a Picture. Click on the Picture Tool Icon in the toolbox. You will now see a Graphics Cursor. Drag the cursor to the general area where you wish to place the graphic and click to get an Open dialog box. You will be prompted to browse for graphic files. NiceLabel accepted file formats: NiceLabel will accept universal graphic files such as BMP, JPG,TIF, WMF, and PNG.
LX900.qxd 1/14/2010 12:42 PM Page 27 INDEX TOC b. There are other tools at your disposal to align the object or add shapes. On the right side of the screen you will see alignment tools so you can align the objects on your label in relation to each other. Select objects by clicking on them or clicking and dragging a "lasso" around multiple objects or by holding down the SHIFT key and clicking on each object individually.
LX900.qxd 1/14/2010 12:42 PM Page 28 INDEX TOC B. CREATING BARCODES IN NICELABEL a. Click the Barcode Tool Icon from the Toolbox. b. You will now have a Barcode Cursor that can be positioned anywhere within the Document Window. Position your cursor in the general area where you wish your barcode to print and click to start entering your barcode information. Once clicked, you will see the Barcode Wizard. i.
LX900.qxd 1/14/2010 TOC 12:42 PM Page 29 INDEX iii. This contains four tabs, General, Check Digit, Human Readable and Details. iv. The General Tab allows you to choose the appropriate barcode type from the Available barcodes: menu. You can choose one- or two-dimensional barcodes. Note that different barcode types have different requirements - some of them only allow numbers to be encoded, while others only allow upper case characters.
LX900.qxd 1/14/2010 TOC 12:42 PM Page 30 INDEX When you change the barcode dimension directly from the screen by moving the drag handle, the changed dimension will also appear in this dialog box. Some of the barcode types also allow the definition of Narrowto-wide bar ratio. It can only be set from the predefined steps in the pull-down menu - 1:2, 1:3 or 2:5. Base element width (mils) is calculated automatically from the X expansion factor. v.
LX900.qxd 1/14/2010 12:42 PM Page 31 INDEX TOC C. PRINTING FROM OTHER PROGRAMS Since this printer uses a standard Windows printer driver you can print from any application you would like. There are just a few things to remember that will make it much easier. 1. Set the Page/Label Size in the Driver. NiceLabel auto matically prompts you for the size of the label that you are using. When printing from any other program you must do this manually.
LX900.qxd 1/14/2010 12:42 PM Page 32 INDEX TOC 3. Choose the right printing program. There are many different applications that are capable of printing to the LX900. However there are only a few that are ideal printing applications. For example, Adobe Illustrator is an excellent design program but is not always the best printing program. It can be difficult to find the printing preferences or to know the exact size of the art board.
LX900.qxd 1/15/2010 8:00 AM Page 33 INDEX TOC Adjust print alignment using the Status Monitor. Go to the Alignment Tab (third tab). Three items can be adjusted here: • • • Tear off Position. This value adjusts the position of the last label printed after it has been presented for tear off. This only applies if the output mode is set to "Yes" Present the label. Add to the current value to move the tear point closer to the printer.
LX900.qxd 1/14/2010 12:42 PM Page 34 INDEX TOC You may have to make several adjustments to one or more of these values. After each adjustment you can click the Test button to print a small test pattern on the label. This will help you find the proper alignment value. E. CREATING A FULL BLEED PRINT 1. If you are having trouble making the image cover the entire label, first make sure the image is printing at least as big as the label size you have selected.
LX900.qxd 1/14/2010 12:42 PM Page 35 INDEX TOC TOF. Decrease the Top of form by 10. This will cause the printer to start printing before the label and ensure a fully printed label. 1 Decrease TOF by 10 Actual Label Stock Size = 2” x 2” 2 Decrease Left Margin Offset by 12 3 Over Bleed Page Size 2.1” x 2.1” (.1 Inch) Note: It is best to over bleed as little as possible to avoid excess ink on the label backing. Also, over bleeding too much will cause the printer to skip labels.
LX900.qxd 1/14/2010 12:42 PM Page 36 TOC INDEX To find Driver Settings: Click the Start button, choose Printers and Faxes (XP), Printers (Vista), Devices and Printers (Windows 7). Right-click on the Color Label 900 Icon and select Printing Preferences from the drop-down menu. The preferences screen will appear. NOTE on PC Settings: Most applications allow you to change these same printer driver options from their "Print" and/or "Printer Setup" screens.
LX900.qxd 1/14/2010 12:42 PM Page 37 INDEX TOC Paper Size If you are using NiceLabel, this setting is adjusted during the label setup wizard. If you are using a program other than NiceLabel you will need to set this to the dimensions of your label. Keep in mind that the dimensions are always relative to the width and height of the actual label in the printer. Orientation of an image on the label should not change this setting. See Section 2A for minimum and maximum label sizes.
LX900.qxd 1/14/2010 12:42 PM TOC Page 38 INDEX Ink Cartridge Color + Black is best for images that have large areas of black graphics or text. Although you can print these same images with just the color cartridge, often the blacks will look darker with this setting. Color is the default setting and is best for most images. With this setting the printer only uses the color cartridge to produce all colors including gray scale black and white images.
LX900.qxd 1/14/2010 12:42 PM Page 39 TOC INDEX Best for Photos mode is best used for photographic images where accurate color reproduction is very essential. Images printed in this mode will look lighter than those printed in Photo mode. Skin tones especially will look more natural in this mode. NOTE: Exact color matching of the printed labels to the screen may never be possible since there are factors that affect this out of the drivers control.
LX900.qxd 1/14/2010 12:42 PM Page 40 INDEX TOC Section 5: Troubleshooting and Maintenance A. SOLVING PRINT ALIGNMENT PROBLEMS Image is Vertically Offset The LX900 decides where to start printing by detecting the start of die-cut label, detecting a black mark on the back or detecting a thru-hole that corresponds to the start of the label. The following items can cause the label sensor to improperly detect the start of a label: 1. Top of Form (TOF).
LX900.qxd 1/14/2010 12:42 PM Page 41 INDEX TOC backing, try label stock that has a black mark on the back to show where the label begins. You will need to change the Stock Sensor Mode in the Status Monitor. 3. Insufficient Label Gap Distance. See Section 2A for label specifications. 4. Page Size is Bigger than Label Stock Size. If the page size set in the driver is larger than the actual label stock, ink will be printed on the gaps and the sensor will start looking for a gap too late.
LX900.qxd 1/14/2010 12:42 PM Page 42 INDEX TOC Page Size. Often the page size is not large enough for the label. If this is the case you may see white space on the right (printers left) side of the the label and no image over-lap on the opposite side. This indicates that the page size needs to be increased. Increase the page size through the printer preferences enough to cover the label. B. SOLVING PRINT QUALITY PROBLEMS Many factors can affect the quality of the print.
LX900.qxd 4/21/2010 12:41 PM Page 43 INDEX TOC print quality. Align the printhead by opening the PTStatus Monitor. Click on the Align Printhead button on the Cartridge Utilities Tab (second tab). Follow the onscreen prompts to load your paper for alignment. 5. Clean the Maintenance Station. Clean the maintenance station located on the right side of the print area. This includes the rubber cartridge nozzle cap and the plastic squeegee. Under normal use this can become dirty with ink.
LX900.qxd 1/14/2010 12:42 PM Page 44 INDEX TOC 8. Media. Make sure your label stock is inkjet printable. Many thermal label stocks look the same as inkjet but do not allow the ink to soak into the surface of the media. 9. Source File Image Mode. The image mode of the source file may be set to RGB instead of CMYK. This can cause the color matching to be off. Change the image mode of the original file, resave and reprint. 10. Copper Contacts.
LX900.qxd 1/14/2010 TOC 2. 12:42 PM Page 45 INDEX Resolution. Resolution is measured in dots per inch or dpi. 300 dpi is sufficient to get the best possible quality from most images. A 72 DPI image will look fine on screen but WILL NOT print well. Graphics and logos found on websites are typically 72 DPI. The image below was printed from a 72 DPI image. Notice the jagged edges. Remember, print quality settings found in the label printer driver will have no effect on improving a low dpi source image.
LX900.qxd 1/14/2010 12:42 PM Page 46 INDEX TOC 4. Color Mode. Set the color mode in the source graphic application to CMYK. In most cases this will produce the most accurate color reproduction of the image on screen. However, if CMYK is not producing the desired color matching try changing the source image to RGB and then exporting the image again in one of the universal formats mentioned above.
LX900.qxd 1/14/2010 12:42 PM Page 47 INDEX TOC D. CREATE A SUPPORT REPORT If you are encountering any problems with you LX900 tech support may ask you to create a Tech Support Report. You can do this from the Status Monitor by clicking the "i" icon and clicking Create Report… A zip file will be create on your desktop. E. CLEANING THE PRINTER If any ink has gotten on to the printer casing itself, the case of the printer can be cleaned with an ammonia based window cleaner and a lint-free cloth.
LX900.qxd 6/22/2011 6:40 AM Page 48 INDEX TOC F. CLEANING THE PRINTHEAD It may be necessary to clean the printhead nozzles if you notice reduced print quality, missing colors or if you suspect an cartridge nozzle has become slightly dried out or clogged. Try the following solutions: 1. Secure Cartridges. Make sure the corresponding cartridge is snapped into place. Remove and reseat the cartridge to make sure an air tight connection has been made.
LX900.qxd 6/22/2011 6:40 AM Page 49 INDEX TOC During this process the printer will make several loud whirring noises. This is normal! This is the sound of a pump forcing ink through the nozzles. If you do not hear this sound, the clean purge print did not complete successfully. Try again. 3B. Deep clean the cartridge. (Optional - Only clean in this manner if no back up printheads are available and if the above cleaning procedure have yielded little improvement.
LX900.qxd 6/22/2011 6:40 AM Page 50 INDEX TOC PRINTHEAD / CARTRIDGE REPLACEMENT PROCEDURE If you think your cartridge/printhead is defective, please contact tech support to arrange for a replacement. Tech support may ask you to perform troubleshooting before sending a replacement cartridge or printhead. Notes on Ink Replacement • • • • All replacements for defective cartridges or printheads must be processed through Tech Support.
LX900.qxd 6/22/2011 6:40 AM Page 51 INDEX TOC G. REPLACING THE PRINTHEAD Regular replacement of the printhead is not necessary. However it may become necessary if you notice a gradual decrease in print quality or if some of the print nozzles are still clogged after repeated manual cleanings as described in Section 5F. Follow this procedure: 1. Press the Pause and Load/Feed buttons simultaneously to move the print carriage to the center of the print area.
LX900.qxd 6/22/2011 6:40 AM Page 52 INDEX TOC 3. Remove the printhead. Grasp the printhead near the back as shown in the illustration. 4. Locate a new printhead and place it in the carriage.
LX900.qxd 6/22/2011 6:40 AM Page 53 INDEX TOC 5. Close the latch until you hear a click. 6. Press the Pause and Load/Feed buttons simultaneously to move the print carriage back to normal position. Pause Power Ink Load/ Feed Unload Press Pause + Load/Feed to Start and Finish. 7. Now align the print head as described in Section 5B.
LX900.qxd 6/22/2011 6:40 AM Page 54 INDEX TOC H. INTERPRETING THE PRINTER’S INDICATOR LIGHTS Most error messages will appear on your computer screen via the Status Monitor application. However, if the error prevents communication with the computer the LED lights may be used to help diagnose the problem. LED Explanation Intermittent Flashing Pause Printer is doing maintenance. Appears during start up or after a cartridge change. Slow Flashing Power Missing Label Stock.
LX900.qxd 6/22/2011 TOC 6:40 AM Page 55 INDEX Section 6: Technical Specifications Print Method: Thermal inkjet with Primera Imaging Perfection enhancements Print Resolutions: Up to 4800 DPI Print Speeds: Draft Mode: 4.5" per second Normal Mode: 1.8" per second High Quality Mode: 0.8" per second Print Head: Semi-permanent, user-replaceable Ink Tanks: Individual ink cartridges for Cyan, Magenta, Yellow and Black Colors: 16.7 million Color Matching: Z-Color™ Color Matching Software Max. Print Width: 8.
LX900.qxd 6/22/2011 6:40 AM Page 56 TOC Index Align Printhead ...............................................................................42 Alignment Tab .....................................................................13, 16, 40 Barcode Wizard .........................................................................24, 28 Bidirectional.....................................................................................39 Black Mark ..............................................................
LX900.qxd 6/22/2011 6:40 AM Page 57 Printer Driver Settings ...................................................................35 Printhead Aligning.....................................................................................42 Cleaning ..............................................................................42, 48 Replacing...................................................................................51 Printing ..........................................................................
LX900.