510921PM.
510921PM.qxd 1/25/2007 8:52 AM Page ii Notices: The information in this document is subject to change without notice. NO WARRANTY OF ANY KIND IS MADE WITH REGARD TO THIS MATERIAL, INCLUDING, BUT NOT LIMITED TO, THE IMPLIED WARRANTIES OF MERCHANTABILITY AND FITNESS FOR A PARTICULAR PURPOSE. No liability is assumed for errors contained herein or for incidental or consequential damages in connection with the furnishing, performance, or use of this material.
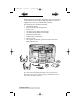
510921PM.qxd 1/25/2007 8:52 AM Page iii Table of Contents Section 1: Getting Started ...............................................................................1 A. Choosing a Good Location ................................................................1 B. Unpacking and Inspection.................................................................2 C. Identifying the Parts ...........................................................................3 D. PC System Requirements...........................
Interactive.qxd 9/6/2005 3:30 PM Page 1 Interactive Feature in this PDF Document There are interactive features that will allow you to jump to different locations within the document. Each listing in the Table of Contents is interactive. Place the cursor on either the words or the page number. A small hand with a pointing finger icon appears. Click on the line with the icon and the document will jump to that page.
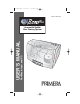
10921PM.qxd 1/25/2007 8:52 AM Page 1 TOC INDEX Section 1: Getting Started THANK YOU… ...for purchasing the BravoProTM AutoPrinter. The BravoPro is the perfect all-in-one solution for printing professional looking CDs and DVDs. Operation is simple and completely automatic once a job has been started. To begin using your AutoPrinter, please read this manual carefully. This Operator's Manual is a complete step-by-step guide to quickly and easily print discs with your new AutoPrinter.
510921PM.qxd 1/25/2007 8:52 AM Page 2 TOC INDEX B. UNPACKING AND INSPECTION While unpacking your Printer, inspect the carton to ensure that no damage has occurred during shipping. Make sure that all supplied accessories are included with your unit.
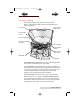
510921PM.qxd 1/25/2007 8:52 AM Page 3 TOC INDEX C. IDENTIFYING THE PARTS Front Panel and Top This illustration shows the Printer, its Control Panel, Buttons, LED indicator lights, Input and Output Bins and other components.
510921PM.qxd 1/25/2007 8:52 AM Page 4 INDEX TOC The Input/Output Bins are situated under the top cover of the Printer. The bins will hold up to 50 discs. The right-side bin is the Input Bin for blank media; the left-side bin is the Output Bin for finished discs. The Front Cover is a durable plastic cover that will protect the Printer from dust and interference. The Ink Cartridge Carrier holds both a color ink cartridge (right-side pen) and a monochrome ink cartridge (leftside pen).
510921PM.qxd 1/25/2007 8:52 AM Page 5 TOC INDEX • Free hard drive space of at least 10 GB. • Available USB Port. If your PC does not have these minimum system requirements, system performance may not be acceptable. E. MAC SYSTEM REQUIREMENTS Before getting started, it is important for you to verify that your computer meets the recommended system requirements. Here's what you need in order to successfully burn and print with the Discribe software: • G4 PowerPC 700MHz or higher running OS X version 10.
510921PM.qxd 1/25/2007 TOC 8:52 AM Page 6 INDEX 2. The Robotic Disc Transporter will pick a disc from the Input Bin. After each disc is placed in the printer, the Robotic Disc Transporter checks the input stack to "see" if multiple discs were accidentally picked. 3. Printing will now begin. Print time varies according to which print mode has been selected (section 3-A). In most cases, print time takes no more than 2 minutes.
510921PM.qxd 1/25/2007 8:52 AM Page 7 INDEX TOC Section 2: Hardware and Software Setup Set-Up This section will describe the step-by-step process of setting up your Printer. This includes information on how to load the supplies (ink and disc media) necessary to start printing discs. A. INSTALLING THE PC SOFTWARE The Installer Disc has a QuickStart menu that will guide you through the process of setting up your duplicator. Please refer to the following for more information on each step: 1.
510921PM.qxd 1/25/2007 8:52 AM Page 8 TOC c. INDEX Double-click on the AutoPrinterPro Installer.mpkg file icon. Follow the on-screen instructions. d. The volume containing the operating system should be selected for installation. Click the Continue button. All components will be installed to their proper locations. e. Once the installation has completed, click Quit. You have successfully installed all the necessary software! Section C below will describe how to connect the Printer to your Mac. C.
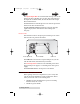
510921PM.qxd 1/25/2007 8:52 AM Page 9 INDEX TOC Refer to the following steps when loading discs in to the Printer: • Open the front cover of the Printer • The Printer will automatically position the cartridge carrier and Robotic Disc Transporter to the center position allowing for easy access to the bins. • Load the Input Bin (the bin located on the right-hand side of the Printer) with 50 blank discs and place the bins on the mounting pegs.
510921PM.qxd 1/25/2007 8:52 AM Page 10 TOC INDEX Step 3: Connecting the USB 2.0 Cable/Installing the Driver Connect the Printer to your PC or Mac with your beige USB 2.0 Cable. If you are using a PC: If you are using a PC, after a few moments, Windows will tell you it has found new hardware and is looking for software to install it.
510921PM.qxd 1/25/2007 8:52 AM Page 11 TOC INDEX If you are using a Macintosh: When connecting USB to a Mac it may be necessary to Add the printer via the Printer Setup Utility. 1. Open the Printer Setup Utility located in the Applications Utilities folder. 2. Click Add. Select the Disc Publisher Pro from the list of available printers. Click Add again.
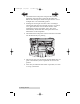
510921PM.qxd 1/25/2007 8:52 AM Page 12 TOC INDEX Step 4: Installing Ink Cartridges • With the cover open, press the Ink Cartridge Button to move the Ink Cartridge Carrier to the load position and open the ink cartridge covers. • Remove each ink cartridge from its packaging. • Slowly remove the tape covering the cartridge's print head. DO NOT TOUCH THE COPPER AREA! • Insert the ink cartridges into the carrier, copper end first and snap the cartridge cover in place.
510921PM.qxd 1/25/2007 8:52 AM Page 13 INDEX TOC Section 3: Printing Discs on a PC The printer driver allows you to adjust quality, speed and other settings. Both will be described in detail in this section. A. SETTING UP THE PRINTER DRIVER Once the Printer software has been successfully installed, you will want to take a moment to familiarize yourself with the printer driver settings for your Printer. These settings affect the print quality of your discs.
510921PM.qxd 1/25/2007 8:52 AM TOC Page 14 INDEX NOTE: Most applications allow you to change these same printer driver options from their "Print" and/or "Printer Setup" screens. This means that you don't have to go back to the main printer setup window each time you want to change a setting or option in the printer driver. These applications will usually give you the same choices and options, but in a slightly altered format.
510921PM.qxd 1/25/2007 8:52 AM Page 15 TOC INDEX Business Card Disc - This prints to the 58mm by 86mm rectangular business card CD-r media (Primera Part Number 53340). Hockey Rink Disc - This setting is for the rounded edge or, "Hockey Rink", shaped business card CD-r media (Primera Part Number 53341). Non-printable Outer Margin Adjust this value to print all the way to the outer edge of a CD. This is useful if you are printing full coverage images.
510921PM.qxd 1/25/2007 8:52 AM Page 16 TOC INDEX Ink Saturation This option controls the ink saturation of the printed image. When printing onto the printer manufacturer's TuffCoat CD media, this option can be left at its default setting of 100%. When printing onto other brands of printable CD media, you may need to adjust this control in order to optimize the ink saturation for the printable surface of your specific CD media. Click on the up and down arrows to change the ink saturation setting.
1/25/2007 8:52 AM Page 17 INDEX TOC centered when printed on a CD. To do this, refer to the following steps: 1. Verify that a disc and a color ink cartridge are installed in the Printer. It is important to use the same disc you normally use for your publishing because different brands of discs may vary slightly in size. Also, verify that the Printer is powered ON and that it is connected to your computer. 2. Click on the Center the Print Image and then the Properties button.
510921PM.qxd 1/25/2007 8:52 AM Page 18 TOC 6. INDEX Select the OK button. Your images should now be centered when printed on a disc. After your selections have been made, close out of the printer setup window. You are now ready to go to an application program and print. All printer driver selections will stay the same until you change them. Enable Ink Low Warning This setting lets you enable or disable the warning from the printer to tell you when the ink cartridges are getting low.
510921PM.qxd 1/25/2007 8:52 AM TOC Page 19 INDEX Clean/Purge Select Clean/Purge button to send a simple test pattern to the printer. Be sure to have a disc in the Printer's input bin and the front cover closed. The test pattern purges ink through nozzles of your ink cartridge to clear any blockages. Details Select the Details button for information on the drivers, firmware, alignment and number of discs printed with your Printer.
510921PM.qxd 1/25/2007 8:52 AM Page 20 TOC INDEX B. CREATING A PRINT LABEL USING SURETHING The SureThing Disc Labeler software included with your Printer is a great tool for creating professional looking discs. You can use SureThing's Smart Designs to quickly label a disc, or easily import your own design in many popular file formats. The Help section included with the software will provide complete instructions on all the features in this package.
510921PM.qxd 1/25/2007 8:52 AM Page 21 TOC INDEX 4A. Open the text panel by clicking the arrow on the text button. Add text by selecting one of the options below. To create text that follows the curve of the disc choose Add Circular Text. 4B. You may also choose from several SureThing smart designs. These design templates automatically position your text and use certain text effects to give your label a professional look.
510921PM.qxd 1/25/2007 8:52 AM Page 22 INDEX TOC D. USING KIOSK MODE Kiosk Mode allows you to use both of Printer's Bins as input, doubling your disc capacity from 50 discs to 100 discs. In this mode, the finished discs will be deposited out through the front "reject area" of the Printer. In Kiosk mode all discs would be ejected in this manner. Rejects can be identified in the stack because they will not be printed in the same manner as successfully recorded discs.
510921PM.qxd 1/25/2007 8:52 AM Page 23 TOC INDEX Kiosk mode is enabled as follows: Click the Start button. For Windows 2000 point to Settings and click on Printers. For XP Professional click on Printers and Faxes. For XP Home click on Control Panel, then click on Printers and Other Hardware, then click on Printers and Faxes. For Windows Vista click the Windows button and choose Printers. Click on the Disc Printer Pro icon with the right mouse button and select Printing Preferences.
510921PM.qxd 1/25/2007 8:52 AM Page 24 TOC INDEX Section 4: Printing Discs on a Mac A. PRINTED LABEL FORMAT REQUIREMENTS Your printer driver allows you to create labels in most any graphics application. The driver will center the image and automatically crop it to the shape of a CD. This means you do not necessarily need a template to create a CD in your favorite graphics program. Simply create a custom page size of 120mm (4.
510921PM.qxd 1/25/2007 8:52 AM Page 25 INDEX TOC 4. Before you print or save your image in another format, either hide the template layer or delete the template layer. The circular shape and center cut out should not be printed. Use it only as a guide to layout your image. B. PRINTING FROM ANY APPLICATION To print simply follow the normal procedure for printing from your graphics application. Select the Disc Publisher Pro as your printer. Select the number of copies.
510921PM.qxd 1/25/2007 8:52 AM INDEX TOC 2. Page 26 The paper sizes for the Printer refer to the type of disc to which you will be printing. The available sizes are: CD/DVD, Business Card Disc, 80mm CD Hockey Rink Disc and Digital Vinyl Disc. Print Settings Click Print Setup to see the driver window and all of its settings. Click the Copies and Pages button and select Printer Settings option in the drop-down menu to see the full pane and access all the printer driver settings.
510921PM.qxd 1/25/2007 TOC 8:52 AM Page 27 INDEX The following is a description of the printer driver settings: • • • • • • Cartridge to use The Black and Color setting will use both cartridges when printing your image. Color will only use the Color Cartridge, and Black Only will only use the monochrome cartridge for printing.
510921PM.qxd 1/25/2007 8:52 AM Page 28 TOC • • • • INDEX Outer Margin The Outer Margin refers to where the printing will cut off around the outer edge of your disc. The size of the printable surface can vary from one type of media to the next. This allows you to set the outer margin in millimeters allowing you to print all the way to the edge regardless of the type of disc you are using. Config Utility This button launches the Configuration Utility.
510921PM.qxd 1/25/2007 8:52 AM TOC Page 29 INDEX You can also launch the Configuration Utility from the Disc Publisher Pro printer settings in any printing application by clicking File then Print and selecting Printer Settings. In Printer Settings you will find a button to launch the Configuration Utility. When launched, the following pane appears: You will see both the Color and Monochrome Ink Levels are displayed. The Color Ink Level represents the lowest color in your cartridge.
510921PM.qxd 1/25/2007 8:52 AM Page 30 TOC INDEX nozzles are not fully clear after a few cleaning prints, it may be necessary to remove the cartridge and actually clean the print head by gently blotting the nozzles with a moist cloth or paper towel and replace it in the Printer. Change Cartridge If you need to change cartridges, it is a good idea to use the Change Cartridge button in the Configuration Utility. This ensures the most accurate tracking of ink levels.
1/25/2007 8:53 AM Page 31 INDEX TOC prompted to open the Printer's front cover, rotate the printed disc 180 degrees, reload it into the input, and close the cover. Click OK when ready and the Printer will pick the disc and print another scale of numbers. The disc should look like this: After printing this image once, rotate this CD so the ARROWS point to the BACK of the printer and print again.
510921PM.qxd 1/25/2007 8:53 AM TOC Page 32 INDEX Look at the finished alignment disc and pick the numbers that come closest to lining up with one another. For instance, on the disc shown in this manual, the vertical alignment is 2 and the horizontal alignment is 0. Enter this in the alignment dialog box. If you choose not to print the test print, you will simply see the alignment dialog box and can enter values to move the image. The unit of measure is roughly 0.1mm.
510921PM.qxd 1/25/2007 8:53 AM Page 33 INDEX TOC Section 5: Interpreting the Printer's Indicator Lights The Power and Busy LED indicator lights located on the top of the Printer can tell you a lot about what is happening inside the Printer.
510921PM.qxd 1/25/2007 8:53 AM Page 34 TOC INDEX Section 6: Maintenance and Troubleshooting The Printer is designed to operate for extended periods of time with very little attention. In fact, no regular maintenance is recommended other than cleaning the outside case. NOTE: Do NOT attempt to oil or grease the Printer's Robotic Arm shaft or other components.
510921PM.qxd 1/25/2007 8:53 AM Page 35 INDEX TOC C. CLEARING A MEDIA JAM If a disc should become jammed inside the printing area of the Printer, with the lid closed press the Cartridge Button. This will eject the Printer Tray. Then open the lid. The Cartridge Carrier will move to the center position automatically. WAIT FOR THE CARTRIDGE CARRIER TO STOP MOVING! Then carefully move the cartridge carrier assembly to the left to gain access to the printer tray. D.
510921PM.qxd 1/25/2007 8:53 AM Page 36 INDEX TOC Section 7: Technical Specifications Model Auto Printer Pro Printing Method Ink-Jet Printing Resolution 4800 x 1200 dpi, 1200 x 1200 dpi, 600 x 600 dpi Ink Types Dual Cartridges: One 3-color (CMY) cartridge, and one Black Monochrome (K) Media Types Ink-Jet Printable Surface CD-R, CD-RW, DVD-R, DVD RAM, DVD+R, DVD+R. Maximum print width 4.
510921PM.qxd 1/25/2007 8:53 AM Page 37 TOC Index Alignment Calibration..................................................................30 Cartridge Type ................................................................................15 Centering Test Print.......................................................................30 Color Matching.........................................................................15, 27 Connections, Rear Panel ..........................................................
510921PM.