
User Manual


QUICK GUIDE
S450 Bluetooth Laser Mouse for Notebooks
S450 Bluetooth Laser Mouse for Notebooks
EN To view the complete User's Manual and/or to install the driver, please refer to either the CD-ROM
enclosed in the package, or go online to: www.icon7.com/support.aspx
PL W celu wyświetlenia całego podręcznika użytkownika i/lub instalacji sterownika należy odszukać w
opakowaniu dysk CD-ROM lub przejść online pod adres: www.icon7.com/support.aspx
HU A teljes felhasználói kézikönyv megtekintéséhez és/vagy az illesztőprogram telepítéséhez tekintse meg a
csomagban mellékelt CD-ROM-ot, vagy látogassa meg a weboldalt: www.icon7.com/support.aspx
SP PPara visualizar el Manual de usuario completo y/o instalar el controlador, consulte el CD-ROM incluido
en el embalaje o diríjase a: www.icon7.com/support.aspx
CZ Pokyny pro zobrazení celé uživatelské příručky a/nebo pro instalaci ovladače najdete na disku CD-ROM
přiloženém v krabici nebo online na: www.icon7.com/support.aspx
RO Pentru a vedea Manualul de ulizare complet şi/sau pentru a instala driverul, consultaţi CD-ROM-ul inclus
în pachet sau accesaţi online: www.icon7.com/support.aspx
www.icon7.com/support.aspx
Bluetooth
Laser Mouse for Notebooks
Bluetooth
Laser Mouse for Notebooks
S450
Icon 7 Inc. 3-Year Limited Warranty Information
Thank you for your purchase of our product! Icon 7 Inc. (“Icon7”) warrants your Icon7 hardware
product against defects in material and workmanship under normal condions of use and service
for three years beginning from your original date of purchase. Please retain your original dated sales
receipt as proof of the date of purchase. You will need it and might be requested to show the receipt
for your warranty service. In addion, this warranty is limited to the original purchaser and is
non-transferable. Under this warranty, Icon7, at its discreon, shall repair or replace
the defecve device.
For this warranty to be in effect, by normal condions of use, the product should be used and
handled as outlined in the instrucons accompanying the product. Icon7 does not cover any
damage due to accident, negligence or misuse of the product. This warranty is only valid if the
product is used on the required systems as outlined on the packaging. Please check the product
box or use's manual for further details and instrucons. Any other inquiry,
please e-mail: support@icon7.com.
Repair or replacement, as indicated in this warranty, is at the discreon of Icon7.
Icon7 shall not be responsible or liable for any incidental damages. Some territories/countries
do not allow limitaons on how long a warranty lasts, so the above limitaon may not apply
to your parcular territory/country.
Designed by Icon 7 Inc.
Made in China
FCC Statement
This equipment has been tested and found to comply with the limits for a Class B digital device,
pursuant to Part 15 of the FCC Rules. These limits are designed to provide reasonable protecon
against harmful interference in a residenal installaon. This equipment generates uses and can
radiate radio frequency energy and, if not installed and used in accordance with the instrucons,
may cause harmful interference to radio communicaons. However, there is no guarantee that
interference will not occur in a parcular installaon. If this equipment does cause harmful
interference to radio or television recepon, which can be determined by turning the equipment
off and on, the user is encouraged to try to correct the interference by one or more of the
following measures:
- Reorient or relocate the receiving antenna.
- Increase the separaon between the equipment and receiver.
- Connect the equipment into an outlet on a circuit different from that to which the receiver
is connected.
- Consult the dealer or an experienced radio/TV technician for help.
FCC Cauon: Any changes or modificaons not expressly approved by the party responsible for
compliance could void the user's authority to operate this equipment.any interference received,
including interference that may cause undesired operaon.
IMPORTANT NOTE:
FCC Radiaon Exposure Statement:
This equipment complies with FCC radiaon exposure limits set forth for an uncontrolled
environment. This equipment should be installed and operated with minimum distance 20cm
between the radiator & your body. This transmier must not be co-located or operang in
conjuncon with any other antenna or transmier.
This device complies with Part 15 of the FCC Rules. Operaon is subject to the following two
condions: (1) This device may not cause harmful interference, and (2) this device must accept
any interference received, including interference that may cause undesired operaon.
RSVP Your Icon7 Style Now!
Thank you for your interest and purchase of an Icon7 product!
Your enjoyment and sasfacon with our product(s) are our greatest achievements, and to beer
serve you, we cordially invite you to register your Icon7 product online at:
www.icon7.com/support.aspx
Please go to the link above to register and receive Icon7's latest news, product, soware and
driver updates, plus other fun-filled offerings…
So, don't wait and
REGISTER TODAY!
* For complete informaon about Icon7's Privacy Policy, please visit us at
www.icon7.com
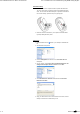
1. 4-way Scroll Wheel
2. Top Buon
1) Holding for 2 sec. for DPI seng switch
2) Single Click for Vista Applicaon Switch
3) Double Click for Vista Flip 3D
3. DPI Indicator
1) Green : 800 dpi
2) Orange : 1200 dpi
3) Red : 1600 dpi
4. Power LED
1) Orange: Baery level normal
2) Orange blinking slowly: Baery level running low
3) Orange blinking rapidly: Baery level crically low
5. Bluetooth® Connecon Indicator
1) Blue blinking once every one second: Pairing Mode
2) Blue double-blinking once every one second:
Connecng Mode
6. Backward (Window Buon 4)
7. Power Switch
8. Bluetooth® Pairing Buon
EN 1. 4-kierunkowe przewijanie
2. Górny guzik
1) Przytrzymanie przez 2 sek. Przełącza przełącznik
ustawień DPI
2) Pojedyncze kliknięcie przełącza aplikacje
3) Dwukrotne kliknięcie włącza funkcję Vista Flip 3D
3. Wskaźnik DPI
1) Migając w kolore pomarańczowym: 800 dpi
2) Pomarańczowy: 1200 dpi
3) Niebieski: 1600 dp
4. Włączanie diody świecącej
1) Pomarańczowy: Poziom baterii normalny
2) Pomarańczowy migający powoli: Słabe baterie
3) Pomarańczowy migający szybko: Baterie prawie
wyczerpane
5. Wskaźnik połączenia Bluetooth®
1) Niebieski migający raz na 1s: tryb parowania urządzeń
2) Niebieski migający podwójnie w ciągu 1s: tryb łączenia
urządzeń
6. Do tyłu (przycisk okna 4)
7. Włącznik zasilania
8. Bluetooth® Przycisk parowania urządzeń
PL
1. Négyirányú görgetőgomb
2. Felső gomb
1) Tartsa lenyomva 2 másodpercig a DPI
beállítás váltásához
2) Egy kantás az alkalmazások közö váltáshoz
3) Dupla kantás a Vista Flip 3D funkcióhoz
3. DPI kijelző
1) Narancssárga fénnyel villog : 800 dpi
2) Narancssárga : 1200 dpi
3) Kék : 1600 dpi"
4. Bekapcsolt állapotot jelző LED
1) Narancssárga: Elem töltésszintje normális
2) Narancssárga lassan villog: Az elem kezd lemerülni
3) Narancssárga gyorsan villog: Az elem csaknem kimerült
5. Bluetooth® kapcsolat kijelző
1) A kék jelzőlámpa másodpercenként egyet
villan: párosítás
2) A kék jelzőlámpa másodpercenként keőt
villan: csatlakozás
6. Vissza (Windows 4. gomb)
7. Üzemkapcsoló
8. Bluetooth® Párosítás Gomb
HU 1. 4směrné procházení
2. Horní tlačítko
1) Ssknu a podržení o dobu 2 sekund: přepínač DPI
Seng (Nastavení DPI)
2) Klepnu: Vista Applicaon Switch (Přepínačaplikací)
3) Poklepání: Vista Flip 3D (Překlopit 3D)
3. Indikátor DPI
1) Bliká oranžově : 800 dpi
2) Oranžová : 1200 dpi
3) Modrá : 1600 dpi
4. Indikátor napájení
1) Oranžová: Normální napě baterie
2) Oranžová bliká pomalu: Napě baterie se snižuje
3) Oranžová bliká rychle: Napě baterie je kricky nízké
5. Bluetooth® Indikátor připojení
1) Modré blikání každou sekundu: Režim párování
2) Dvojité modré blikání každou sekundu:
Režim připojování
6. Dozadu (tlačítko Window 4)
7. Vypínač
8. Bluetooth® Párovací tlačítko
CZ
1. Desplazamiento en 4 direcciones
2. Botón superior
1) Manténgalo presionado durante 2 segundos para
cambiar a la configuración DPI
2) Haga clic con él para cambiar de aplicación
3) Haga doble clic con él para pasar a Vista Flip 3D
3. Indicador DPI
1) Ilumina en color naranja : 800 ppp
2) Naranja : 1200 ppp- Azul : 1600 ppp
4. LED de encendido
1) Naranja: Carga normal de las pilas
2) Naranja con parpadeos lentos: Carga baja de las pilas
3) Naranja con parpadeos rápidos: Carga muy baja
de las pilas
5. Indicador de conexión Bluetooth®
1) Un destello por segundo en color azul: modo
de asociación
2) Dos destellos por segundo en color azul: modo
de conexión
6. Retroceder (botón de ventana 4)
7. Conmutador de alimentación
8. Botón de asociación Bluetooth®
SP 1. Defilare în 4 sensuri
2. Buton superior
1) Menţineţi apăsat mp de 2 sec. pentru comutare
Setare DPI
2) Faceţi un singur clic pentru comutare aplicaţie
3) Faceţi dublu clic pentru Răsturnare 3D
3. Indicator DPI
1) portocaliu intermitent : 800 dpi
2) Portocaliu : 1200 dpi
3) Albastru : 1600 dpi
4. LED alimentare
1) Portocaliu : Nivel baterie normal
2) Portocaliu intermitent încet: Nivel baterie slabă
3) Portocaliu intermitent rapid: Nivel baterie cric
5. Indicator conectare Bluetooth®
1) Albastru clipitor o dată la o secundă: Mod asociere
2) Albastru clipitor de două ori la o secundă: Mod conectare
6. Înapoi (buton 4 Window)
7. Comutator de alimentare
8. Buton asociere Bluetooth®
RO
* Toshiba®
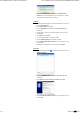
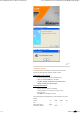
1. (EN) Double-click Bluetooth Sengs icon located at the boom of the screen, and then click New Connecon.
(PL) Kliknij podwójnie na ikonę Ustawienia Bluetooth zlokalizowaną na dole ekranu, następnie naciśnij Nowe Połączenie.
(HU) Kantson duplán a Bluetooth Beállítások ikonra képernyője alsó részén, majd válassza ki az Új Kapcsolat-ot.
(SP) Haga doble clic en el icono Configuración Bluetooth situado en la parte inferior de la pantalla y, a connuación,
en Nueva conexión.
(CZ) Proveďte dvojité kliknu na ikonu Bluetooth nastavení umístěnou na spodní straně obrazovky a pak klikněte
na Nové připojení.
(RO) Daţi dublu clic pe pictograma Setări Bluetooth localizată în partea inferioară a ecranului şi apoi daţi clic pe
Conexiune nouă.
2. (EN) Select Express Mode and click Next.
(PL) Wybierz Express Mode i naciśnij Next.
(HU) Válassza ki az Expressz mód-ot és kantson a következő gombra.
(SP) Seleccione Modo Express y haga clic en Siguiente.
(CZ) Zvolte Expresní režim a klikněte na Další.
(RO) Selectaţi Mod expres şi daţi clic pe Înainte.
3. (EN) Press the Pairing Buon on S450 mouse. The connecon LED starts flashing blue.
(PL) Naciśnij Przycisk Parowania myszki S450. Dioda LED połączenia zacznie pulsować na niebiesko.
(HU) Nyomja meg a párosító gombot az S450 egéren. A csatlakozás kijelző kék fénnyel villogni kezd.
(SP) Pulse el botón de asociación del ratón S450. El indicador LED de conexión comenzará a parpadear en color azul.
(CZ) Zmáčkněte Párovací tlačítko na myši S450. LED připojení začne modře blikat.
(RO) Apăsaţi Butonul de asociere de pe mouse-ul S450. LED-ul de conectare începe să clipească albastru.
4. (EN) On your computer, when a screen appears asking you to select a device, click Refresh.
(PL) Na ekranie pojawi sie komunikat proszący o wybór urządzenia, naciśnij Odśwież.
(HU) Amikor számítógépe képernyőjén megjelenik, hogy válasszon ki egy eszközt, kantson a frissítés gombra.
(SP) Si aparece una pantalla en su equipo solicitando la selección de un disposivo, haga clic en Actualizar.
(CZ) Když se na vašem počítači objeví obrazovka se žádos o výběr zařízení, klikněte Obnovit.
(RO) Pe calculatorul dvs., atunci când apare solicitându-vă să selectaţi un dispoziv, daţi clic pe Reîmprospătare.
5. (EN) Select Icon7 S450 Bluetooth Laser Mouse on your computer screen, and then click Next.
(PL) Wybierz Icon7 S450 Bluetooth Laser Mouse w oknie komputera i kliknij Next.
(HU) Válassza ki az Icon7 S450 Bluetooth Laser Mouse opciót a képernyőn, majd kantson a Következő gombra.
(SP) Seleccione Ratón láser Bluetooth S450 de Icon7 en la pantalla de su equipo y haga clic en Siguiente.
(CZ) Zvolte Icon7 S450 Bluetooth Laser Mouse na obrazovce vašeho počítače a pak klikněte na Další.
(RO) Selectaţi Icon7 S450 Bluetooth Laser Mouse pe ecranul calculatorului dvs. şi apoi daţi clic pe Înainte.
6. (EN) Follow the onscreen instrucons to finish connecng.
(PL) Postępuj zgodnie z komendami pojawiającymi sie na ekranie aby zakończyć procedurę połączenia.
(HU) Kövesse a képernyőn megjelenő utasításokat a beállítások befejezéséhez.
(SP) Siga las instrucciones en pantalla para finalizar la conexión.
(CZ) Pro dokončení připojení postupujte dle zobrazených pokynů.
(RO) Urmaţi instrucţiunile de pe ecran pentru a termina conectarea.
* Microsoft®
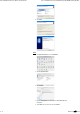
1. (EN) Double-click Bluetooth Devices located at the boom of the screen. Click Add Bluetooth Device.
(PL) Kliknij podwójnie na Urządzenia Bluetooth umieszczoną na dole ekranu. Następnie kliknij Dodaj
urządzenie Bluetooth.
(HU) Kantson duplán a képernyője alján található Bluetooth Eszközök ikonra. Kantson a Bluetooth
Eszköz hozzáadása opcióra.
(SP) Haga doble clic en el icono Disposivos Bluetooth situado en la parte inferior de la pantalla. Haga clic
en Agregar disposivo Bluetooth.
(CZ) Poklepejte na ikonu Zařízení Bluetooth umístěnou na liště. Klikněte na Přidat zařízení Bluetooth.
(RO) Daţi dublu clic pe Dispozive Bluetooth localizat în partea inferioară a ecranului. Daţi clic pe Adăugare
dispoziv Bluetooth.
2. (EN) Press the Pairing Buon on S450 mouse. The connecon LED starts flashing blue.
(PL) Naciśnij Przycisk Parowania myszki S450. Dioda LED połączenia zacznie pulsować na niebiesko.
(HU) Nyomja meg a párosító gombot az S450 egéren. A csatlakozás kijelző kék fénnyel villogni kezd.
(SP) Pulse el botón de asociación del ratón S450. El indicador LED de conexión comenzará a parpadear en color azul.
(CZ) Sskněte Tlačítko párování na myši S450. LED připojení začne modře blikat.
(RO) Apăsaţi Butonul de asociere de pe mouse-ul S450. LED-ul de conectare începe să clipească albastru.
3. (EN) Select My device is set up and ready to be found and click Next.
(PL) Wybierz Moje urządzenie jest ustawione i gotowe do znalezienia, następnie kliknij Dalej.
(HU) Válaszza ki Az eszköz rendelkezésre áll és felderítésre kész opciót majd válaszza a Következő gombot.
(SP) Seleccione la opción Mi disposivo está configurado y listo para ser detectado y haga clic en Siguiente.
(CZ) Vyberte Zařízení je nainstalováno a viditelné a klikněte na Další.
(RO) Selectaţi Dispozivul meu este configurat şi pregăt să fie găsit şi daţi clic pe Înainte.
4. (EN) Select Icon7 S450 Bluetooth Laser Mouse on your computer screen, and then click Next.
(PL) Wybierz Icon7 S450 Bluetooth Laser Mouse w oknie komputera i kliknij Dalej.
(HU) Válaszza ki az Icon7 S450 Bluetooth Laser Mouse feliratot, majd kantson a Következő gombra.
(SP) Seleccione Ratón láser Bluetooth S450 de Icon7 en la pantalla de su equipo y haga clic en Siguiente.
(CZ) Zvolte Icon7 S450 Bluetooth Laser Mouse na obrazovce vašeho počítače a pak klikněte na Další.
(RO) Selectaţi Icon7 S450 Bluetooth Laser Mouse pe ecranul calculatorului dvs. şi daţi clic pe Înainte.
5. (EN) Click Finish.
(PL) Naciśnij Zakończ.
(HU) Kantson a Befejezés gombra.
(SP) Haga clic en Finalizar.
(CZ) Klikněte na Dokončit.
(RO) Daţi clic pe Terminare.
(4)* Widcomm®
1. (EN) Double-clik Bluetooth® icon located on your desktop or Windows® task bar
(PL) Kliknij podwójnie na ikonę Bluetooth® znajdującą się na pasku zadań Windows® lub na pulpicie.
(HU) Kantson duplán a Bluetooth® ikonra számítógépén vagy a Windows feladat kezelőben.
(SP) Haga doble clic en el icono de Bluetooth® ubicado en su escritorio o en la barra de tareas de Windows®.
(CZ) Proveďte dvojité kliknu na ikonu Bluetooth® umístěnou na vaší pracovní ploše nebo hlavním panelu Windows®.
(RO) Daţi dublu clic pe pictograma Bluetooth® localizată pe desktopul dvs. sau bara de acvităţi Windows®
2. (EN) Click Bluetooth® Setup Wizard
(PL) Kliknij na Bluetooth® Setup Wizard.
(HU) Kantson a Bluetooth® Beállítás Varázslóra.
(SP) Haga clic en el Asistente de configuración de Bluetooth®.
(CZ) Klikněte na průvodce instalace Bluetooth®.
(RO) Daţi clic pe Expert configurare Bluetooth®
3. (EN) Press the Pairing Buon on S450 mouse. The connecon LED starts flashing blue.
(PL) Naciśnij Przycisk parowania na myszce S450. Dioda LED połączenia zacznie migać na niebiesko.
(HU) Nyomja meg a párosító gombot az S450 egéren. A csatlakozás kijelző kék fénnyel villogni kezd.
(SP) Pulse el botón de asociación del ratón S450. El indicador LED de conexión comenzará a parpadear en color azul.
(CZ) Sskněte Párovací tlačítko na myši S450. LED připojení začne modře blikat.
(RO) Apăsaţi Butonul de asociere de pe mouse-ul S450. LED-ul de conectare începe să clipească albastru.
4. (EN) On your computer, select I want to find a specific Bluetooth Device and config how this computer will use its services
and click Next.
(PL) W komputerze wybierz Pokarz urządzenia Bluetooth i dokonaj konfiguracji następnie naciśnij przycisk Next.
(HU) Számítógépén válassza ki a következőt: Egy kiválaszto Bluetooth eszközt szeretnék használni és meghatározni, hogy
a számítógép hogyan használja a szolgáltatásokat (I want to find a specific Bluetooth Device and config how this
computer will use its services), majd kantson a Következő gombra.
(SP) En su equipo, seleccione Deseo buscar un disposivo Bluetooth específico y configurar cómo ulizará este equipo
sus servicios y haga clic en Siguiente.
(CZ) Na vašem počítači si vyberte Chci najít specifické Bluetooth zařízení a nakonfigurovat jak bude tento počítač
používat svoje služby a klikněte Další.
(RO) Pe calculatorul dvs., selectaţi Doresc să găsesc un dispoziv Bluetooth specific şi să configurez modul în care
calculatorul va folosi serviciile lui şi daţi clic pe Înainte.
5. (EN) On the Bluetooth Device Selecon screen, double-click Icon7 S450 Bluetooth Laser Mouse.
(PL) W oknie Urządzenia Bluetooth, kliknij podwójnie na ikonę Icon7 S450 Bluetooth Laser Mouse.
(HU) A Bluetooth eszköz kiválasztása képernyőn kantson duplán az Icon7 S450 Bluetooth Laser Mouse eszközre.
(SP) En la pantalla Selección de disposivo Bluetooth, haga doble clic en Ratón láser Bluetooth S450 de Icon7.
(CZ) Na obrazovce pro výběr Bluetooth zařízení proveďte dvojité kliknu na Icon7 S450 Bluetooth Laser Mouse.
(RO) Pe ecranul Selectare dispoziv Bluetooth, daţi dublu clic pe Icon7 S450 Bluetooth Laser Mouse.
6. (EN) Using your S450 mouse to click to confirm selecon of the mouse, then the flashing connecon LED on S450 mouse goes off.
(PL) Używając twojej myszki S450 kliknij aby potwierdzić wybór myszki, dioda LED połączenia na myszce S450 wyłączy się.
(HU) Az S450 egeret megerősítve a csatlakozás kijelző villogó kék fénye elalszik.
(SP) Ulice el ratón S450 para hacer clic y confirmar la selección del ratón. El indicador LED de conexión intermitente del
ratón S450 se apagará en este momento.
(CZ) Pomocí vaší myši S450 klikněte potvrzení výběru myši. Poté blikající LED připojení na myši S450 zhasne.
(RO) Ulizaţi mouse-ul dvs. S450 pentru a confirma cu clic selectarea mouse-ului, apoi LED-ul de conectare clipitor de
pe mouse-ul S450 se snge.
7. (EN) Select Icon7 S450 Bluetooth Laser Mouse on the Bluetooth Device Selecon screen and click Next. Wait for
your computer screen to display a message that your S450 mouse is ready for use.
(PL) Wybierz mysz Icon7 S450 Bluetooth Laser Mouse w kategorii Urządzenia Bluetooth i naciśnij przycisk Next.
Zaczekaj aż na ekranie komputera pojawi się wiadomość, że Twoja mysz S450 jest gotowa do użycia.
(HU) Válassza az Icon7 S450 Bluetooth Laser Mouse-t a Bluetooth Eszköz Kiválasztása képernyőn és kantson a
Következő gombra. Várja meg még számítógépe képernyőjén megjelenik az üzenet, miszerint az S450 egér használatra kész.
(SP) Seleccione Ratón láser Bluetooth S450 de Icon7 en la pantalla Selección de disposivo Bluetooth y haga clic en Siguiente.
Espere a que la pantalla de su equipo muestre un mensaje indicando que el ratón S450 está preparado para su uso.
(CZ) Vyberte Icon7 S450 Bluetooth Laser Mouse na obrazovce pro výběr Bluetooth zařízení a klikněte Další. Počkejte,
dokud obrazovka počítače nezobrazí zprávu, že vaše myš S450 je připravená k používání.
(RO) Selectaţi Icon7 S450 Bluetooth Laser Mouse pe ecranul Selectare dispoziv Bluetooth şi daţi clic pe Înainte.
Aşteptaţi ca ecranul calculatorului dvs. să afişeze un mesaj că mouse-ul dvs. S450 este pregăt pentru ulizare.
* Mac®
1. (EN) Click System Preferences, then click Bluetooth.
(PL) Kliknij na Preferencje Systemu, następnie kliknij na Bluetooth.
(HU) Kantson a Rendszer Preferencia gombot, majd kantson a Bluetooth opcióra.
(SP) Haga clic en Preferencias de sistema y, a connuación, en Bluetooth.
(CZ) Klikněte na Systémové volby, pak klikněte na Bluetooth.
(RO) Daţi clic pe Preferinţe sistem, apoi daţi clic pe Bluetooth.
2. (EN) Click Set Up New Devices.
(PL) Kliknij na Ustawienia nowych urządzeń.
(HU) Válassza az Új eszköz telepítése lehetőséget.
(SP) Haga clic en Configurar disposivos nuevos.
(CZ) Klikněte na Nastavení nových zařízení.
(RO) Daţi clic pe Configurare dispozive noi.
3. (EN) Click Connue.
(PL) Kliknij Kontynuuj.
(HU) Kantson a Következő gombra.
(SP) Haga clic en Connuar.
(CZ) Klikněte na Pokračovat.
(RO) Daţi clic pe Connuare.
4. (EN) Press the Pairing Buon on S450 mouse. The connecon LED starts flashing blue.
(PL) Naciśnij Przycisk Parowania myszki S450. Dioda LED połączenia zacznie pulsować na niebiesko.
(HU) Nyomja meg a párosító gombot az S450 egéren. A csatlakozás kijelző kék fénnyel villogni kezd.
(SP) Pulse el botón de asociación del ratón S450. El indicador LED de conexión comenzará a parpadear en color azul.
(CZ) Zmáčkněte Párovací tlačítko na myši S450. LED připojení začne modře blikat.
(RO) Apăsaţi Butonul de asociere de pe mouse-ul S450. LED-ul de conectare începe să clipească în albastru.
5. (EN) Select Mouse from the device list, and click Connue.
(PL) Wybierz Myszka z listy urządzeń, następnie naciśnij Kontynuuj.
(HU) Válassza az egér opciót az eszközök listájából, majd kantson a Következő gombra.
(SP) Seleccione Ratón en la lista de disposivos y haga clic en Connuar.
(CZ) Zvolte Myš se seznamu zařízení a klikněte na Pokračovat.
(RO) Selectaţi Mouse din lista de dispozive şi apoi daţi clic pe Connuare.
6. (EN) Select Icon7 S450 Bluetooth Laser Mouse on your computer screen, and then click Connue.
(PL) Wybierz Icon7 S450 Bluetooth Laser Mouse w oknie komputera i kliknij Dalej.
(HU) Válaszza ki az Icon7 S450 Bluetooth Laser Mouse feliratot, majd kantson a Következő gombra.
(SP) Seleccione Ratón láser Bluetooth S450 de Icon7 en la pantalla de su equipo y haga clic en Connuar.
(CZ) Zvolte Icon7 S450 Bluetooth Laser Mouse na obrazovce vašeho počítače a pak klikněte na Pokračovat.
(RO) Selectaţi Icon7 S450 Bluetooth Laser Mouse pe ecranul calculatorului dvs. şi apoi daţi clic pe Connuare.
7. (EN) On the Conclusion screen, click Quit.
(PL) W oknie Podsumowanie, naciśnij przycisk Wyjdź.
(HU) A befejező képernyőn kantson a Kilépés gombra.
(SP) En la pantalla Finalización, haga clic en Salir.
(CZ) Na obrazovce Zakončení klikněte na Skončit.
(RO) În ecranul Terminare, daţi clic pe Ieşire.
ONOFF
ONOFF
1 2 3
PRINTING INFO
File Name
Project
Contact Person
Contact Number
Document type
Material
Finish Size
Color
S450_QG.ai
S450
Johnny Wang
886-2-8790-2577 ext.118
Illustrator CS3
105磅銅版紙
375*250 mm
BLACK單色雙面印刷