
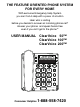
User's Manual

7
Choose your location
Your ClearVoice 50,100 or 200 must be placed on a hard surface and connected to both the telephone
wall jack and an AC power source. Allow at least one inch to the rear and four inches above the unit for
ventilation. If you have a ClearVoice 100 or 200, we suggest you locate it in a location within 10 feet of
where user spends much of his time.
For users of ClearVoice 100 or 200: You can activate the speakerphone on an incoming call of the
ClearVoice 100 or 200 remotely. You can typically speak form up to 10-15 feet from the phone which
should be in direct line of sight. Speaking louder can allow you to speak up to 20 feet, line of sight.
For users of ClearVoice 200: The ClearVoice 200 is supplied with a dual pendant which can activate the
speakerphone, but also can activate the emergency mode from a distance of up to 80 feet. This range
may be reduced by structural or environmental conditions.
For users of ClearVoice 50 and 100: You can purchase accessory(s) which can activate both the
speakerphone for incoming calls as well as activating the Emergency Help System.
To retain full operation of ClearVoice 50, 100 and 200, during power failures insert 4 AA batteries (not
included) into the battery compartment located at bottom of unit. You may do this by simply disconnecting
the AC adaptor from the power source, then removing the battery cover, connecting the batteries and
replacing the cover. Then immediately connect AC Adaptor to AC outlet to assure battery life is not
being affected. Note: The AA batteries should be alkaline.
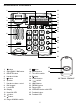
Connecting the ClearVoice 50, 100 or 200:
1. A. Plug one end of the supplied telephone cord into the jack labeled TEL LINE located at the back of
the unit.
B. Plug the other end of the supplied modular cord into the telephone wall jack.
2. A. Plug the supplied power cord of the AC Adaptor into the jack labeled DC9V 200ma located on the
back of the unit.
B. Plug the other end of the power cord into an electrical outlet not controlled by a wall switch.
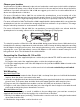
Wall Mounting
On a Wall Phone Plate
1. Press and lift out the handset holder. Rotate it 180°, and snap it into place so it will hold the handset
in place when the phone is mounted on the wall.
2. Insert the mounting bracket’s two tabs into the matching slots opposite the keyhole slot on the underside
phone’s base. Then press down and slide the bracket upward until the tabs snap into place.
3. Plug one end of the supplied short modular cord into the LINE jack at the back of the base.
4. Plug the cord’s other end into the wall plate jack, then align the base’s keyhole slots with the wall
plate studs and slide the phone downward to secure it.
On a Wall Without a Plate
To mount the phone directly on a wall, in addition to the preceding steps, you need two screws (not
supplied) with heads that fit into the keyhole slot on the bottom of the base.
1. Drill two holes 83mm apart (vertically). Then thread a screw into each hole, letting the heads extend
about 5mm from the wall.
2. Substitute the long modular cord for the short cord.