
Install Instructions


4515 E. 139th Street Grandview, MO 64030 | (800) 362-9055 | PRIER.com
Installation Instructions for PRIER
P-118 Hot & Cold Wall Hydrant
Please leave this sheet for the property homeowner
1. Determine the location for the installation of the hydrant. The valve must
be installed into a heated area of the structure that will not drop below
freezing. Ensure there is adequate work room in the interior of the structure
for securing the hydrant to the plumbing system (hot and cold).
2. Prepare the mounting surface and entry hole. The P-118 requires a vertical
and smooth mounting surface to ensure proper installation and draining.
Depending on the surface the hydrant will be mounted, a mounting block
may be required to provide the vertical and smooth mounting surface.
Mounting blocks can be purchased or made on-site with a piece of wood or
other materials on hand.
3. Bore a 2” hole through the wall (and mounting block if using one) in the
desired position for the installation.
4. Center and level the mounting bracket with the 2” hole and attach to
structure with the (4) - 1” supplied screws. Depending on substrate, you
may want to drill a pilot hole. The tab with a hole needs to be positioned at
the bottom.
5. Slide the P-118 hydrant through the mounting bracket into the structure.
Do not bend, compress, or force inlets through hole. Align spout with half
moon notches at 5 o’clock and 11 o’clock and fully insert the hydrant ush
to the wall. Once fully inserted, rotate clockwise until the hydrant locks in
place. Use a level to ensure proper alignment.
6. Install the remaining 5/8” screw through the bottom of the hydrant and into
the mounting bracket. Tighten until the hydrant is secure.
7. Proceed to the interior of the structure to complete installation by
connecting the hydrant to the plumbing system.
8. Depending on the plumbing system, you may need to solder adapter ttings
to the inlet tubes to make compatible with the existing plumbing system.
Do not overheat. Overheating will cause damage and void the warranty.
9. Make sure to connect the hot water to the inlet tube labeled with a red
dot. Complete the installation by connecting the cold water line to the
remaining inlet tube and turning on the water supply.
10. Attach a closed-end hose to the outlet of the hydrant and open hydrant to
create back pressure. Inspect the hydrant and connection points inside the
house for leaks.
INSTALLATION
TOOLS REQUIRED
• 2” Hole Saw
• Level
• Phillips Screwdriver
• PEX Crimp or Clamp Tool
• Crimp or Clamp Rings
• Soldering Torch, Solder, Flux
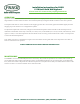
Step 4: Tab with hole positioned at 6 o’clock,
half moon indents at 5 o’clock and 11 o’clock
Step 4 cont’d: Ensure mounting bracket is level
Step 5: Align spout and inlet with the half
moon indents at 5 o’clock and 11 o’clock.
Step 6: Install remaining screw