SOFTWARE VERSION 3.6.1 WWW.PRG.
AutoPar®, Bad Boy®, Best Boy 4000®, PRG Series 400®, MBOX®, MBOX Extreme®, OHM™, Super Node™, V476®, V676®, Virtuoso®, Virtuoso® DX, Virtuoso® DX2, and VL6C+™ are trademarks of Production Resource Group, LLC, registered in the U.S. and other countries. Mac®, QuickTime® and FireWire® are registered trademarks of Apple Computer, Inc. All other brand names which may be mentioned in this manual are trademarks or registered trademarks of their respective companies.
TABLE OF CONTENTS Introduction About This Manual........................................................................................................................................................................ Additional Documentation ............................................................................................................................................................ Training Videos .................................................................................................
Editing Layers Using Drag and Drop .......................................................................................................................................... Creating Duplicate Layers ................................................................................................................................................... Applying Parameter Settings.........................................................................................................................................
REVISION HISTORY This manual has been revised as follows: Version Release Date Notes 3.4 June 15, 2011 Initial release. 3.5 September 15, 2011 3.5 A January 26, 2012 Updated to software version 3.5.1. 3.6 January 08, 2013 Updated to software version 3.6. 3.6 A May 22, 2013 Updated to software version 3.6.1 Updated to software version 3.5.
Notes IV MBOX® DIRECTOR USER MANUAL
INTRODUCTION About This Manual This manual provides necessary information regarding product safety, installation, and operation for the following PRG product: + MBOX® Director This manual applies to software version 3.6.1. Familiarizing yourself with this information will help you get the most out of your PRG product. This manual assumes a basic understanding of MBOX Media Server concepts. For more in-depth explanations of MBOX parameters (layers, cameras, lighting, effects, textures, shutters, etc.
Training Videos MBOX Media Server Training Videos are available on the PRG website. The following is a list of videos that apply to MBOX Director: + Patching: http://www.prg.com/mbox-media-server-training-video-4/ + Director Media Player: http://www.prg.com/mbox-media-server-training-video-5/ + CITP - Streaming Feedback & Thumbnails: http://www.prg.com/mbox-media-server-training-video-6/ + Daemon Application: http://www.prg.com/mbox-media-server-training-video-7/ + Simple Playback: http://www.prg.
OVERVIEW About MBOX Director MBOX Director is a software application that allows control of an MBOX media server from a personal computer. It can be used to configure and control all aspects of the MBOX media content and playback, therefore eliminating the need for a lighting console. MBOX Director will run on any Intel-based Mac® computer (MacBook Pro, MacBook, Mac Mini, Mac Pro, etc.) using the Snow Leopard®, Lion®, or Mountain Lion® operating system. (PowerPCbased Mac computers are not supported.
INSTALLATION AND SETUP Installing MBOX Director When installing MBOX Director on a separate Mac computer, be sure it meets the following requirements: + Intel-based. (MacBook Pro, MacBook, Mac Mini, Mac Pro, etc.) + Running Snow Leopard, Lion, or Mountain Lion operating system. To install MBOX Director application: Step 1. Download or copy MBOX Director installer file to computer. Step 2. Double-click installer icon. Step 3. Follow instructions to accept license and choose destination.
Network Configuration When first setting up MBOX Director, it is important to configure the network settings properly so the application will detect the MBOX server (or servers). This is especially critical when running MBOX Director on a separate Mac computer, since the network setup will be more involved than when running it locally on an MBOX server. MBOX CITP Setting The network CITP setting should always be configured at the Mbox Setup tab.
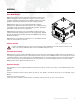
When connecting a Mac computer (running MBOX Director) to an MBOX server, use the Ethernet 1 port for this type of network connection. The physical Ethernet 1 port on the MBOX server is located on the front of its Dual I/O module. A network switch can be used if multiple MBOX servers need to be connected as shown below: To Ethernet 1 Port of Mac To Ethernet 1 Port of MBOX Dual I/O Module NETWORK SWITCH MAC COMPUTER * * This diagram shows a sample Mac computer. The computer type may vary.
Running MBOX Director on an MBOX Server Use this procedure when running MBOX Director locally. If MBOX Director will be running on a separate Mac computer or you will be controlling multiple MBOX servers, go to page 9 for networking instructions. Note: When running MBOX Director directly on an MBOX server, it is important that MBOX Director not affect performance of the server. In order to guarantee this, MBOX Director can sacrifice the amount of time it spends drawing on its own graphical user interface.
Step 4. Launch MBOX application (if the MBOX application is not already running). Step 5. At MBOX main window, click on Setup tab. Step 6. At Network section, set Sync to Ethernet 1 and CITP to Local as shown below. Also, set Single Output Setup to Output 2. Note: It is not possible to operate the MBOX server in a dual output configuration in Fullscreen mode while using MBOX Director on the same computer. Refer to"Changing Configuration / Using Dual Output Features" on page 14 Step 7.
Running MBOX Director on a Separate Mac Computer Use this procedure when running MBOX Director on a separate computer to operate one or more networked MBOX servers. The computer, in this case, could be a stand-alone Mac or an MBOX server itself. If MBOX Director will be run on an MBOX server where it will control only that server, go back to page 7 for instructions. To configure network when running MBOX Director on a separate computer: At Mac computer (running MBOX Director)... Step 1.
Note: If you do not choose "Manually" and/or you are connected to a public network (with a DHCP server), MBOX Director may warn you that controlling an MBOX server over a DHCP-enabled network is not recommended unless the network administrator can guarantee that your IP addresses will not change dynamically. The network administrator should also verify that the subnet mask will allow the two machines to "see" each other. At each networked MBOX Media Server... Step 4.
Step 7. At MBOX main window, click on Setup tab. Step 8. At Network section, set Sync to Ethernet 1 and CITP to Ethernet 1 as shown below: Step 9. When MBOX is launched, it will atomically launch the MBOX Daemon application. Confirm that MBOX Daemon is running by pressing [ D] (while MBOX server is in Window mode). Step 10. At MBOX Daemon window, verify that Network Interface reads: Ethernet 1. (It should update automatically.) Step 11.
Adding Fixtures Once the network is configured and the MBOX servers are connected, the servers will need to be added to MBOX Director so they can be controlled. The "Add Fixture" window is used to locate MBOX servers on the network. Before adding fixtures, it is a good idea to configure the DMX Profile type at the MBOX server’s Setup window (such as Single Output, Panoramic Dual, Dual Independent, etc.) For more information, refer to "Changing Configuration / Using Dual Output Features" on page 14.
Step 3. Once an MBOX server is chosen, the IP Address, Art-Net Universe, Art-Net Channel, # of Layers, and DMX Profile fields will be populated according to the settings configured in the MBOX server Setup window. (Note: If any of these values or settings are changed here at the MBOX Director Add Fixture window, the conflicting value will be highlighted, but will not be changed at the actual MBOX server.
Changing Configuration / Using Dual Output Features The MBOX software can use either one or two video outputs. The default DMX Profiles (Designer or Studio) only use one of these outputs (Single Output mode). Dual output modes can be enabled by choosing one of the dual DMX Profile options: + Panoramic Wide - one master, maximum twelve layers. + Panoramic Dual - one master with two shutters and two keystones, maximum twelve layers. + Dual Independent - two masters with up to six layers each.
To correct a profile mismatch: Step 1. Right-click on fixture icon box. At pop-up menu, select Change Configuration. Step 2. At Change Configuration window, conflicting settings will be highlighted in green. Click Use Detected Settings from Mbox button to pull in new settings from MBOX server. 2) Click to accept changes 1) Click to pull in new settings Step 3. Click Save button to accept changes. Step 4. At confirmation window, click Finish Reconfiguring Director to relaunch MBOX Director application.
Once MBOX Director has relaunched, the fixture and master icon boxes will reflect the new DMX Profile setting. In this example, the window is setup for the Panoramic Dual mode with two server icons and two master icons. Notice also that the Master now has two Shutter and two Keystone tabs in the parameters area. Note: For a more in-depth explanation of the MBOX profile settings, refer to the latest version of the MBOX Media Server User Manual (02.9800.0001.xx).
Working with the Dual Independent Mode Important! In order to use the Dual Independent mode, Director must be run on a separate computer from the MBOX server. Refer to "Running MBOX Director on a Separate Mac Computer" on page 9. Adding Dual Independent Fixtures In Dual Independent mode, Director will treat the output as two separate servers even though they are actually on the same server.
Switching to Dual Independent from Other Modes When switching to Dual Independent mode, a dialog provides two setup options as shown below. These options allow the Alpha server to be configured independently or both servers to be configured together.
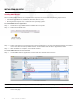
GENERAL OPERATION MBOX Director Window The MBOX Director main window is divided into several sections which are used to add media content to layers, configure parameters, and create "scenes" for playback.
Hot-Key (Keyboard Shortcut) List File Open Show Save Show Save Show As Show/Hide Media Library Show/Hide Media Library Show/Hide Media Library Follow Updates in Media Library O S S Undo Cut Copy Paste Select All (items in timeline) Select All Layers + Master Edit Fade Time Mode Show Effects Show Keystone Show Shutter T L Show Lighting Z Z X C V A A T W Y Master Navigation F3 option T Edit Redo Show Spin Show Sync Show Pixel Show Camera E K or K S P L or L C Scene Previou
Timeline Editing Create New Scene at Playhead Move Selected Scene to Playhead ^S Nudge Left option Nudge Left 10 Frames option Nudge Left 1 Second option Nudge Right option Nudge Right 10 Frames option Nudge Right 1 Second Select Next Scene in Timeline Select Previous Scene in Timeline option ] [ ^optionS Window Minimize M Cycle Mouse Cursor To Next Screen option ’ Help MBOX Director QuickStart Guide ? Mbox Director Hide MBOX Director , H Hide Others optionH Quit
Hot Key (Keyboard Shortcut) Notes Previous Scene Recalls the previous scene in the Scene List. Next Scene Recalls the next scene in the Scene List. Next Scene After End of Loop Break out of an Autofollow loop by advancing to the scene after the end of loop. Create New Scene Creates a new scene in Scene List, inserting after the currently selected scene. Update Selected Scene Applies manual changes to the current selected scene.
Preference Settings MBOX Director preferences can be set in the Preferences window. + To open, select Preferences at the Mbox Director menu. General Preferences General MBOX Director preferences can be set at the General tab: + Network Interface - Sets the network connection. + Timecode Source - Selects a source for timecode input: Internal, Audio Left, Audio Right, or MIDI. (Refer to "Timecode Input Options" on page 49 for more information.) + Display FPS - Sets the Frames Per Second.
Media Preferences Media Picker (library) preferences can be set at the Media tab: + When "Media Window is a HUD" is checked, the Media Picker window will always stay on top. + It is recommended to leave the "Automatically turn off Follow Updates when browsing" option checked. Note: Refer to "Media Picker" on page 25 for more information about this window. MIDI Preferences When receiving MIDI timecode from an external source, the preferences can be set at the MIDI tab.
Media Picker The Media Picker is used to select media content for layers. The Media Picker can be opened by clicking the "eye" icon in the Media section of the MBOX Director window. The Media Picker displays the media content files available in the MBOX server library. These consist of textures, effects, transitions, and objects. It will display the standard MBOX library along with any custom files that may have been added to the server(s).
Generating Thumbnails When the Refresh Thumbnails button is clicked, the Fetch Thumbnails window will appear. The default setting is for the box to be unchecked. However, if this is the first time that thumbnails are being generated or if you have added/ changed/deleted media on the server, then the box needs to be checked.
Enabling Feedback In order to view real-time feedback of MBOX Director scene content, either MBOX must be running in Fullscreen mode (typical operation) or, if running in Window mode, the MBOX tab must be selected in the MBOX server window as shown below.
Pinning Windows Windows with the pin icon can be "pinned" so that they stay on top of all other windows. To pin a window, click on its pin icon in the upper-left corner. Pin Icon Undo/Redo MBOX Director supports a robust, unlimited undo/redo system. Undo/Redo is not only useful to back out of any unwanted changes, but it’s a great tool for exploring MBOX features, since you can always get back to where you were if you decide you don't like the look. The following edits can be undone: + Scene List edits.
QUICK START Up and Running MBOX Director is a powerful program which can be used to configure an extensive number of layer parameters and scenes. However, it is not difficult to quickly select some media content and preview it in the MBOX server window. (Once you are familiar with the basic operations and verify that the media will play on the MBOX server, scenes can be created with more complex layer configurations.) Quick Start: Step 1.
Step 6. At MBOX Director window, open Media Picker by clicking on "eye" icon. Step 7. If thumbnails are not visible, press Refresh Thumbnails icon. Wait about 10 seconds for thumbnails to appear. Step 8. Select a texture by clicking directly on its thumbnail. Refresh Thumbnails Open Media Picker Step 9. Return to MBOX window to view results. The texture should be visible.
CREATING SHOWS About Show Files A show file is a series of media events which can be played back on one or more MBOX servers. The playback events are organized into "scenes," which are stored in the show file. A scene is a pre-programmed event which defines what happens on each layer during playback. The show file also stores the list of configured servers (fixtures) where the scenes will be played back. The following diagram illustrates the concept of a show file.
Changing Between Servers When MBOX Director is connected to more than one MBOX server, each server (will appear as an icon in the main window. To change between servers, click the server’s icon or press Command [] + a number (1 thru x) to select the corresponding server. The window will now display the master control settings and active layers for that particular server. + The active number of layers was defined when the server (fixture) was added to MBOX Director, and cannot be changed.
Adding Content to Layers Each server has a predefined number of active layers. Each layer can have its own unique content and parameters. Content can include still images, videos, 3D objects, camera angles and lighting. Parameters include options such as opacity, texture, intensity, color, blending, tilting, and many more. The combination of all layers results in the final "look" of the virtual scenery, which can then be saved as a scene and played back on an MBOX server.
To customize layers: Step 1. Select desired server by clicking on its icon. The active layers will be displayed. Step 2. Select desired layer by clicking on its icon. Step 3. Using Opacity slider, raise intensity to a level above 0. (255 is full.) Step 4. Add content to the layer as follows: a. Open Media Picker by clicking on "eye" icon. b. If thumbnails are not visible, press Refresh Thumbnails icon. Wait about 10 seconds for thumbnails to appear.
Creating and Editing Scenes A scene is a pre-programmed event which defines what happens on each layer during playback. The scene contains the pre-programmed settings for all master controls and layer parameters. Scenes can be named and played back in sequence using manual control, autofollow times or timecode. Guidelines: + Each scene stores all data for all fixtures, all the time.
+ AF (AutoFollow) - Specifies an autofollow time. To enter a time, click in the AF field. Format: Minutes:Seconds + max - This is the computed maximum time-fade of all parameters in the scene, in seconds. If there are no timed fades, this will be blank. This field in not editable at the Scene List, but if the scene’s xFade (crossfade) Time is changed it will change the max time.
Editing Scenes The Scene List can be configured to automatically save changes using the Auto Apply Edits checkbox. If this box is not checked, then the manual Update [upd] button will need to be pressed in order to save any changes. Manual Update Auto Apply Edits On/Off Selected Scene To edit an existing scene with manual update: Step 1. At Scene List, select scene to be edited. Step 2. Make changes to layer content and parameters. Step 3. At Scene List, click Update [upd] button.
Editing Layers Using Drag and Drop MBOX Director has a drag and drop feature which can be used to create new duplicate layers or copy a layer’s parameter settings onto another layer. It can also be used to add layers to scenes. Creating Duplicate Layers Duplicate layers can be easily created using the drag and drop method. The target layer can be blank or have existing data. In either case, an exact copy of the dragged layer will be created in that position.
To apply parameter settings to another layer: Step 1. Select layer which contains the settings to copy by clicking on its layer icon box. Step 2. Using cursor, click on a category or individual parameter and drag it up to the target layer’s icon box. For example, dragging the "Size" tab of Layer 1 to the layer icon box of Layer 3 will overwrite Layer 3’s Size settings with those of Layer 1. Adding Layers to Scenes Layers can be easily added to different scenes using the drag and drop method.
Selectively Store into a Scene It is possible to selectively store a parameter, group, tab, an entire layer, or multiple layers into a scene. To perform a selective store: + Using cursor, click on a parameter, group, tab, layer, or multiple layers and drag it on top of a scene in the Scene List.
Editing Multiple Layers Multiple layers can be selected and edited at the same time. This can be used for quick editing or to create fan offsets. Selecting Multiple Layers Multiple layers can be selected using the Shift [] and Command [] keys. + Hold down [] while clicking on layer icon boxes to select a range of layers. + Hold down [] while clicking on layer icon boxes to select individual layers.
Adjusting Relative Offset Across Layers If multiple layers are selected, the relative offset values can be adjusted using the [V] key. This method will maintain any relative offsets in the parameter values for the selected layers. Notes: + During this action, the parameter sliders will be disabled to prevent accidental override of layer offsets. + The Value button will display "relative" to indicate that Director is in Relative mode.
Fanning Layers A fan effect can be applied to multiple layers using the [F] key. This is especially useful with parameters like X-Position to create a nice spread across layers. Fanning Time or Delay values will also create impressive results. Notes: + When setting a fan, Layer 1’s values will stay the same while all other selected layers will change. + The number of values changing, and the values, will be shown in text at the bottom of the window.
Copying Multiple Layers From One Server to Another Multiple layers can be copied from one server to another using the multiple selection feature. Even if the servers are configured differently, Director will duplicate the parameters that are common to both. To copy multiple layers: + Select multiple layers and drag them on top of a different server’s icon.
PLAYBACK Overview Once scenes have been created and stored in a show file, they can be played back individually using manual control or played back automatically using timecode, autofollows, and/or triggers. Guidelines: + A scene with an assigned timecode value will take precedence over its autofollow time. + Triggers take precedence over both timecode and autofollow. To see a preview in the MBOX server window, be sure that the MBOX tab is selected. Refer to "Enabling Feedback" on page 27.
Guidelines: + If AF is checked, autofollow times will execute when the scene is recalled (unless a timecode has been specified, in which case autofollows will be ignored). + It is not necessary to have timecoded scenes in order for the autofollow feature to work. It is best to use one or the other, not both (except in the case of Implicit Loops -- see below). AF Play/Pause Autofollow Time To play scenes using autofollows: Step 1. At first scene, click in AF field. Step 2.
To delete a loop: Step 1. Right-click on required scene. Step 2. At pop-up menu, select Delete. To delete a link: Step 1. Right-click on link in Scene List. Step 2. At pop-up menu, select Delete Link. Implicit Loops Loops can also be "implied" by using a combination of timecode and autofollow times. For example, if an autofollow time is running and the next scene in the Scene List has a timecode value greater than the current timecode, then it will loop back to the last timecoded scene in the list.
Playback Using Timecode Timeline Overview When a timecode is entered for a scene, the scene will be displayed in the timeline graphic at the bottom of the MBOX Director window. The timeline shows the current position of the playback sequence, and provides controls for play, pause, forward and back. Note: Regardless of the scene order in the Scene List, the timeline will always display scenes in time order.
Timecode Playback Scenes can be configured to playback in sequence using timecode. The timecode entry specifies the starting point for the scene. Timecode can be entered directly in the Scene List using the format: Hours:Minutes:Seconds:Frames. Guidelines: + In order for all scenes to execute using timecode, a timecode must be entered for all scenes. + Timecode, either internal or external, must be running in order for scenes to execute.
Display Frames Per Second The Display Frames Per Second (FPS) setting affects how timecode values are displayed and edited within Director’s timeline. Although Director does not require that you match this preference setting with the FPS of an external source (since it automatically detects the FPS of external timecode), this setting can be changed in order to display a more accurate timeline. To change the setting, select Preferences from the Mbox Director menu.
To play scenes using external timecode: Step 1. At first scene, click in timecode field. Step 2. Enter timecode using the format: Hours:Minutes:Seconds:Frames Step 3. Advance to the next scene and enter timecode until all scenes are complete. Step 4. At Preferences window, select an external timecode source option. (This will typically be Audio Left for SMPTE input.) Step 5. Connect audio signal to LINE IN port of the Mac computer. Step 6. At Mac desktop, select System Preferences from Apple menu. Step 7.
Scrub Feature The current position of the timeline can be changed by entering a new time in the clock field or "scrubbed" using the scrub feature. To go to a new timecode position: + Click inside time clock field and enter a new clock position. The timeline will move to that position. To scrub in the timeline: + Click inside the time clock field, then use the mouse to scrub forward or backward in the timeline.
Timecode Editing Timecode entries can be edited at any time by changing the values in the Scene List or by dragging the markers in the timeline. To edit timecode using the timeline: Step 1. Be sure Play Lock button is not enabled. Step 2. At timeline, single-click on a scene marker (it will turn purple) and drag to a new position. Changes will be reflected in the Scene List timecode fields. A double-click will recall the scene and also select it in the Scene List.
+ Remove Scene from Timeline - Removes the timecode value, but leaves the scene in the Scene List. + Delete Scene Preview - Removes preview thumbnail. + Set Preview With Layer Image - Sets preview thumbnail to layer image. + Link To Scene - Allows scenes to be linked together. Note: The Timeline popup, Scene List popup, and Scene menu are similar. The concept of the "selected scene" depends on which menu is used and where the scene was last selected.
MIDI OPERATION Playback Using Triggers Scenes can be played back using MIDI triggers. Director allows three basic trigger types: + MIDI Show Control (GO) + MIDI Control Change (CC) + MIDI Note (NT) A drop-down menu, available at the Scene List trigger field, provides options for MIDI playback. Trigger Menu Drop-Down Arrow Trigger Menu Trigger Column Options: + MIDI Show Control: GO - If the scene has a number at the start of its name, then this option can be used as a trigger.
+ MIDI Control Change: CC - Allows for an arbitrary control change command. When selected, CC will be entered into the trigger column. Using the keyboard, enter the desired control change number after the CC prefix. Director supports entries from 0-124. For example, "CC 52." + MIDI Note On: NT - Allows for an arbitrary note command. When selected, NT will be entered into the trigger column. Using the keyboard, enter the desired note number after the NT prefix. Director supports entries from 0127.
+ Input Device - Selects a MIDI device to "listen to." This preference should normally be set to "All MIDI Sources," but a specific device may be chosen if the external inputs need to be limited. + Output (Feedback) - Selects a device where feedback will be sent. (This only works with devices that support feedback such as MIDI controllers with motorized faders or LED indicators.) + MIDI Input Channels - Allows specific channels to be enabled or disabled. (All channels are enabled by default.
External Control Setup Controlling Director with a Lighting Console In order to use trigger controls from a lighting console, the correct output settings must be configured at the console. For example, when using a PRG Vx76 control console, the output configuration is set using the Settings window. To configure Vx76 console MIDI output: Step 1. At console’s Setup menu, select Settings. Step 2. At Settings window, select Midi tab. Step 3. At MIDI Output section, choose an output using drop-down menu.
Controlling Director with a MIDI Device When MBOX Director is used with a third-party MIDI device, the MIDI controls can be mapped to the device’s buttons, knobs, and faders.
PARAMETER STORE AND RECALL Palettes Settings for parameters (or groups of parameters) can be stored and recalled using the Palettes feature. A Palettes window, available from the Media Picker, contains 20 banks of 100 palettes (for a total of 2000 palettes). Settings (i.e., "looks") can be stored into these individual palettes for later recall. They can also be deleted or edited at any time. Once stored, palette data can be easily exported and imported into other Mbox Director files.
To store into a palette: Step 1. Open Palettes window. Step 2. Pin Palettes window on top by pressing its pin icon. Step 3. At main Director window, click and drag an individual parameter or parameter group (tab) and drop it on a palette box. For example, drag the Keystone tab to palette 12 as shown below: Step 4. Double-click palette box. At Inspector window, edit palette name and label as required. Step 5. Click x button to close window.
To recall a palette: Step 1. Open Palettes window. Step 2. Right-click on required palette. Step 3. Choose a Recall option (Value Only, Timing Only, or Timing & Value). To delete a palette: Step 1. Open Palettes window. Step 2. Right-click on required palette. Step 3. Select Delete Item. To export/import palette info: Step 1. Open Palettes window. Step 2. Right-click on a palette. Step 3. Select Export or Import options.
ADVANCED CONTROLS Value vs. Time The layer parameters can be displayed in the MBOX Director window by Value, Delay, or Time. These are defined as follows: + Value - Specifies a parameter’s value setting. For example, opacity can range from 0 (not visible) to 255 (100% visible). The number from 0 to 255 would be considered the "value" of opacity. + Delay - Specifies how long before the new state (in the next scene) will begin after the end of the previous state (in the previous scene).
Ease In/Out The Ease In / Ease Out timing option provides a method for applying a sine curve to a timed move. This option can be toggled on or off in the pop-up menu for any parameter that can have a timing value, or it can be done by typing in E6, for example, where 6 is the number of seconds.
Hide and Solo Functions When a large number of layers are playing content, it is often difficult to determine what content is being generated by which layer. The [hide] and [solo] buttons provide a way to isolate or turn off different layers. + Hide - Sets the output opacity of the selected layer to zero. + Solo - Hides all layers except for the selected layer. When a layer is in hide or solo mode and a scene is stored, it will store the "unhidden" values.
Pop-Up Menus Special pop-up menus can be accessed by right-clicking in different areas of the main screen. These menus contain various options depending on the area clicked. Server Pop-up Menu To access the server pop-up menu, right-click on a fixture’s icon box. + Force Restart Mbox Network Daemon - This option restarts the MBOX Daemon application. (Refer to "Network Configuration" on page 5 for more information about the MBOX Daemon.
Master Pop-up Menu To access the master pop-up menu, right-click on a master’s icon box. This menu has the same options as the Server Menu (see previous), but also includes options for clearing timing, values, or all data. Selecting any of the clear options will return the master control to the default values for that specific item (such as the default timing). Layer Pop-up Menus The layer pop-up menus have the same options as the Server Menu (see previous).
Parameter Pop-up Menus Pop-up menus for the various parameters, and groups of parameters, can be accessed by right-clicking on the parameter titles or tabs in the main window. For example, click on Intensity to bring up the Intensity Menu. Click on Effects tab to bring up Effects Group Menu. Selecting any of the clear options will return the parameter (or group) to the defaults. Note: The clear options in the menu are the same as clicking on the white dot.
TROUBLESHOOTING Network Configuration MBOX Director will provide troubleshooting assistance if problems are found with the network configuration. In this case, an error will be displayed in the server’s icon box. When an error is visible, place the cursor over the icon box to display the tooltip pop-up. Error Message Tooltip Help Helpful Tips! + Be sure your Ethernet cables are not swapped (reversed). 4 out of 5 warnings are caused by swapped cables.
IP Address Changed If "IP Address changed!" is displayed in the server icon, it means that either the MBOX server has been plugged into a different Ethernet port or the network configuration has been changed. To correct: Step 1. Be sure your Ethernet cables are not swapped. Step 2. Bring up the tooltip help and note the new IP address that is displayed. Step 3. Right-click on the server icon and select Change Configuration from the pop-up menu. Step 4.
No Reply If "no reply" is displayed in the server icon, it means there is no network connection available for that MBOX server. For example, a cable may be unplugged or your network configuration is invalid. First check to be sure your Ethernet cables are not swapped, then follow tooltip suggestions for troubleshooting.
Window Mode If MBOX is in Window mode while adding a Dual Independent fixture, the "window mode 2nd image not available" warning will be displayed in the AlphaR icon box. To view both output images, it will be necessary to switch MBOX to Fullscreen mode. Refer to "Enabling Feedback" on page 27. For more information, refer to "Working with the Dual Independent Mode" on page 17.
MBOX® Director User Manual Version as of: May 22, 2013 PRG part number: 02.9800.0002.
Production Resource Group, LLC Dallas Office 8617 Ambassador Row, Suite 120 Dallas, Texas 75247 www.prg.