
User's Manual
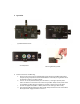
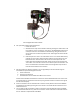
Table Of Contents

B. Set-up Procedure-Video Camera Calibration
i. Power the camera.
ii. Wireless Version only: Set the mode to Video by pressing the mode button until
the “Video Iris” LED is lit. Press the “Cal” button. The Digital Motor will find the
end stops of the lens. The f2.8 LED should be blinking. Using the knob on the
VLC to move the iris to f2.8 and press the “Cal” button again. Now the F16 LED
will blink.
iii. Cable Only Version. There is no mode switch on this unit. Initiate calibration by
pressing the “Cal” button. After the motor finds the end stops of the lens, the
F2.8 LED will blink. Use the knob to set the lens to F2.8 and press the “Cal”
button again. Now the F16 LED will blink. Adjust the lens to F16 and press the
“Cal” button. Turn the knob until the iris is at F16 and press the Cal button. The
lens is now calibrated to the video camera and the engraved F-stop marks on
the knob should match those of the lens.
C. Set-Up Procedure for wireless operation. The V+F (p/n 4050) can be controlled through its
microwave link by the following hand controls:
a. The FI+Z Hand Unit
b. The Focus-Iris Hand Unit
c. The Radio Micro Force module with a Micro Force control.
Communication between the Hand Unit and the V+F will be established when both units are set
to the same channel. The wireless channel is by using the channel button located to the right of
the LED channel display.
D. Control of the motor can be switched from an external source (wireless Hand Unit or RMB150
type device) to the knob by pressing the “Local” button. The red LED will be lit when the unit is
under local control.
E. The V+F may also be controlled via a cable connection through the Remote Iris Box (p/n 4020).
To use this device with the V+F, place the unit into the “Local” mode and connect the Iris Box to
the V+F “Remote” receptacle with cable 4642
VLC and Digital Motor with brackets