
Use and Care Manual
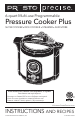


Fig. K
Rock the cooker from side to side to disperse air bubbles.
Display
window
Fig. L
Control knob
Start button
Cancel button
Preset programs
(entire perimeter)
Timer
Progress bar
Digital control
panel
98
marked inside of the cooking pot (Fig. J, page 7). In addition, in each section of
the recipes you will nd instructions on the maximum ll level for each type of
food.
● Always make sure cooking liquid has been added to the cooking pot. One cup of
liquid is the minimum amount.
● Always follow special procedures found in the instruction book when pressure
cooking dry beans, peas, and lentils (see page 34). During cooking, these foods
tend to froth and foam which could cause the vent pipe to become blocked.
● Never pressure cook applesauce, cranberries, rhubarb, cereals, pasta, split peas,
and soup mixes containing split peas, pasta, or grains. These foods expand so
much as a result of foaming and frothing that they should never be cooked under
pressure.
● Always follow the special procedures found on page 37 when pressure cooking
rice and grains.
● Do NOT use the quick pressure release method after cooking dry beans, peas,
lentils, grains, or foods that are mostly liquid, such as soup, sauces, and stews
(see page 14).
● Always verify that the green air vent/cover lock is down before attempting to
open the cooker (see Fig. Q, page 13). If it is up, the cooker contains pressure
which, if released, may result in burns and/or property damage. Then check that
no steam is emitted when the pressure release valve is rotated to the STEAM OUT
position.
● WARNING! Air bubbles may form when pressure cooking foods with a higher
fat content (such as meats with visible fat or poultry with skin and visible fat) or
thicker foods (such as stews, sauces, heavy soups, dried beans, lentils, and grains
such as rice and barley). Even after all pressure has been released, those air bub-
bles can rise to the surface when the cover is opened, unless they are dispersed
beforehand. If the air bubbles are not dispersed, hot food may erupt out of the
cooker, which could cause
serious burn injuries.
To disperse the air
bubbles, follow these
steps: First, verify the
pressure has been released
(the green air vent/cover
lock will be in the down
position). Next, prior to
opening the cover, gently
rock the cooker from side
to side. To rock, grasp the handles and tilt the cooker to the left, so the right side
of the cooker lifts 2 inches off the counter. Then rock to the right so the left side
of the cooker lifts 2 inches off the counter (Fig. K). Repeat once. Verify the air
vent/cover lock is still down before attempting to open the cover.
HOW TO OPERATE THE DIGITAL CONTROL PANEL
Whenever you plug in the unit, it will beep once and all of the program options will
appear in the display window on the digital control panel. The KEEP WARM setting
will be ashing. This is the “Ready State” (Fig. L).
The following information describes how the control panel buttons and preset
programs function.
CONTROL KNOB
The control knob is used to select the preset programs that appear around the
perimeter of the display window as well as adjust the time and cook settings. As
you turn the knob, each preset program will ash.
START BUTTON
The start button activates the unit once the cooking function and time have been
selected.
CURRENT MODE INDICATORS
Once the start button is pressed, the mode the unit is currently in will illuminate.
There are three modes: WARM UP, COOKING, and KEEP WARM.
CANCEL BUTTON
The cancel button allows you to end the cooking or keep warm function at any time.
Simply press the cancel button once. When you press cancel, the unit will return to
the “Ready State.”
TIMER
When pressure cooking, the timer will not start counting down until the cooker
reaches operating pressure. When slow cooking, the timer immediately starts count-
ing down once the slow cooking function is activated. When the unit is in the KEEP
WARM mode, the timer will count up to indicate how much time the unit has been in
this mode.