
User manual


Example for Navigating to a Place of Interest
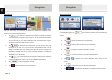
Example: To find a park around your destination, do as follows (starting from the
Navigation menu):
Tap .
Tap .
Tap .
Tap .
The list of place categories appears. Tap or slide your finger to browse the list,
and tap
.
Tap to browse the whole category, or tap to narrow
down your search.
Tap any of the list items.
Check the details and the location of the place, and then tap .
After a short summary of the route parameters, the map appears showing the entire
route. Wait for a few seconds or tap
and start navigating.
Navigation
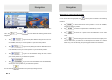
The Map screen is the most important and frequently used screen of the software. The
Vehimarker (a blue arrow by default) represents your current position, and the orange
line shows the recommended route. There are screen buttons and data fields on the
screen to help you navigate. During navigation, the screen shows route information.
• At the top of the screen, you see your heading and the house numbers on left and
right if you have not selected a route destination. When navigating a route, you see
the next manoeuvre and the next street/road on your route. Tap either of them to
open the route itinerary.
• Tap to open the Quick menu with a selection of functions that are useful
during navigation.
• Tap the map anywhere to explore the map around your current position. Additional
map control buttons appear.
• Tap to open three data fields on the map. Tap any of them to
suppress the others. The default values (you can change them in Map settings):
• the remaining distance to the destination,
• the estimated time of the arrival at the destination, and
• the remaining time of the trip.
• Tap to return to the Navigation menu.
More Menu
EN
EN -9