
User Guide


Setting up an Image Map
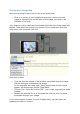
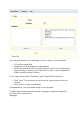
Now we are going to learn how to set up an image map.
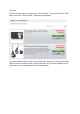
Click on a corner of your image and drag your mouse over the
image to highlight/cut out the part of the image you want to be
clickable to the user.
Your selection will be clear and illuminated while the rest of the image will
darken. Take good care to align the frame of your image with the zone
onto which your customer can click.
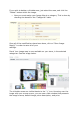
Once this is done:
Type the first few letters of the product associated with this image
into the field just underneath the image.
In our example, we would type ―Ipod‖ and several choices would
appear. We would then choose ―Ipod Nano‖.
Confirm your choice by clicking ―OK‖. Your image map has just been
created.
Repeat this process for all of the products that you wish to make
accessible through your image.
If you have made a mistake on your clickable area, you can resize by
grabbing its sides or corners.