
User Guide
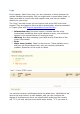


It gives you an indication of your version number, and the number for the
latest version available on the PrestaShop servers. If there's a difference,
you can click the "Upgrade PrestaShop Now!" button in order to start the
upgrade process. A status upgrade then appears at the right, while the
process is running.
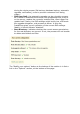
The area below the "Update" section will then scroll with a list of the
various changes brought to your PrestaShop install: removed files
(normally, the ones for the default theme), location of the backup archive
(normally in the /[admin]/autoupgrade folder), files added to said archive,
files copied from the new version (and therefore marked as upgraded). A
lot of files are thus mentioned, and you do not need to read it all!
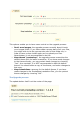
You'll know the upgrade is over when the message "upgrade complete.
Please check your front-office (try to make an order, check theme)"
appears in green, along with the following status update: "Upgrade
process done. Congratulations ! You can now reactive your shop."
Indeed, the auto-update does deactivate your shop, but does not re-
activate it automatically. Until you have checked that everything is okay in
your back-office (everything is functioning correctly, all your products and
images are there...), it is better to keep your shop from the public eye.
Once you have made sure your install is still correct, active your shop
using the option in the "Preferences" tab, at the top of the options list,
then make tests on your front-office: browse products, sort them, try to
order one, etc. In short, go through the entire buying process, in order to
make sure that you won't miss a sale.
Everything working fine? Congratulations, you know have successfully
upgraded your PrestaShop install!
Rollbacks
Sadly, not all upgrades are successful – which is the very reason why you
should always backup all your files and data, and why PrestaShop