Reference Guide Updating PrestaShop Use this document as a step-‐by-‐step guide to update your store to PrestaShop version 1.4 Thank you for using PrestaShop Document version : 1.4.
5 Steps to Follow for a Successful Upgrade These five steps are necessary for a successful upgrade. Please pay close attention and do not skip any steps. 1. Save and Backup Your Current Shop This step consists of backing up your database and your files.
Step 1 – Save and Backup Your Current Store Caution: Not backing up your store constitutes a very important risk if you encounter any difficulties with the upgrade. There is a risk of data loss. Do not ever skip this step.
B. Deactivating Your Store Warning: disabling your store is very important. By doing so, you make sure that there is no activity on your store while you are updating it. Therefore, if you ever have to revert the update using a backup, you won’t have lost any unfinished carts or orders.
C. Backing Up Your Database You must absolutely back up the whole database in conjunction to your PrestaShop store.
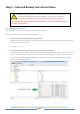
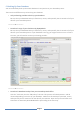
D. Backing up Your Customized Translation If you did not add any personalized translation at the root of your modules, please proceed to step 2. Navigate to the “Tools” tab, then the “Translations” sub-‐tab of your back-‐office.
Step 2 – Getting Ready for the New Version A. Downloading and Unzipping of the Latest PrestaShop Version Visit http://www.prestashop.com and download the latest version of PrestaShop (click the “Download” button on the homepage). You now should have a file: prestashop_1.x.x.zip (where “x” represents the version number).
□ “themes/yourtheme” folder, only copy your current theme. If you use the default theme from PrestaShop, do not copy it, you must use the one from the new version. □ “download” and “upload” folders, which contain all the downloadable products, the attached files and the customizable products.
D. Checking before going further Let’s say your store is at the following URL: http://www.myshop.com 1. To test the update, you first downloaded the latest version of PrestaShop. 2. You unzipped this version, which contained a folder called “prestashop” 3.
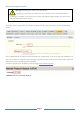
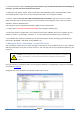
Step 3 – Starting the Update A. Launching the update script Visit the following URL: http://www.myshop.com/prestashop/install (Replace myshop.com with the actual URL of your store, and “prestashop” with the name of the folder that you have just transferred to your FTP) That URL should show: 1. Select « Update » 2.
If you did follow the first step of this guide concerning back-‐ups, you can click “I certify that I backed up my database and application files. I assume all responsibility for any data loss or damage related to this upgrade.
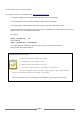
If sufficient rights are assigned to your files and folders, the following page will show: If not, make sure that the folders are properly configured: change their permissions of the folders in red on your FTP server (CHMOD 777 or 775, depending on your hosting provider) then click the “Refresh these settings” button.
C.
Step 4 – Verifying the update A. Import your Translation that you saved in Step 1 If you did export your own translations during step 1 (Backups), import them back into your new store by going to the “Tools” tab, then the “Translations” sub-‐tab.
B. Verification of the main Domain Name and regeneration of your .htaccess You should verify that the domain name assigned in the database is indeed the one that you are working with. To do so, visit the “Preferences” tab, then the “SEO & URLs” sub-‐tab.
D. Tests to be done on your new store.
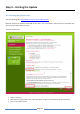
Step 5 – Going live with your Up to Date Store. A. Swapping your updated store and your production store. Congratulations, you have achieved all the essential steps to update your store! You now need to swap your updated store with your production store.
Page 18
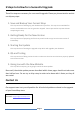
In case of issues In some rare cases, some modules are not compatible with new version of PrestaShop. You should contact the company / person that provided you with this module to request a few code changes to bring it up to date. A. Rolling back your database.