
Getting Started Guide


Creating a database for your shop
Before you can actually install PrestaShop, you need to make sure your
MySQL server has a database ready for PrestaShop's data, and if not,
create one. This can be done using the free phpMyAdmin tool, which
should come pre-installed on your web server most of the time (read you
host's documentation). Connect to it using your account credentials, that
your host provided you with. It should be accessible through a standard
URL, tied to your domain name, or that of your host.
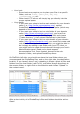
In the left column, you can see the current databases. Some of them
should be left alone, because they are either used by phpMyAdmin or by
the host: phpmyadmin, mysql, information_schema, performance_schema and
others. Read your host's documentation to know if one of these can be
used as a default database.
Either way, you can create a brand new database using the central form
named "Create new database". Simply enter a unique name, and click
"Create". The name of the database will be added to the list on the left.
You can now use it to store PrestaShop's data.
Some hosts prefer to have customers use a graphic control panel, such
as cPanel, Plesk or a custom-made one. Make sure you read your host's
support documentation about handling MySQL databases, and create a
database for your shop by following their specific explanations.
Launching the auto-installer
Now comes the part where it all comes together: installing PrestaShop.
The installation process is quite easy, as it is streamlined by PrestaShop's
auto-installer. To launch it, simply browse to PrestaShop's location on
your hosting: the script will automatically detect that it is not yet installed,