
Getting Started Guide


Your host:
o Some hosts may require you to place your files in a specific
folder, such as /htdocs, /public_html, /web, /www,
/yourdomainname.com, etc.
o Other hosts' FTP server will simply log you directly into the
proper upload space.
Your needs:
o If you want your shop to be the main website for your domain
name (i.e., http://www.myprestashop.com), upload
PrestaShop at the root folder of the upload space (which may
depend on the host).
o If you want your shop to be in a sub-folder of your domain
name (http://www.mywebsite.com/shop), you must first
create said folder through FileZilla (right-click and choose
"Create directory"), then upload PrestaShop in that folder.
o If you want your shop to be in a sub-domain of your domain
name (http://shop.mywebsite.com), you must first create said
sub-domain. This depends on your host: you might be able to
do it simply by adding a new folder with your FTP client, or
you might have to create the sub-domain through your host's
administration panel. Read you're hosts support
documentation first. Once created, browse to the sub-
domain's folder, and upload PrestaShop there.
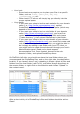
On FileZilla's left side, you should now have the local folder where you
uncompressed the PrestaShop files, and on the right side, the destination
location. If you haven't done it yet, uploading is simple: select all files and
folders from the local folder (use Ctrl-A), and either drag & drop them to
the remote folder, or right-click on the selection and choose "Upload" in
the context menu.
After a short while, all of PrestaShop's files and folders should be online.
Great!