
Getting Started Guide


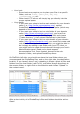


Open the "File" menu, and select the "Site Manager..." option.
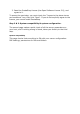
A window opens.
To add your hosting space to the Site Manager:
1. Click the "New Site" button. A new entry is created in the site list.
Give it a recognizable name.
2. On the right side, in the "General" tab, enter the parameters your
host provided you with: host, user, password. You should not have
to change the other default parameters, unless told so.
3. Once all the fields are properly filled, click the "Connect" button.
This will both save your site in the list, and log you into your
account, so that you can make sure everything works right.
Uploading your files
Now that you are connected to your hosting space, it is time to transfer
the PrestaShop files from your computer to your server.
In FileZilla (or any other FTP client), browse your local folders until you
find the one that contains the PrestaShop files. Keep it open.
In the "Remote site" section (on the right), browse to the location where
you want PrestaShop to be publicly available (root of the domain, sub-
folder, su-domaine...). This can change a lot, depending on both your host
and your needs: