Getting started with PrestaShop 1.4 Whether you are a computer expert or a novice, the PrestaShop™ eCommerce solution lets you take any business online. Since PrestaShop can be accessed from any computer with a standard Web browser, you can manage it from anywhere in the world where there is Internet access. Update your homepage, add new products, check on order status -- all you need is your PrestaShop username and password. This Getting Started guide will show you how to: 1. 2. 3. 4.
PrestaShop can host your online business on its in-house Web servers; please consult our PrestaBox website for details on our low-priced, secure Website hosting service. This is highly recommended for businesses with little to no experience with the Internet or computers. Naturally, we install and update PrestaShop for you. Whichever hosting service you use must have the following components installed on your server space: System: Unix, Linux or Windows. Unix is highly recommended.
the latest version (1.4.4.1 as of this writing): a stable version, ready for all websites. a stable version with a free trial for a PrestaShop partner tool (Store Manager). (at the bottom of the page) the alpha version (1.5.0 as of this writing): in heavy development, it is only available for testing purposes, NOT for production. Use at your own risk.
Once FileZilla is installed, you will need to configure it with your site's login parameters, which should have been sent to you by your host. If not, ask for them to your host – or check your spam folder Basically, the needed parameters are: a hostname or an IP address: the location of your hosting space's FTP server. a username: your hosting account identifier, which is unique to you. a password: obligatory security measure. Open FileZilla, and open its Site Manager tool.
Open the "File" menu, and select the "Site Manager..." option. A window opens. To add your hosting space to the Site Manager: 1. Click the "New Site" button. A new entry is created in the site list. Give it a recognizable name. 2. On the right side, in the "General" tab, enter the parameters your host provided you with: host, user, password. You should not have to change the other default parameters, unless told so. 3. Once all the fields are properly filled, click the "Connect" button.
Your host: o Some hosts may require you to place your files in a specific folder, such as /htdocs, /public_html, /web, /www, /yourdomainname.com, etc. o Other hosts' FTP server will simply log you directly into the proper upload space. Your needs: o If you want your shop to be the main website for your domain name (i.e., http://www.myprestashop.com), upload PrestaShop at the root folder of the upload space (which may depend on the host).
Creating a database for your shop Before you can actually install PrestaShop, you need to make sure your MySQL server has a database ready for PrestaShop's data, and if not, create one. This can be done using the free phpMyAdmin tool, which should come pre-installed on your web server most of the time (read you host's documentation). Connect to it using your account credentials, that your host provided you with. It should be accessible through a standard URL, tied to your domain name, or that of your host.
and will take you to the auto-installer. From there on, you just have to read and click. Step 1: Welcome page This page is a quick intro into the installation process. 1. Select the language in which you wish the installer to be. 2. Select whether you wish to install or update PrestaShop (if this is your first time, you can only install).
3. Read the PrestaShop license (the Open Software License 3.0), and agree to it. To access the next step, you must check the "I agree to the above terms and conditions" box, then click "Next". If you do not explicitly agree to the license, you cannot install PrestaShop. Step 2 & 3: System compatibility & system configuration. The second page makes a quick check of all the server parameters on your host, and if nothing wrong is found, takes you directly to the third step.
If anything goes wrong, the installer stops you here, enabling you to see the few technical details that need fixing, be it changing the PHP configuration or updating the file permissions. While changing the PHP configuration can only be done on a case-by-case basis depending on your level of access to your server, and therefore cannot be explained here, updating the file permissions is easier to explain.
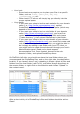
Depending on your server configuration (which you don't always have a hand at), you'll need to both "Read" and "Execute" columns of boxes checked, and at least the "Owner" and "Group" rows for the "Write" column. Some host might require you to have the public "Write" box checked, but be careful with that: have anyone be able to edit the content of your folder is rarely a good thing. For folders that the installer is needing a recursive permission change on, you can check the "Recurse in subdirectories" box.
Database configuration Fill all the fields with the connection information provided by your webhost, along with the name of the database you chose/created for PrestaShop, then click the "Verify now!" button in order to check that everything is fine. If so, the installer will display the following message: "Database is connected". Choose the prefix for your tables.
Note that the logo will appear: On all of your store's pages. In your back-office. In all of the e-mails sent to your customers.
In all of your contract documents (bills, return authorizations, etc.) It is highly recommended to not keep the default PrestaShop logo, for obvious reasons. You can also choose to use PrestaShop simply as catalog, which will disable all purchase and payment features, even if temporarily. This is useful when you are setting your shop up for first time, as it insures that no purchase can be made until you are ready to let people shop on your site.
An easy way to improve your installation's security is to delete or rename some key files and folders. This is done using your FTP client, directly on the server. Items to delete: "install" folder. "readme_*" files (5 of them). "CHANGELOG" file. Item to rename: "admin" folder: you should give it a unique name, so that no attacker can access your admin files. For instance, "admin42", "secretFolder" or "xyz123" – anything unique.
Write down the new name for your admin folder, as you will from now on access it directly. Congratulations! Installation is now complete. Log in to the PrestaShop back-office and start filling out your products catalog and configuring the many settings to suit your tastes and needs. Finally, in order to close all potential doors, use your FTP client to update the files and folders permissions to 664, or 666 if your host requires it.
2. Uncomment the extension=php_gd2.dll line (about half-way through the file, in the middle of a long list of extensions) by deleting the ";" at the start of the line. 3. Restart the PHP services. If you have no access to the php.ini file (which is often the case in shared hosting), contact your host about your hosting needs. Activating PHP5 Oftentimes, dedicated or shared servers have both PHP 4 and PHP 5 available, but only PHP4 is activated by default. To install PrestaShop, PHP 5 must be activated.
RewriteEngine On RewriteBase / Free.fr Add this line to the "Specific configuration" text-field from the Tools > Generators sub-tab: php 1 OVH Add this line to the "Specific configuration" text-field from the Tools > Generators sub-tab: SetEnv PHP_VER 5 To deactivate global registers: SetEnv REGISTER_GLOBALS 0 GoDaddy To View Your PHP Version: 1. Log in to your Account Manager. 2. From the Products section, click Web Hosting. 3. Next to the hosting account you want to use, click Launch.
Your language change request is submitted. Please allow up to 24 hours for the change to be processed by the hosting server. Updating PrestaShop We have a dedicated guide for that: Updating PrestaShop. Uninstalling PrestaShop PrestaShop is very easy to uninstall: 1. Delete the /prestaShop (or the name you gave it after the installation, if you renamed it) from the main directory of your Web server (generally /www). 2. Delete your PrestaShop database, using phpMyAdmin.