PrestaShop Developer Guide The technical documentation is currently being updated. Some aspects of it might not yet be fully updated. Do not hesitate to contact us if you have any issue with the documentation. Fundamentals Concepts You should be familiar with PHP and Object-Oriented Programming before attempting to write your own module. PrestaShop was conceived so that third-party modules could easily upon its foundations, making it an extremely customizable e-commerce software.
This is the same principle as the Model–view–controller (MVC) architecture, only in a simpler and more accessible way. Our developer team chose not to use a PHP framework, such as Zend Framework, Symfony or CakePHP, so as to allow for better readability, and thus faster editing. This also makes for higher performances, since the software is only made of the lines of code it requires, and does not contain a bunch of supplemental generic libraries.
Database schema You can download the PrestaShop 1.4 SQL schema in PNG form (1 Mb), or in the original MySQL Workbench file format (you will need MySQL Workbench to view it). What is a PrestaShop module PrestaShop's extensibility revolves around modules, which are small programs that make use of PrestaShop's functionality and changes them or add to them in order to make PrestaShop easier to use or more customized.
enables you to handle the module's display in various ways, according to the current theme. Let's see an example with PrestaShop's blockuserinfo module: Any PrestaShop module, once installed on an online shop, can interact with one or more "hooks". Hooks enable you to "hook" your code to the current View at the time of the code parsing (i.e., when displaying the cart or the product sheet, when displaying the current stock...).
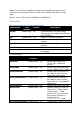
When one of the site's pages is loaded, the PrestaShop engine check which are the modules to call for each of the hooks that make up the page. Here is a list of 53 hooks, available in PrestaShop. Front-office Homepage and general website items Hook name File Visible Description location header header.php No Called between the HEAD tags. Ideal location for adding JavaScript and CSS files. top header.php Yes Called in the page's header. leftColumn header.php Yes Called when loading the left column.
Ideal location for the content of a tab that has been defined using the productTab hook. Cart Hook name cart File location Class: Cart.php shoppingCart order.php shoppingCartExtra order.php createAccountTop authentication.php createAccountForm authentication.php createAccount authentication.php customerAccount my-account.php myAccountBlock Module: blockmyaccount.php Visible Description No Called right after a cart creation or update. Yes Called right below the cart items table.
authentication Search Hook name search authentication.php File location Class: Search.php Carrier choice Hook name Visible No File location extraCarrier order.php Payment Hook name payment Called right after the client identification, only if the authentication is valid (e-mail address and password are both OK). Description Called after a search is performed. Ideal location to parse and/or handle the search query and results.
backBeforePayment order.php Merchandise Returns Hook name File location orderReturn orderfollow.php PDFInvoice Class: PDF.php No Visible No Yes Called when displaying the list of available payment solutions. Ideal location to redirect the user instead of displaying said list (i.e., 1-click PayPal checkout).. Description Called when the customer request to send his merchandise back to the store, and if now error occurs. Called when displaying the invoice in PDF format.
updateOrderStatus "Payment accepted". Called when an order's status is changed, right before it is actually changed. Called when an order's status is changed, right after it is actually changed. Called when an item is deleted from an order, right after the deletion. Called when the order's details are displayed, above the Client Information block. Called when the order's details are displayed, below the Client Information block. Called during the creation of a credit note, right after it has been created.
updateproduct AdminProducts.php No deleteproduct Class: Product.php No updateQuantity Class: No PaymentModule.php updateProductAttribute Class: Product.php No watermark No Statistics Hook name GraphEngine GridEngine AdminProducts.php File location Class: ModuleGraph.php Module: GridEngine.php AdminStatsModules AdminStatsTab.php after said creation/duplication. Called when a product is update with a new picture, right after said update.
to. Carriers Hook name File location Visible Description updateCarrier AdminCarriers.php No Called during a carrier's update, right after said update. Creating a PrestaShop module Modules' operating principles Modules are the ideal way to let your talent and imagination as a developer express themselves, as the creative possibilities are many. They can display a variety of content (blocks, text, etc.), perform many tasks (batch update, import, export, etc.), interface with other tools...
Module file tree All PrestaShop modules are found in the /modules folder, which is at the root of the PrestaShop main folder. This is true for both default modules (provided with PrestaShop) and 3rd-party modules that are subsequently installed. Each module has its own sub-folder inside the /modules folder: /bankwire, /birthdaypresent, etc. Basic structure of a module All modules use the same basic structure, which makes it easier to learn by observing existing modules' source code.
there's only one such file, it is good practice to give it the same name as the folder and main file: mymodule.tpl. The mymodule.php file must start with the following test: if ( !defined( '_PS_VERSION_' ) ) exit; This checks for the existence of a PHP constant, and if it doesn't exist, it quits. The sole purpose of this is to prevent visitors to load this file directly. The file must also contain the module's class. PrestaShop uses ObjectOriented programming, and so do its modules.
public function __construct() Defines the class' constructor. $this->name = 'mymodule'; $this->tab = 'Test'; $this->version = 1.0; $this->author = 'PrestaShop'; This section assigns a handful of attributes to the class instance (this): A 'name' attribute. This is an internal identifier, so make it unique, without special characters or spaces, and keep it lower-case. A 'tab' attribute. This is the title for the table that shall contain this module in PrestaShop's back-office modules list.
public function install() { return ( parent::install() ); } In this first and extremely simplistic incarnation, this method is useless, since all it does is check the value returned by the Module class' install() method. Moreover, if we hadn't created that method, the superclass' method would have been called instead anyway, making the end result identical.
PrestaShop automatically creates a small config.xml file in the module's folder, which stores a few configuration information. You should NEVER edit it by hand. On installation, PrestaShop also adds a line to the ps_module SQL table. Hooking a module Displaying data, starting a process at a specific time: in order for a module to be "attached" to a location on the front-office or the backoffice, you need to give it access to one of the many PrestaShop hooks, described earlier in this guide.
if ( parent::install() == false OR !$this->registerHook( 'leftColumn' ) ) return false; return true; We changed the original line to add a second test. This code checks: the boolean value returned by the Module class' install() method: if true, the module is installed and can be used. the boolean value returned by registerHook() for the leftColumn hook: if true, the module is indeed registered to the hook it needs, and can be used.
In the transplantation form, find "My module" in the modules drop-down menu, then choose "Left column blocks" in the "Hook into" drop-down menu. It is useless to try to attach a module to a hook for which it has no implemented method. Save. The "Positions" page should reload, with the following message: "Module transplanted successfully to hook". Congratulations! Scroll down, and you should indeed see your module among the other modules from the "Left column blocks" list. Move it to the top of the list.
Displaying content Now that we have access to the left column, we should display something there. As said earlier, the content to be displayed in the theme should be stored in .tpl files. We will create the mymodule.tpl file, which was passed as a parameter of the display() method in our module's code. So, let's create the mymodule.tpl file, and add some lines of code to it. mymodule.
basic line, and call that file from mymodule_page.php, which will add the theme's header, footer, etc. You should strive to use explicit and recognizable names for your TPL files, so that you can find them quickly in the back-office – which is a must when using the translation tool. mymodule_page.tpl Welcome to my shop! mymodule_page.php display( dirname(__FILE__) . '/mymodule_page.tpl' ); include( '../.
If you make multiple changes and reloads to your homepage, it may seem said changes do not apply. This is because Smarty caches a compiled version of the homepage. In order to force Smarty to recompile templates on every invocation, you must go to "Preferences" tab, its "Performance" sub-tab, and choose "Yes" for the "Force recompile" option.
$mymodule = new MyModule(); $message = $mymodule->l( 'Welcome to my shop!' ); $smarty->assign( 'messageSmarty', $message ); // creation of our variable $smarty->display( dirname(__FILE__) . '/mymodule_page.tpl' ); include( '../../footer.php' ); ?> From there on, we can ask Smarty to display the content of this variable in our TPL file. mymodule_page.tpl {$messageSmarty} PrestaShop includes a number of variables.
currencies id_currency_cookie currency cookie languages logged page_name customerName priceDisplay roundMode use_taxes The various available currencies. ID of the current currency. Currency object (currently used currency). User cookie. The various available languages. Indicates whether the visitor is logged to a customer account. Page name. Client name (if logged in). Price display method (with or without taxes...). Rounding method in use. Indicates whether taxes are enabled or not.
Strings in TPL files will need to be turned into dynamic content, which Smarty will replace by the translation for the chosen language. In our sample module, this file: mymodule.tpl (partial)
- Click me!
...becomes: mymodule.tpl (partial) - {l s='Click me!' mod='mymodule'}
...using the l() method), simply find your module in the list (use the browser's in-page search), and fill the empty fields. Once all strings for your module are correctly translated, click on the "Update translation" button, either at the top or the bottom of the page. Each field has an icon on its right. This enables you to get an suggestion from Google Translate. You can hover the mouse over it to see the translation, and click it to fill the field with the translation.
Now that we have a translation, we can click on the French flag in the front-office (provided the language has indeed been installed), and get the expected result: the module's strings are now in French. They are also translated in French when the back-office is in French. The translated strings can only be taken into account by the PrestaShop tool, the PHP and TPL files have to be located at the root of the module's folder.
protected $fieldsValidate = array( 'test' => 'isGenericName' ); protected $table = 'test'; protected $identifier = 'id_test'; public function getFields() { parent::validateFields(); $fields[ 'test' ] = pSQL( $this->test ); return $fields; } } ?> 1. Create a blank file named AdminTest.php in PrestaShop's /admin/tabs. 2. Add the following lines to that file: AdminTest.php