Updating PrestaShop New versions of PrestaShop come every few weeks. Some are major, most are minor, but they all bring a slew of innovations, improvements and bug-fixes. It is therefore highly advised to keep up with the latest version. There are 5 steps to follow for a successful upgrade: 1. Save and Backup Your Current Shop This step consists of backing up your database and your files. This step is not to be avoided, and should never ever be ignored or skipped.
By e-mail: support@prestashop.com By phone: +33.1 40 18 30 04 (9 am – 6 pm Central European Time) http://support.prestashop.com And the ever-helping community forums Step 1 – Save and Backup Your Current Store Caution Not backing up your store constitutes a very important risk if you encounter any difficulties with the upgrade. There is a risk of data loss. Do not ever skip this step.
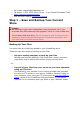
Deactivating Your Store Caution Disabling your store is very important. By doing so, you make sure that there is no activity on your store while you are updating it. Therefore, if you ever have to revert the update using a backup, you won't have lost any unfinished carts or orders.
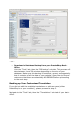
Go to your store's back-office, click on the "Preference" tab, then select "No" for the "Enable Shop" option. In the "Maintenance IP" field, located just below the "Enable Shop" one, enter your own IP address, so that you can keep on using your store during the update. This will allow you to test the store, while still making sure visitors cannot access the website. In order to find out your IP address, visit this page: http://www.myip.
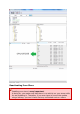
...or... Download a Database Backup from your PrestaShop BackOffice Visit the "Tools" tab, then the "DB backup" sub-tab. This process will take between 1 and 20 minutes depending on the size of your database. Make sure this backup is functional, recent, and especially that it contains of all the data of your website. Open the zip file and make sure that there are absolutely NO ERRORS before proceeding to the next step.
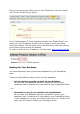
In the section "Export a Language" select the language to which you have made any modifications, then select your current theme, and click "Export". Save the downloaded file into a backup folder of your choice, on your local computer… Do this for all your custom languages, both those you created/added and those you modified/corrected.
Does it contain... ...a complete copy of all of your files? ...a complete and error-less copy of your database? ...a copy of your customized translations (optional)? You have checked the entire backup folder, and made sure that they are all correct and that you would be able to return to your current version / restore all of your data. If you answered yes to all of the questions above, then proceed to Step 2.
The following folders must be copied from your backup to the recently unzipped /prestashop folder: folder has all the mails that you have modified. If you have never made any modification there, do not worry about this folder. /img folder contains your logo and all the pictures of your store (categories, products…) /modules folder, only copy the modules that you have added. /themes/yourtheme folder, only copy your current theme.
folders, only copy the settings.inc.php file, then modify the following lines: o The line that contains "PS_BASE_URI" must contain the name of the subfolder where you are going to do your update. For instance, "/prestashop/" instead of "/", or of the name of current folder for your current store. o If you modified your database credentials (you should not have had to do that normally), update all the lines that contain "DB_NAME", "DB_USER" and "DB_PASSWD" too.
Checking before going further Let's say your store is at the following URL: http://www.myprestashop.com. 1. To test the update, you first downloaded the latest version of PrestaShop. 2. You unzipped this version, which contained a folder called "prestashop". 3. You copied your customized files from your backup to this new "prestashop" folder. 4. You modified the file config/settings.inc.php on line "PS_BASE_URI" so that it has the name of the folder on your server (should be "prestashop"). For instance: 5.
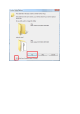
Did you follow these 5 steps? 1. 2. 3. 4. 5. Downloaded PrestaShop Unzipping the downloaded .zip file Manual copy of the folder of step 2.B Transfer the whole directory "prestashop" onto your FTP Edited the PS_BASE_URI line from the config/settings.inc.php file If you answered yes to all the questions above, then proceed to step 3. Step 3 – Starting the Update Launching the update script Visit your shop's install script URL; for instance: http://www.myprestashop.
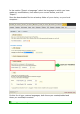
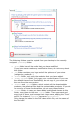
1. Select "Update" instead of "Installation". 2. Read the license agreement, then select the option "I agree to the above terms and conditions". 3. Click on the "Next" button. If you did follow the first step of this guide concerning back-ups, you can click "I certify that I backed up my database and application files.
assume all responsibility for any data loss or damage related to this upgrade." If you did not do the required back-ups or if you did not have a chance to verify the data's integrity and that these backups are functional and recent, please go back to step 1 of this guide. Verification of all parameters before the update The parameters of your hosting provider should show on the screen, as well as more details about the operation about to be launched.
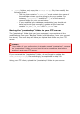
Otherwise, click the "Next" button at the bottom of the page. If sufficient rights are assigned to your files and folders, the following page will show: If not, make sure that the folders' rights are properly configured: change the access rights of the folders marked in red in the install/update tool, directly on your FTP server (make a CHMOD 755 or 775, depending on your hosting provider) then click the "Refresh these settings" button.
to display their properties (or even better, their access rights), and tick the boxes that are not yet ticked, until a refresh of the "System and Permissions" page gives you only green folder. Once you're done, click "Next" at the bottom of the page, the update will start and probably last a few minutes. You can check if the update has started in the upper right part of the screen, thanks to the progress bar. Do not leave the page or close your browser; wait for the update to be completed.
On your FTP server, inside the "prestashop" folder, you should delete: The {{/install} folder (this subfolder contains the update tools). The README files (contain information about the PrestaShop install). The CHANGELOG file (contains information about the latest changes in PrestaShop). You can now access your store's front-office at http://www.myprestashop.com/prestashop (change the URL accordingly).
1. Launched the Update tool 2. Verified the parameters and started the update 3. Finished the installation and removing the unneeded folders and files. If you answered yes to all the questions above, then proceed to step 4. Step 4 - QA and Testing Import your Translations If you did export your custom translations during step 1 (Backups), import them back into your new store by going to the "Tools" tab, then the "Translations" sub-tab.
Verification of the main Domain Name and regeneration of your .htaccess You should verify that the domain name assigned in the database is indeed the one that you are working with. To do so, visit the "Preferences" tab, then the "SEO & URLs" sub-tab.
You must check the following information: "PS directory": This folder should be the one that you have transferred onto your FTP server; in this tutorial, it would be /prestashop/ "Domain Name": This should be the domain name to which you are currently connected. Otherwise, all your links will be invalid and will use an incorrect domain name. In any case, do not forget to regenerate your .htaccess file by going to the "Tools" tab, then "Generators". If your old .
Testing To-Do List (this is not a complete list, you should do as much testing as possible): All pages load properly (Home, Categories, Products…) Create a customer account Place an order (add to cart and order) Verify that payments work properly (credit card, PayPal, etc.
Visit the "Preference" tab in the back-office of your production (now up-todate) store and click "Yes" for the option "Enable Shop". In case of issues In some rare cases, some modules are not compatible with new version of PrestaShop. You should contact the company / person that provided you with this module to request a few code changes to bring it up to date. Rolling back your database.
Contact us For any support request or help to setup your website, contact us and discover our yearly support offers. Our support team is at your disposal for any technical detail pertaining to updating your shop to the latest PrestaShop version. By e-mail: support@prestashop.com By phone: +33.1 40 18 30 04 (9 am – 6 pm Central European Time) http://support.prestashop.