
User Guide

85
PrestaShop version 1.3 UserGuide – OCTOBER 2010
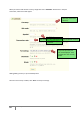
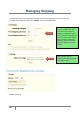
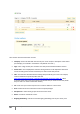
First of all, you must create a code for your voucher. You can write in your own code. You can also
generate an automatic, random code. To do this, click on the “new” button, right next to the “Code”
field.
The “type” field allows you to choose the method of the applied discount. You have three choices.
Discount on order (%). The voucher applies to a percentage of the order total. For example—
the order is valued at $200 outside of taxes. The voucher has a value of -15%. When applying
this coupon the customer will only have to pay $170 before taxes.
Discount on order (amount). This choice is applied to a monetary discount on the entire
order. For example: The order is valued at $100 before taxes. The discount offers $20 off the
purchase. By using the discount the customer pays $80.
Free shipping. With this discount you can treat your customers to free shipping. They can use
the code when paying and it will apply to their offer.
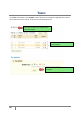
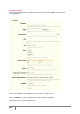
The “Description” field is where you enter a short description, which will appear in your Back Office
under the discount tab as well as in your customer’s shopping cart during check out.
The “categories’ field allows you to restrict your discount to certain categories. Select the categories
by checkin the appropriate boxes.
The “Total quantity” field limits how many times your discount can be used. You can organize, for
example, a doorbuster sale, along the lines of “The first 100 orders will receive a discount of 10% off
by using the code X123X.”
The “Qty Per Each User” field is filled out in the same manner as the preceding field, but you can
filter the quantity available for each customer. Basically if you want a voucher to only be used once
per customer, enter “1.” If, on the contrary, you want customers to have access to several vouchers,
then enter the number of your choice.
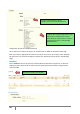
The “Minimum Amount” field allows you to enter the minimum amount necessary in order to apply
the discount. Your discounts will only be applied at or after this amount.
You can choose whether or not the vouchers are allowed to be used with other promotions on your
products or other vouchers. Choose your preferences by clicking the boxes.
The “To be used by” field permits you to restrict your voucher to only one of your customers. For
example, if you had a delivery delay and you want to apologize, you can create a voucher for this
customer that only he or she can access. To quickly find the customer, type in the first few letters of
their First or Last name.
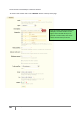
The voucher can have a time limit. Click the “From” and “To” fields in order to choose your dates
from the calendar.
Finally, the “Enable” field allows you to enable or disable the vouchers.
Once your information is entered, click “Save.”
Your voucher will appear in the “Vouchers” tab and you can delete or edit it later if you wish.