
User Guide


45
PrestaShop version 1.3 UserGuide – OCTOBER 2010
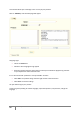
Image Map Parameter Setting 1
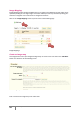
Your selection will be clear and illuminated while the rest of the image will darken. Take care to align
the frame of your image with the zone onto which your customer can click. Once this is done, type
the first few letters of the product associated with this image into the field just underneath the
image. In this case, we would type “Ipod” and several choices would appear. We would then choose
“Ipod Nano.” Confirm your choice by clicking “OK.” Your image map has just been created. Repeat this
process for all of the products that you wish to make accessible in your image.
If you have made a mistake on your image map you can click on the button found on the image itself.
If you wish to delete the image map click on the red cross icon .
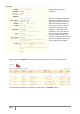
Let’s now assign your Image Map to a category by checking the boxes on the “Categories”
table. See page 44, Image Map Configuration 1.
Once all of the modifications have been finished, click on “Save Image Maps” to save all of your
settings.
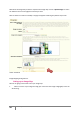
Your image map is now accessible on your store in the selected categories. See the image below.
Front Office Scene 1