
User Guide


17
PrestaShop version 1.3 UserGuide – OCTOBER 2010
Renaming the Admin Folder
Completing the Installation/ Connecting to Back Office
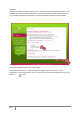
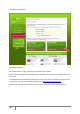
Back Office connection page
Once the file has been renamed, type your store’s URL directly into your navigation bar. For example,
http://www.mystore.com/adminprestashop
You will see the login page for your store’s control panel. See the screen shot to the left. Enter the
email address and password that you registered with when you installed Prestashop. Click “Connect,”
and you are taken to the Back Office welcome page, or your store control panel. From this step
forward you can begin to configure your store and offer products to your customers.
Discovering and Configuring the
PrestaShop Back Office
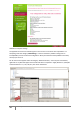
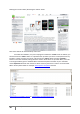
The PrestaShop Back Office welcome page is made up of three different areas.
Navigation: Groups together all of the tabs indicating the different sections of your store.
The Dashboard: Displays all of your store’s important information such as the number of orders, sales
completed, etc.