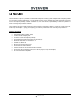
FIRESTUDIO PROJECT 24-bit/96k Recording Interface w/ Eight Microphone Preamplifiers FIRESTUDIO™ 10X10 FireWire Interface | 8 XM AX Preamps | 96kHz | M IDI I/O | S/PDIF I/O | Digital M ixer 1 48V 2 1/ 2 0dB -6dB -40dB 3 48V 4 0dB -6dB -40dB 3/ 4 5 48V 6 5/ 6 0dB -6dB -40dB 7 48V 8 7/ 8 1 11 Phones 1 Mic 2 Inst r ument 3 4 5 6 Mic Line 7 8 -10 0 1 60 + 30 -10 0 2 60 + 30 -20 0 3 60 + 20 -20 0 4 60 +20 User’s Manual Version 1.
PRESONUS LIMITED WARRANTY PreSonus Audio Electronics Inc. warrants this product to be free of defects in material and workmanship for a period of one year from the date of original retail purchase. This warranty is enforceable only by the original retail purchaser. To be protected by this warranty, the purchaser must complete and return the enclosed warranty card within 14 days of purchase.
TABLE OF CONTENTS 1 OVERVIEW 1.1 1.2 1.3 1.4 Introduction ........................................................................................................................................... Features ................................................................................................................................................ What is in the Box .................................................................................................................................
OVERVIEW 1.
OVERVIEW 1.2 FEATURES The FireStudio Project is a powerful and affordable computer recording system complete with everything needed for real-world recording applications. The FireStudio Project comes complete with eight high-quality PreSonus X-MAX microphone preamps, S/PDIF and MIDI I/O, rock solid drivers, expandability, as well as a plethora of music recording and production software.
OVERVIEW 1.
OVERVIEW 1.4 SYSTEM REQUIREMENTS Below are the minimum computer system requirements for your FireStudio Project. Macintosh • • • • OS: Mac OS X 10.4.x or later Computer: Apple Macintosh series with FireWire 400 port CPU/Clock: PowerPC G4/1 GHz or higher (Intel/Dual 1 GHz recommended) Memory (RAM): 512 MB (1 GB or more recommended) Windows • • • • OS: 32-bit Microsoft Windows Vista or XP (with at least SP1) Computer: Windows compatible computer with FireWire 400 port.
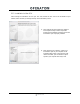
OPERATION 2.1 QUICK START UP 2.1.1 Installation in Microsoft Windows After inserting the Installation CD into your CD-ROM drive, the FireStudio Project installer will take you through each step of the installation process. Please read each message carefully – ensuring especially you do not connect your FireStudio Project early. 1) The FireStudio Project Installer was written to be as simple and easy-to-follow as possible.
OPERATION 2.1.2 Installation in Mac OS X After inserting the Installation CD into your disc drive, browse the disc and run the FireStudio Project installer, which will take you through each step of the installation process. 1) The FireStudio Project Installer was written to be as simple and easy-to-follow as possible. Please read each message carefully to ensure the FireStudio Project is properly installed.
OPERATION 2.1.3 Cubase LE 4 – Device Setup Once you have installed the FireStudio Project drivers and connected your FireStudio Project, you can use the Cubase LE 4 Music Creation and Production System software included with your FireStudio Project to begin recording, mixing and producing your music. Insert the Cubase LE 4 installation CD into your computer and run the installer.
OPERATION 3) Select ‘PreSonus FireStudio’ from the ASIO Driver dropdown list. 4) Click ‘Switch’ to begin using the FireStudio Project Driver. For more help on using Cubase LE 4, please read the Getting Started and Operation Manual help documents located in Help > Documentation.
OPERATION 2.1.4 Cubase LE 4 – Creating a Project To begin recording in Cubase LE, you first need to create a project. Once you have the project environment, you can begin adding audio and MIDI tracks to record and edit on. Follow these simple steps to begin recording your first audio in Cubase LE: 1) Plug an XLR microphone or instrument into FireStudio Project channel one and turn on 48V phantom power if needed for your microphone (typically only for condenser microphones.
OPERATION 4) Right-click in the track space within the new project and select ‘Add Audio Track’ from the dropdown menu which appears. You can also add a track by entering the Project menu and selecting ‘Add Track’. 5) When the Add Audio Track dialogue appears, choose the number of Audio Tracks you wish to add, whether they will be Mono or Stereo and then click ‘OK’. If you have two audio signals making up a stereo pair (i.e. keyboard, FX processor, cd player, etc.), you should use a Stereo Configuration.
OPERATION 2.2 SAMPLE HOOK UP DIAGRAM With the FireStudio Project, you can simultaneously record and play back up to 10 channels. Since it is loaded with eight preamplifiers, you can plug in eight microphones to the FireStudio Project along with S/PDIF digital input to record a full band. This makes recording extremely easy. All you need are a few microphones, some cables to connect them, a musician (or two or three or more) and the creative energy to bring it all together.
OPERATION 2.3 MICROPHONES The FireStudio Project works with many microphones including dynamic, ribbon and condenser microphones. 2.3.1 Condenser Condenser microphones tend to generate a high-quality audio signal and are one of the most popular mic choices for today’s studio recording applications. Because of their design technology, condenser microphones require a power source, which can be provided from a small battery, external power supply or from microphone inputs as phantom power.
OPERATION 2.4 USING THE PREAMP OUTPUT AND LINE INPUT AS AN INSERT The FireStudio Project features ¼” TRS balanced Send and Return jacks on Channels 1 and 2. These jacks are labeled as Preamp Output (Send) and Line Input (Return). These connectors allow the use of external processors such as compressors, limiters, EQ’s, de-essers, etc. Simply connect the Preamp Output jack to the line input of your external processor.
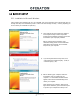
C CONT TROL LS AN ND CO ONNE ECTIO ONS 3.1 PR RESONUS S FIRECONTROL SOFTWAR S RE The FireControl is a pow werful, flexiblee and easy to use u solution foor creating muultiple mixes frrom your inputs and DAW playyback streams with zero lateency. It allowss you to createe a zero-latenccy mix with upp to 18 of yourr input and outputt signals for ea ach of your FireStudio Projeect’s output paairs.
CONTROLS AND CONNECTIONS 3.1.2 FireControl Master Section The Master Section is always visible and gives you control over the FireStudio Project’s outputs’ source and level as well as the Sample Rate and Buffer Size of the FireStudio drivers. Output Select Section • Output Select Buttons Changes the Output Mixer displayed The FireControl has five output mixes – one for each of the FireStudio Project’s five outputs.
CONTROLS AND CONNECTIONS Master Output Section • Master Output Fader Changes the selected output’s audio level Move the Master Fader up and down to increase and decrease the level of the selected output’s audio. The dB value of boost or attenuation is displayed below the Channel Fader from –infinity to 0.0 dB. Two virtual LED meters to the right of the Master Fader display the pre fader levels of the audio signal.
CONTROLS AND CONNECTIONS These are the individual elements of the Mixer and their functions: • Channel Pan Sliders Moves the channel’s audio left/right in the stereo field Double-clicking the slider returns the pan to center. • Link Buttons Links the adjacent channels as a stereo pair When channels are linked, changing either channel’s level changes both, and pan states are hard left/right.
CONTROLS AND CONNECTIONS 3.1.4 FireControl Menus • Session. Allows you to Save and Load the FireControl Mixer and Output settings o o • Load Session... Loads a saved FireControl session file Save Session... Saves the FireControl Mixer and Output settings for loading later Advanced. Gives additional options specific to Windows functionality. o Sample Rate Lock Mode. Sets which types of applications can change the Sample Rate. o Unlock. Any WDM or ASIO application can change the Sample Rate.
CONTROLS AND CONNECTIONS 3.2 FRONT PANEL LAYOUT FIRESTUDIO™ 10X10 FireWire Interface | 8 XM AX Preamps | 96kHz | M IDI I/O | S/PDIF I/O | Digital M ixer 1 2 Mic • 3 4 5 Instr ument 6 Mic 7 8 Line Microphone Pre-Amplifier. Your FireStudio Project is equipped with eight custom designed PreSonus X-MAX microphone preamplifiers for use with all types of microphones including Dynamics, Condensers and Ribbons as well as instruments and line level signals.
CONTROLS AND CONNECTIONS FIRESTUDIO™ 1 2 Mic • Instr ument Instrument Inputs (Channels 1 and 2). The ¼” TS connector on channels 1 and 2 are for use with an instrument (guitar, bass, etc.). When an instrument is plugged into the instrument input, the microphone preamp is bypassed, and the FireStudio Project becomes an active instrument preamplifier. NOTE: Active instruments are those that have an internal preamp or a line level output.
CONTROLS AND CONNECTIONS 1 11 Phones -80 10 Main • Main. The Main knob controls the output level for the Main Outputs on the back of the FireStudio Project with a range of -80 db to +10 dB. • Phones. The Phones knob controls the amount of volume going to the headphone output on the front of the unit. Notice the volume indicator goes to 11 … use this setting with extreme caution. • ¼” Headphone Jack. This is where you connect your headphones to the FireStudio Project.
CONTROLS AND CONNECTIONS 3.3 BACK PANEL LAYOUT • Power Adaptor Input. This is where you plug the provide IEC power cable into the FireStudio Project. • Power Switch. Push the top part of the switch to turn your FireStudio Project on ( | ). Push the bottom part of the switch to turn your FireStudio Project off ( O ). • FireWire Ports. There are two standard 6-pin FireWire ports on the back of the FireStudio Project.
CONTROLS AND CONNECTIONS NOTE: MIDI is not audio but is frequently used to trigger or control an audio source (such as a VST plugin or synthesizer). When using MIDI, ensure your MIDI data is correctly sent and received by the appropriate hardware or software instruments. You may also need to return those devices’ audio to the FireStudio Project. Please consult the User’s Manual of your MIDI devices for help with MIDI setup and usage. • Main Output.
TECHNICAL INFORMATION 4.1 TROUBLESHOOTING Please note that many technical issues can arise when converting a standard computer into a DAW (Digital Audio Workstation). PreSonus will only provide support for issues that directly relate to the FireStudio Project interface. It may be necessary to contact the manufacturer of the computer, operating system and/or software to obtain additional technical support.
TECHNICAL INFORMATION 4.2 SPECIFICATIONS Microphone Preamp Type ............................................................................................................................. XLR Female Balanced Frequency Response (±0.5 dB) ............................................................................................... 20 Hz to 50 kHz Frequency Response (±3.0 dB) .............................................................................................
TECHNICAL INFORMATION Line Outputs (including Preamp Output, General Purpose Outputs and Main Outputs) Type .................................................................................................................................... ¼” TRS Balanced Output Impedance .................................................................................................................................... 51 Ω Headphone Output Type ..............................................................................